Need to setup a VPN? Here’s how to download and install OpenVPN.
SERVER SETUP
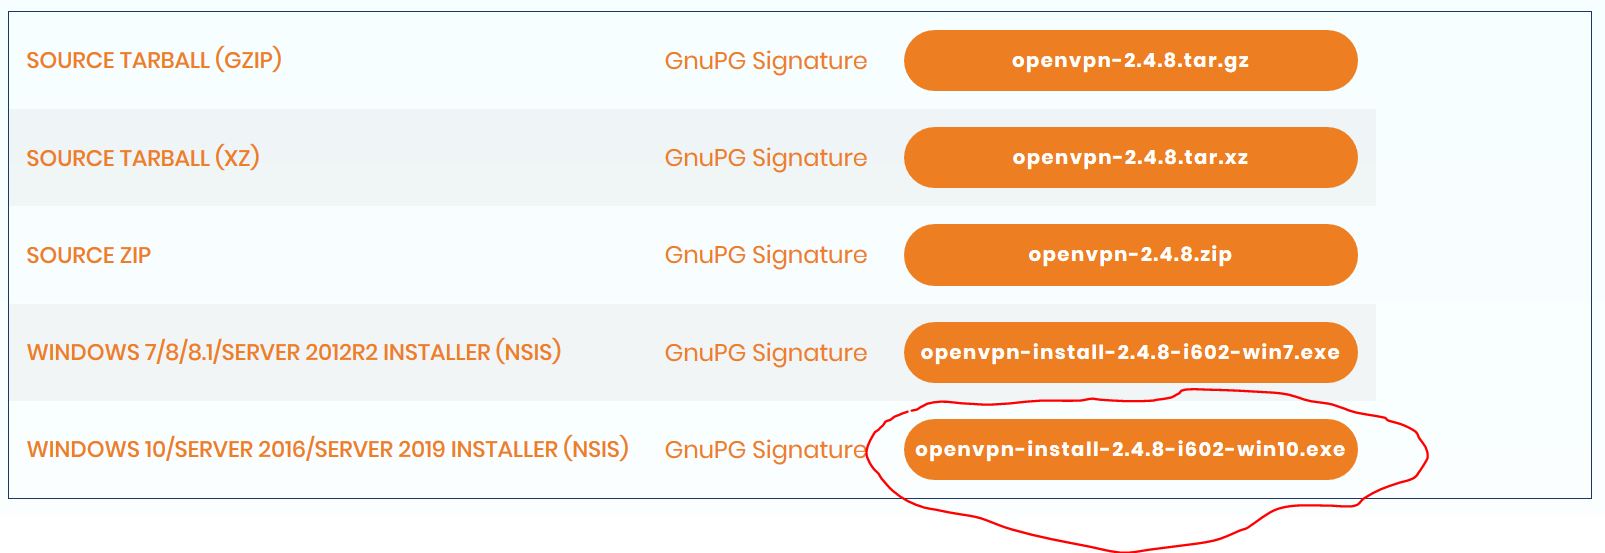
Download the installer from https://openvpn.net/index.php/download/community-downloads.html and run it on the server computer.
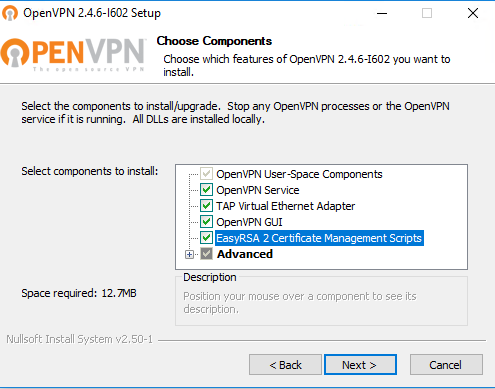
Open the installer file and start the installation.
- Remember to adjust the Windows firewall (open the 1194 UDP port).
- Assign a static IP to the new created TAP interface (like 10.8.0.1).
- Install OpenVPN on each client. (This step can be skipped for now and done at any convenient time)
- Choose All check boxes for the install
Certificates and Keys
Preparatory Steps
Navigate to the C:\Program Files\OpenVPN\easy-rsa folder in the command prompt:
Press Windows Key + R
Type “cmd.exe” and press Enter.
cmd.exe
Right click to run as administrator
Navigate to the correct folder:
cd "C:\Program Files\OpenVPN\easy-rsa"
<a href="https://www.geekdecoder.com/wp-content/uploads/2014/08/cmdcall.jpg"><img class="alignnone size-large wp-image-5187" src="https://www.geekdecoder.com/wp-content/uploads/2014/08/cmdcall-1024x593.jpg" alt="" width="648" height="375" /></a>
Initialize the OpenVPN configuration:
init-config
<a href="https://www.geekdecoder.com/wp-content/uploads/2014/08/init.jpg"><img class="alignnone size-full wp-image-5188" src="https://www.geekdecoder.com/wp-content/uploads/2014/08/init.jpg" alt="" width="597" height="133" /></a>
NOTE: Only run init-config once, during installation.
Open the vars.bat file in a text editor:
notepad vars.bat
Edit the following lines in vars.bat, replacing “US”, “CA,” etc. with your company’s information:
set KEY_COUNTRY=US
set KEY_PROVINCE=CA
set KEY_CITY=SanFrancisco
set KEY_ORG=OpenVPN
set KEY_EMAIL=mail@host.domain
Save the file and exit notepad.
Run the following commands:
vars
clean-all
Building Certificates and Keys
The certificate authority (CA) certificate and key:
build-ca
When prompted, enter your country, etc. These will have default values, which appear in brackets. For your “Common Name,” a good choice is to pick a name to identify your company’s Certificate Authority. For example, “OpenVPN-CA”:
Country Name (2 letter code) [US]:
State or Province Name (full name) [CA]:
Locality Name (eg, city) [SanFrancisco]:
Organization Name (eg, company) [OpenVPN]:
Organizational Unit Name (eg, section) []:
Common Name (eg, your name or your server's hostname) []:OpenVPN-CA
Email Address [mail@host.domain]:

* This builds the ca key in C:\Program Files\OpenVPN\easy-rsa\keys
The server certificate and key:
build-key-server server
When prompted, enter the “Common Name” as “server”
When prompted to sign the certificate, enter “y”
When prompted to commit, enter “y”
Client certificates and keys:
For each client, choose a name to identify that computer, such as “mike-laptop” in this example.
build-key mike-laptop
When prompted, enter the “Common Name” as the name you have chosen (e.g. “mike-laptop”)
Repeat this step for each client computer that will connect to the VPN.
Generate Diffie Hellman parameters (This is necessary to set up the encryption)
build-dh
Set up the ta.key file.
In command prompt as administrator, go to cd “C:\Program Files\OpenVPN\bin”
# openvpn --genkey --secret ta.key
copy the file to the C:\Program Files\OpenVPN\config directory and to your config directory on your local machine.
Configuration Files
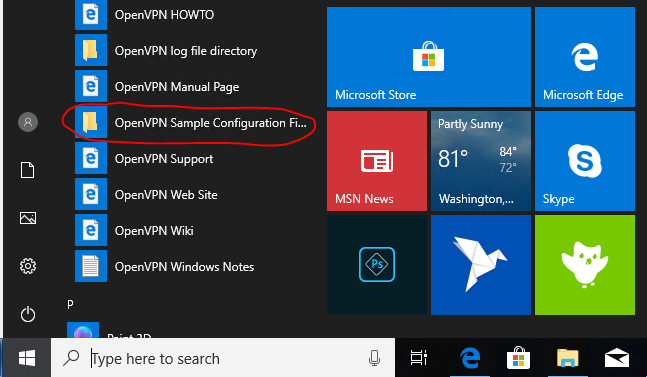
Find the sample configuration files:
Start Menu > All Programs > OpenVPN > OpenVPN Sample Configuration Files
Server Config File
go to C:\Program Files\OpenVPN\sample-config
Open server.ovpn
Find the following lines:
ca ca.crt
cert server.crt
key server.key
dh dh2048.pem
Edit them as follows:
ca "C:\\Program Files\\OpenVPN\\easy-rsa\\keys\\ca.crt"
cert "C:\\Program Files\\OpenVPN\\easy-rsa\\keys\\server.crt"
key "C:\\Program Files\\OpenVPN\\easy-rsa\\keys\\server.key"
Find the following line for the Diffie hellman parameters:
dh
And edit as follows:
"C:\\Program Files\\OpenVPN\\easy-rsa\\keys\\dh2048.pem"
Save the file as C:\Program Files\OpenVPN\easy-rsa\server.ovpn
Set up the ta.key file.
In the server configuration, add:
Set the ta.key path to C:\Program Files\OpenVPN\config\ta.key
tls-auth “C:\\Program Files\\OpenVPN\\config\\ta.key” ta.key 0
Client Installation
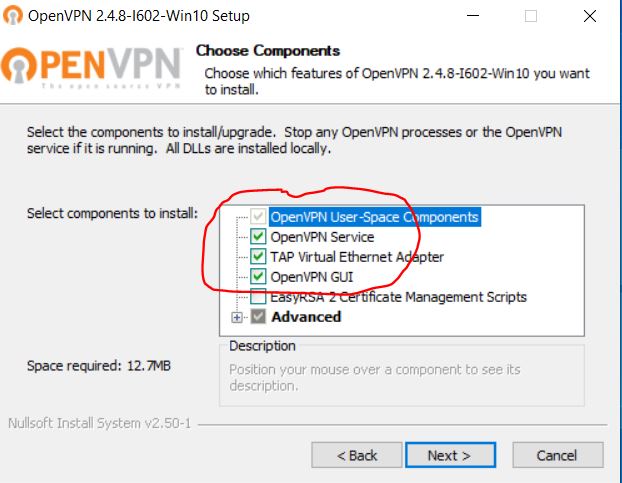
Download the installer to the client Windows 10 Machine and run the intsaller. Leave the defaults selected.
Client Config Files
This is similar to the server configuration.
Open client.ovpn ON THE SERVER MACHINE located at C:\Program Files\OpenVPN\sample-config
Find the following lines:
ca ca.crt
cert client.crt
key client.key
Edit them as follows:
ca "C:\\Program Files\\OpenVPN\\config\\ca.crt"
cert "C:\\Program Files\\OpenVPN\\config\\mike-laptop.crt"
key "C:\\Program Files\\OpenVPN\\config\\mike-laptop.key"
Notice that the name of the client certificate and key files depends upon the Common Name of each client.
You can also include the ca, cert and key content in the client file. You have to copy the file content inside the tag .
Edit the following line, replacing “my-server-1” with your server’s public Internet IP Address or Domain Name. If you need help, see Static Internet IP below.
remote my-server-1 1194
Save the file as C:\Program Files\OpenVPN\easy-rsa\mike-laptop.ovpn (in this example. Each client will need a different, but similar, config file depending upon that client’s Common Name.)
Copying the Server and Client Files to Their Appropriate Directories
Copy these files from C:\Program Files\OpenVPN\easy-rsa\keys to C:\Program Files\OpenVPN\config\ on the server:
ca.crt
dh1024.pem
server.crt
server.key

Copy this file from C:\Program Files\OpenVPN\easy-rsa\ to C:\Program Files\OpenVPN\config\ on the server:
server.ovpn
Copy these files from C:\Program Files\OpenVPN\easy-rsa\keys on the server to C:\Program Files\OpenVPN\config\ on each client (mike-laptop, in this example):
ca.crt
mike-laptop.crt
mike-laptop.key

Copy these files from C:\Program Files\OpenVPN\easy-rsa\ on the server to C:\Program Files\OpenVPN\config\ on each client (mike-laptop, in this example):

mike-laptop.ovpn

Copy this file from C:\Program Files\OpenVPN\config\ on the server to C:\Program Files\OpenVPN\config\ on each client (mike-laptop, in this example):

ta.key

Also, instead of setting up the paths in the files, you can add them directly like follows.

<ca></ca>
<cert></cert>
<key></key>
Starting OpenVPN
On both client and server, run OpenVPN from:
Start Menu -> All Programs -> OpenVPN -> OpenVPN GUI
Double click the icon which shows up in the system tray to initiate the connection. The resulting dialog should close upon a successful start.
Running OpenVPN as a Service
OpenVPN to be run from a non-administrator account.
OpenVPN to be started automatically on system startup. This is often preferred on the server machine, as well as any machines which will be constantly connected to the server.
Run the Windows Service administrative tool:
Press Windows Key + R
Type “services.msc” and press Enter.
services.msc
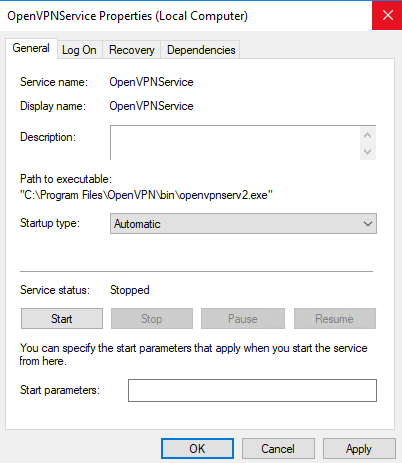
Find the OpenVPN service, and set its Startup Type to “automatic.”
Optionally, start the service now.
Further Considerations / Troubleshooting
Firewall Configuration
If you have connection problems, make sure to set a rule on your server’s firewall allowing incoming traffic on UDP port 1194.
Port Forwarding
If your server is behind a firewall/router, you will need to forward the port chosen for OpenVPN (in this example UDP 1194) to the server. Consult your router’s documentation for details on this.
To set up port forwarding, you will likely need to set up the server with a static local IP address instead of the default dynamic (changing) IP. Make sure to choose a static IP address that is not in the range your router might assign as a dynamic IP, but is within the router’s subnet (usually 192.168.0.xxx , 10.0.0.xxx , or similar).
Security Tips
Transmit all needed files to the client computers using a secure means such as a USB drive (email is not always a secure means).
Choose a port other than UDP 1194, and replace the port number wherever this guide mentions UDP port 1194.
IP or DNS leak
OpenVPN Internet Proxy Windows
This has all internet traffic route to the server IP so your IP is not disclosed.
Generate a TA key and place it in the same folder as the other certificates/keys:
cd C:\Program Files\OpenVPN\bin
openvpn --genkey --secret ta.key
Copy the key to the C:\Program Files\OpenVPN\config directory
Append the following lines to your server.ovpn profile:
# Route all traffic through VPN
push "redirect-gateway def1"
# Push Google DNS to prevent leak
push "dhcp-option DNS 8.8.8.8"
tls-auth ta.key 0 # This file is secret
Set the serer.ovpn file to use the following network as the network sharing below will use this network for the adaptor.
# server 192.168.137.0 255.255.255.0
Append the following lines to your client.ovpn profile:
# Block DNS leak
block-outside-dns
tls-auth ta.key 1 # This file is secret
Service tweaks on the Windows server
Open the Services window
Find Routing and Remote Access and set it to: Startup type – Automatic
Start the service
Adapter tweaks
Open the network adapters window
Right-click your internet adapter (e.g. Ethernet) and then: Properties -> Sharing -> Allow other network users to connect through this computer’s Internet connection
(if applicable) From the drop-down list select your OpenVPN TAP adapter (e.g. Ethernet?)
Note: Only one adapter can be shared at a time, so if you don’t see the Sharing tab, make sure no other adapter is being shared.
Registry tweaks
Key: HKEY_LOCAL_MACHINE\SYSTEM\CurrentControlSet\Services\Tcpip\Parameters
Value: IPEnableRouter
Type: REG_DWORD
Data: 0x00000001 (1)
Optional: Configure a static route (if behind router)
You have to route all packets sent to the client’s virtual IP back to the VPN server.
Example using Cisco router:
10.8.0.0 – virtual network subnet
255.255.255.0 – virtual network subnet mask
192.168.1.175 – VPN server internal IP (in the subnet of the router)
Hardening iformation; https://community.openvpn.net/openvpn/wiki/Hardening
Setting up new user certificates
Navigate to the C:\Program Files\OpenVPN\easy-rsa\ folder in the command prompt. NOTE: Make sure that the ca.crt and ca.key are located in the C:\Program Files\OpenVPN\easy-rsa\keys directory!
Press Windows Key + R
Type “cmd.exe” and press Enter.
cmd.exe
Right click to run as administrator
Navigate to the correct folder:
cd "C:\Program Files\OpenVPN\easy-rsa\keys"
Run the following:
vars
For each client, choose a name to identify that computer, such as “newuser-openvpn” in this example.
build-key newuser-openvpn
Open the C:\Program Files\OpenVPN\sample-config directory. Copy the client.ovpn to the name for the new user, ie, newuser-openvpn.ovpn.
Copy these files from C:\Program Files\OpenVPN\easy-rsa\keys and C:\Program Files\OpenVPN\easy-rsa\sample-config on the server to C:\Program Files\OpenVPN\config\ on each client (newuser-openvpn.ovpn, in this example):
ta.key
ca.crt
newuser-openvpn.ovpn.crt
newuser-openvpn.ovpn.key
newuser-openvpn.ovpn.ovpn
Copy to the C:\Program Files\OpenVPN\config on the new user computer.
Other resources: https://community.openvpn.net/openvpn/wiki/Easy_Windows_Guide