Proxmox VE is a complete open-source platform for enterprise virtualization. It’s a great application for virtualization that can compete with VMware, Hyper-V, KVM and Xen.
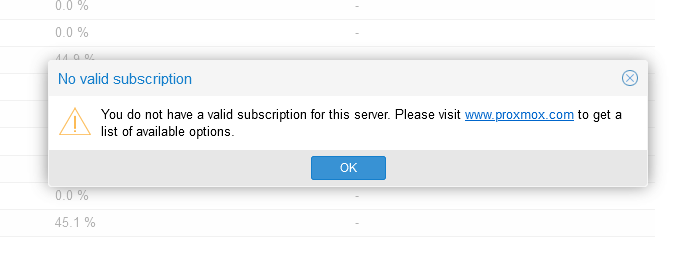
Once installed, you would login to the built-in web interface to manage VMs and containers. So, you have installed Proxmox and when you login you see a pop-up error message:
PVE provides free version. The Paid versions offer support and are highly recommended if you are using Proxmox for production. To see the paid version go here: https://www.proxmox.com/en/proxmox-ve/pricing
This pop-up can get a bit annoying. So, to remove we have researched and put together this article to remove it so we can be pop-up free.:
To start, backup the file “/usr/share/javascript/proxmox-widget-toolkit/proxmoxlib.js” with the following command:
You can use crtl-w if using nano to search. Search for “No valid subscription.”
Look around for the following string:
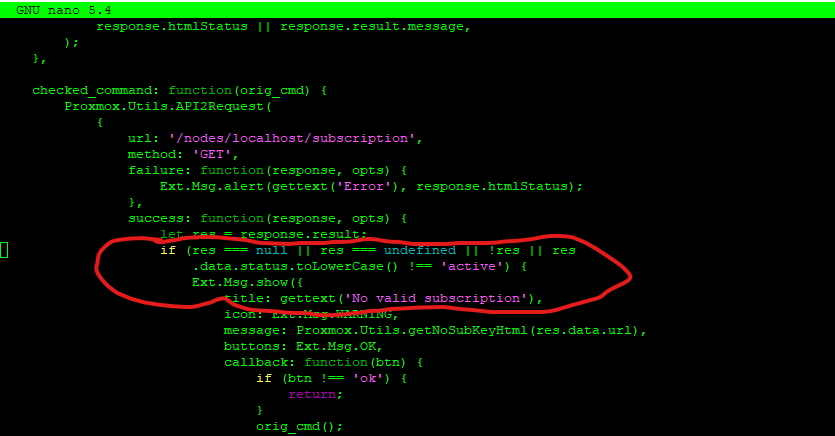
if (res === null || res === undefined || !res || res
                        .data.status.toLowerCase() !== 'active') {
                        Ext.Msg.show({
                            title: gettext('No valid subscription'),
In this instance:
Also, you can check the line where the code starts with the following command Alt + Shift + # will give you line numbers. This will be on line 546 on Proxmox version 7.4-3 -Thank you RELLEK!
Replace the following string with the string below:
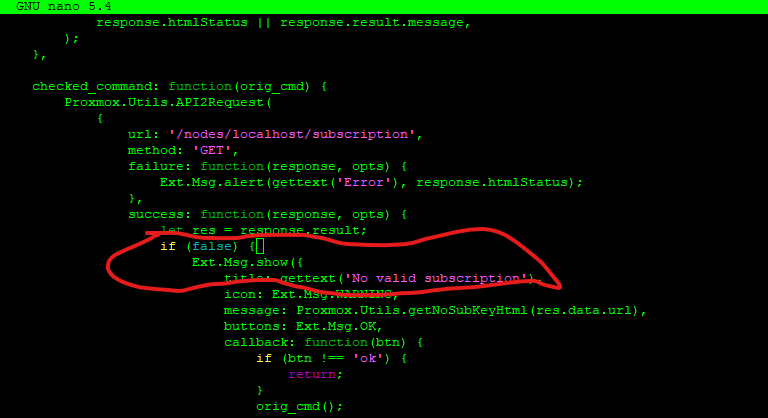
if (res === null || res === undefined || !res || res
                        .data.status.toLowerCase() !== 'active') {
Replace with this:
if (false) {
Here is what it should look like:
Now, restart Proxmox service:
systemctl restart pveproxy.service
Log out of Proxmox, clear the browser cache and restart the browser then login again. The popup should be gone.
The installation of a supported Proxmox VE server should be done via bare-metal ISO installer. In some cases it makes sense to install Proxmox VE on top of a running Debian Bullseye 64-bit, especially if you want a custom partition layout. For this How-To any official Bullseye installation medium should work.
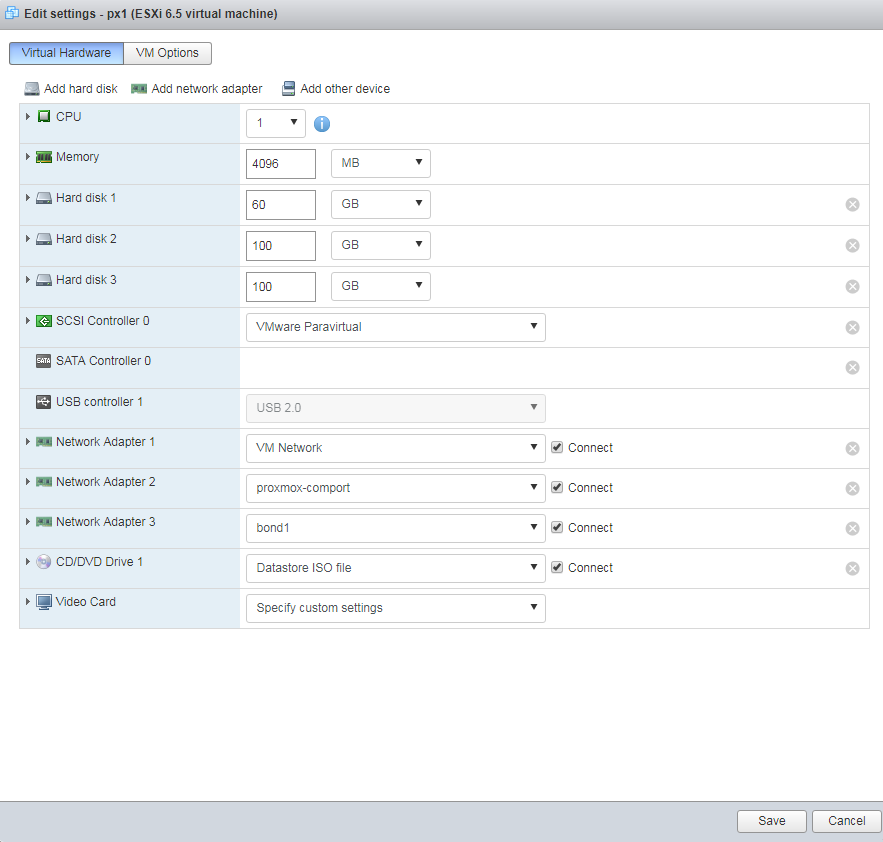
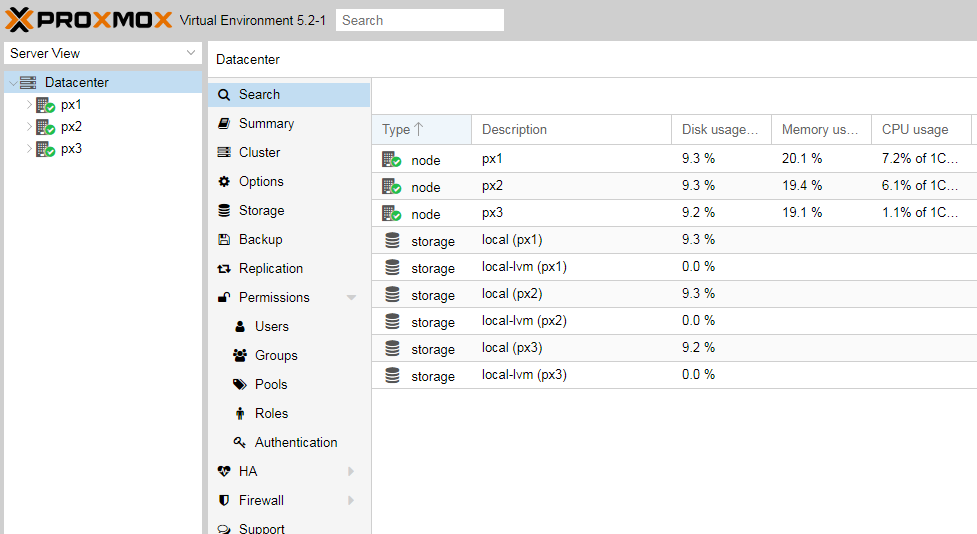
For this Demo, I am installing 3 KVM VM’s. As you can do VM nesting. Also, you can do this on Vmware or Hyper V. Here is the Architecture.
I reciently install proxmox on Debian and the install failed. Here is the error:
 apt-get update
Hit:1 http://download.proxmox.com/debian/pve buster InRelease
Hit:2 http://security.debian.org/debian-security buster/updates InRelease
Hit:3 http://deb.debian.org/debian buster InRelease
Hit:4 http://deb.debian.org/debian buster-updates InRelease
Reading package lists... Done
root@px1:~# apt dist-upgrade
Reading package lists... Done
Building dependency tree
Reading state information... Done
Calculating upgrade... Done
0 upgraded, 0 newly installed, 0 to remove and 0 not upgraded.
2 not fully installed or removed.
After this operation, 0 B of additional disk space will be used.
Do you want to continue? [Y/n] y
Setting up pve-manager (6.3-3) ...
Job for pveproxy.service failed because the control process exited with error code.
See "systemctl status pveproxy.service" and "journalctl -xe" for details.
dpkg: error processing package pve-manager (--configure):
 installed pve-manager package post-installation script subprocess returned error exit status 1
dpkg: dependency problems prevent configuration of proxmox-ve:
 proxmox-ve depends on pve-manager; however:
  Package pve-manager is not configured yet.

dpkg: error processing package proxmox-ve (--configure):
 dependency problems - leaving unconfigured
Errors were encountered while processing:
 pve-manager
 proxmox-ve
E: Sub-process /usr/bin/dpkg returned an error code (1)
The resolution was to make sure the network was set to a static IP:
# The primary network interface
allow-hotplug enp4s0
iface enp4s0 inet static
address 192.168.0.16
        netmask 255.255.255.0
        gateway 192.168.0.1
        # dns-* options are implemented by the resolvconf package, if installed
        dns-nameservers 1.1.1.1 1.0.0.1
        dns-search geekdecoder.com
The second issue was to make sure there was a host entry. Comment out the 127.0.0.1 and make sure to use the full host.domain host as below. Leaving out the end “px1” caused the issue.
After updating/restarting the manager to v14.2.5 we are no longer able to send data to our zabbix servers. Ceph reports a non-zero exit status from zabbix_sender.
Check to install zabbix-server.
apt install zabbix-sender
Info:
# ceph mon versions
Output:
{
    "ceph version 16.2.7 (f9aa029788115b5df5eeee328f584156565ee5b7) pacific (stable)": 4
}
Check Debian version
# cat /etc/debian_version
11.2
# lsb_release -a
No LSB modules are available.
Distributor ID: Debian
Description:    Debian GNU/Linux 11 (bullseye)
Release:        11
Codename:       bullseye
ceph -s
  cluster:
    id:     20a806df-b3f4-4032-ab8e-ae15aef1e836
    health: HEALTH_WARN
            Failed to send data to Zabbix
            mon px1 is low on available space

  services:
    mon: 3 daemons, quorum px1,px2,px3 (age 8d)
    mgr: px1(active, since 8d), standbys: px2, px3
    osd: 32 osds: 32 up (since 8d), 32 in (since 11d)

  data:
    pools:   7 pools, 640 pgs
    objects: 3.52M objects, 13 TiB
    usage:   53 TiB used, 124 TiB / 176 TiB avail
    pgs:     639 active+clean
             1   active+clean+scrubbing+deep

  io:
    client:   0 B/s rd, 23 MiB/s wr, 0 op/s rd, 34 op/s wr
ceph health detail
HEALTH_WARN Failed to send data to Zabbix; mon px1 is low on available space
MGR_ZABBIX_SEND_FAILED Failed to send data to Zabbix
    /usr/bin/zabbix_sender exited non-zero: zabbix_sender [4088351]: DEBUG: answer []
zabbix_sender [4088351]: Warning: incorrect answer from server []
Setting “debug mgr = 20” yields no additional information. Zabbix configuration in ceph has not changed since the v14.2.5 update, and was working under v14.2.4:
Zabbix plugin
The Zabbix plugin actively sends information to a Zabbix server like:
Ceph status
I/O operations
I/O bandwidth
OSD status
Storage utilization
Requirements
The plugin requires that the zabbix_sender executable is present on all machines running ceph-mgr. It can be installed on most distributions using the package manager.
Dependencies.
Installing zabbix_sender can be done under Ubuntu or CentOS using either apt or dnf.
On Ubuntu Xenial:
# apt install zabbix-agent
On Fedora:
# dnf install zabbix-sender
Enabling
You can enable the zabbix module with:
# ceph mgr module enable zabbix
Configuration
Two configuration keys are vital for the module to work:
zabbix_host
identifier (optional)
The parameter zabbix_host controls the hostname of the Zabbix server to which zabbix_sender will send the items. This can be a IP-Address if required by your installation. The identifier parameter controls the identifier/hostname to use as source when sending items to Zabbix. This should match the name of the Host in your Zabbix server. When the identifier parameter is not configured the ceph- of the cluster will be used when sending data to Zabbix.
This would for example be ceph-c4d32a99-9e80-490f-bd3a-1d22d8a7d354
Additional configuration keys which can be configured and their default values:
zabbix_port: 10051
zabbix_sender: /usr/bin/zabbix_sender
interval: 60
Configuration keys
Configuration keys can be set on any machine with the proper cephx credentials, these are usually Monitors where the client.admin key is present.
ceph zabbix config-set
For example:
Since our host acts as a router we have to make sure it’s kernel has all IP packet forwarding features activated. Take a look at ‘/etc/sysctl.conf’ and make sure that the following two lines aren’t commented out:
Lastly make sure your host won’t send ICPM “redirect” messages to guests, telling them to find the gateway by themselves. This won’t work with our particular network setup. Add the following to ‘/etc/sysctl.conf’:
net.ipv4.conf.all.send_redirects=0
Reboot
Networking for nodes Incomplete – this is not currently working):
Set up 3 NIC’s
ens192 – primary for Public IP. This is the public IP for the installation.
ens224 – proxmox VE Cluster Network
ens256 – Ceph Install
Once installed, edit /etc/network/interfaces on all 3 nodes. Change the IP addresses accordingly. Remeber to backup the files before editing.
Example /etc/network/interfaces for px1 node 1.
auto lo
iface lo inet loopback

auto ens192
iface ens192 inet static
        address  216.55.xxx.xxx
        netmask  255.255.255.0
        gateway  216.xx.xxx.1
        post-up echo 1 > /proc/sys/net/ipv4/conf/ens192/proxy_arp
#Public IP

auto vmbr0
iface vmbr0 inet static
        address  192.168.1.151
        netmask  255.255.255.0
        bridge_ports none
        bridge_stp off
        bridge_fd 0
	post-up echo 1 > /proc/sys/net/ipv4/ip_forward
        post-up iptables -t nat -A POSTROUTING -s '192.168.1.0/24' -o ens192 -j MASQUERADE
        post-down iptables -t nat -D POSTROUTING -s '192.168.1.0/24' -o ens192 -j MASQUERADE
#Private Network for VM Creation

auto ens224
iface ens224 inet static
        address  10.0.0.151
        netmask  255.255.255.0
#Proxmox VE Cluster Network

auto ens256
iface ens256 inet static
  address  10.10.10.151
  netmask  255.255.255.0
#ceph network
Setting up the cluster
Hosts file edits. Backup hosts file and change to this on all nodes. This is not the hostname but an identifier.
Adding Nodes With Separated Cluster Network
When adding a node to a cluster with a separated cluster network you need to use the ringX_addr parameters to set the nodes address on those networks:
pvecm add IP-ADDRESS-CLUSTER -ring0_addr IP-ADDRESS-RING0
If you want to use the Redundant Ring Protocol you will also want to pass the ring1_addr parameter.
Creating the cluster after network and host file setup. Log into node 1.
Corosync Cluster Engine Authentication key generator.
Gathering 1024 bits for key from /dev/urandom.
Writing corosync key to /etc/corosync/authkey.
Writing corosync config to /etc/pve/corosync.conf
Restart corosync and cluster filesystem
Reboot
# reboot
Adding nodes.
From man corosync.conf
ringnumber – This specifies the ring number for the interface. When using the redundant ring protocol, each interface should specify separate ring numbers to uniquely identify to the membership protocol which interface to use for which redundant ring. The ringnumber must start at 0.
Adding nodes. Login to a node you want to add, node2, node3, node4, etc. In this example, login to node 2 (10.0.0.152)and the IP for node1 is 10.0.0.151.
Run the following where”