Set up the repository

Update the apt package index and install packages to allow apt to use a repository over HTTPS:

$ sudo apt-get update
$ sudo apt-get install \
 ca-certificates \
 curl \
 gnupg \
 lsb-release

Add Docker’s official GPG key:

$ curl -fsSL https://download.docker.com/linux/ubuntu/gpg | sudo gpg --dearmor -o /usr/share/keyrings/docker-archive-keyring.gpg

Use the following command to set up the stable repository.

 echo \
  "deb [arch=$(dpkg --print-architecture) signed-by=/usr/share/keyrings/docker-archive-keyring.gpg] https://download.docker.com/linux/ubuntu \
  $(lsb_release -cs) stable" | sudo tee /etc/apt/sources.list.d/docker.list > /dev/null

Install Docker Engine

Update the apt package index, and install the latest version of Docker Engine and containerd, or go to the next step to install a specific version:

$ sudo apt-get update
 $ sudo apt-get install docker-ce docker-ce-cli containerd.io

Verify that Docker Engine is installed correctly by running the hello-world image.

$ sudo docker run hello-world

This command downloads a test image and runs it in a container.

Docker Engine is installed and running. The docker group is created but no users are added to it. You need to use sudo to run Docker commands. Continue to Linux postinstall to allow non-privileged users to run Docker commands and for other optional configuration steps.

Manage Docker as a non-root user. To create the docker group and add your user:

$ sudo groupadd docker

Add your user to the docker group.

$ sudo usermod -aG docker $USER

Log out and log back in so that your group membership is re-evaluated. If testing on a virtual machine, it may be necessary to restart the virtual machine for changes to take effect. On a desktop Linux environment such as X Windows, log out of your session completely and then log back in. On Linux, you can also run the following command to activate the changes to groups:

# newgrp docker 

Verify that you can run docker commands without sudo.

$ docker run hello-world

This command downloads a test image and runs it in a container.

Configure Docker to start on boot

sudo systemctl enable docker.service
sudo systemctl enable containerd.service

Configure where the Docker daemon listens for connections

By default, the Docker daemon listens for connections on a UNIX socket to accept requests from local clients. It is possible to allow Docker to accept requests from remote hosts by configuring it to listen on an IP address and port as well as the UNIX socket. For more detailed information on this configuration option take a look at “Bind Docker to another host/port or a unix socket” section of the Docker CLI Reference article.

Before configuring Docker to accept connections from remote hosts it is critically important that you understand the security implications of opening docker to the network. If steps are not taken to secure the connection, it is possible for remote non-root users to gain root access on the host. For more information on how to use TLS certificates to secure this connection, check this article on how to protect the Docker daemon socket.

Configuring Docker to accept remote connections can be done with the docker.service systemd unit file for Linux distributions using systemd, such as recent versions of RedHat, CentOS, Ubuntu and SLES, or with the daemon.json file which is recommended for Linux distributions that do not use systemd.

systemd vs daemon.json

Configuring Docker to listen for connections using both the systemd unit file and the daemon.json file causes a conflict that prevents Docker from starting.

Configuring remote access with systemd unit file.
Use the command sudo systemctl edit docker.service to open an override file for docker.service in a text editor.

Add or modify the following lines, substituting your own values.

    [Service]
    ExecStart=
    ExecStart=/usr/bin/dockerd -H fd:// -H tcp://127.0.0.1:2375

Save the file. Reload the systemctl configuration.

 $ sudo systemctl daemon-reload

Restart Docker.

$ sudo systemctl restart docker.service

Check to see whether the change was honored by reviewing the output of netstat to confirm dockerd is listening on the configured port.

$ sudo netstat -lntp | grep dockerd

Configuring remote access with daemon.json

Set the hosts array in the /etc/docker/daemon.json to connect to the UNIX socket and an IP address, as follows:

    {
      "hosts": ["unix:///var/run/docker.sock", "tcp://127.0.0.1:2375"]
    }

Restart Docker.

Check to see whether the change was honored by reviewing the output of netstat to confirm dockerd is listening on the configured port.

 sudo netstat -lntp | grep dockerd

Ref:
https://docs.docker.com/engine/install/ubuntu/
https://docs.docker.com/engine/install/linux-postinstall/
Set up the repository
Update the apt package index and install packages to allow apt to use a repository over HTTPS:

$ sudo apt-get update
$ sudo apt-get install ca-certificates curl gnupg lsb-release

Add Docker’s official GPG key:

$ curl -fsSL https://download.docker.com/linux/debian/gpg | sudo gpg --dearmor -o /usr/share/keyrings/docker-archive-keyring.gpg

Use the following command to set up the stable repository.

echo \
 "deb [arch=$(dpkg --print-architecture) signed-by=/usr/share/keyrings/docker-archive-keyring.gpg] https://download.docker.com/linux/debian \
  $(lsb_release -cs) stable" | sudo tee /etc/apt/sources.list.d/docker.list > /dev/null

Install Docker Engine

Update the apt package index, and install the latest version of Docker Engine and containerd, or go to the next step to install a specific version:

$ sudo apt-get update
$ sudo apt-get install docker-ce docker-ce-cli containerd.io

Verify that Docker Engine is installed correctly by running the hello-world image.

$ sudo docker run hello-world

Configure Docker to start on boot

$ sudo systemctl enable docker.service
$ sudo systemctl enable containerd.service

Manage Docker as a non-root user
Create the docker group.

sudo groupadd docker

Add your user to the docker group.

sudo usermod -aG docker $USER

Log out and log back in so that your group membership is re-evaluated. If testing on a virtual machine, it may be necessary to restart the virtual machine for changes to take effect. On a desktop Linux environment such as X Windows, log out of your session completely and then log back in.

On Linux, you can also run the following command to activate the changes to groups:

newgrp docker 

Verify that you can run docker commands without sudo.

$ docker run hello-world

This command downloads a test image and runs it in a container. When the container runs, it prints a message and exits.

Configuring remote access with systemd unit file

Use the command sudo systemctl edit docker.service to open an override file for docker.service in a text editor. Add or modify the following lines, substituting your own values.

[Service]
ExecStart=
ExecStart=/usr/bin/dockerd -H fd:// -H tcp://127.0.0.1:2375

Save the file. Reload the systemctl configuration.

 sudo systemctl daemon-reload

Restart Docker.

 sudo systemctl restart docker.service

Check to see whether the change was honored by reviewing the output of netstat to confirm dockerd is listening on the configured port.

$ sudo netstat -lntp | grep dockerd

Configuring remote access with daemon.json

Set the hosts array in the /etc/docker/daemon.json to connect to the UNIX socket and an IP address, as follows:

    {
      "hosts": ["unix:///var/run/docker.sock", "tcp://127.0.0.1:2375"]
    }

Restart Docker. Check to see whether the change was honored by reviewing the output of netstat to confirm dockerd is listening on the configured port.

 sudo netstat -lntp | grep dockerd

Ref:
https://docs.docker.com/engine/install/debian/
https://docs.docker.com/engine/install/linux-postinstall/

Docker Network commands

# docker network ls
NETWORK ID     NAME                  DRIVER    SCOPE
234dbbb8d381   bridge                bridge    local
e23bbf6e6a54   docker-hive_default   bridge    local
e284120f22c7   host                  host      local
019daa8ddd49   none                  null      local
$ docker ps --format "table {{.ID}}\t{{.Status}}\t{{.Names}}"
CONTAINER ID   STATUS             NAMES
608fe6f7a1c4   Up About an hour   docker-tutorial

Docker Example

To illustrate this, we will use a Hive and Hadoop environment, containing 5 Docker Containers from – https://github.com/mesmacosta/docker-hive.
Since I am on windows, I use Github desktop.

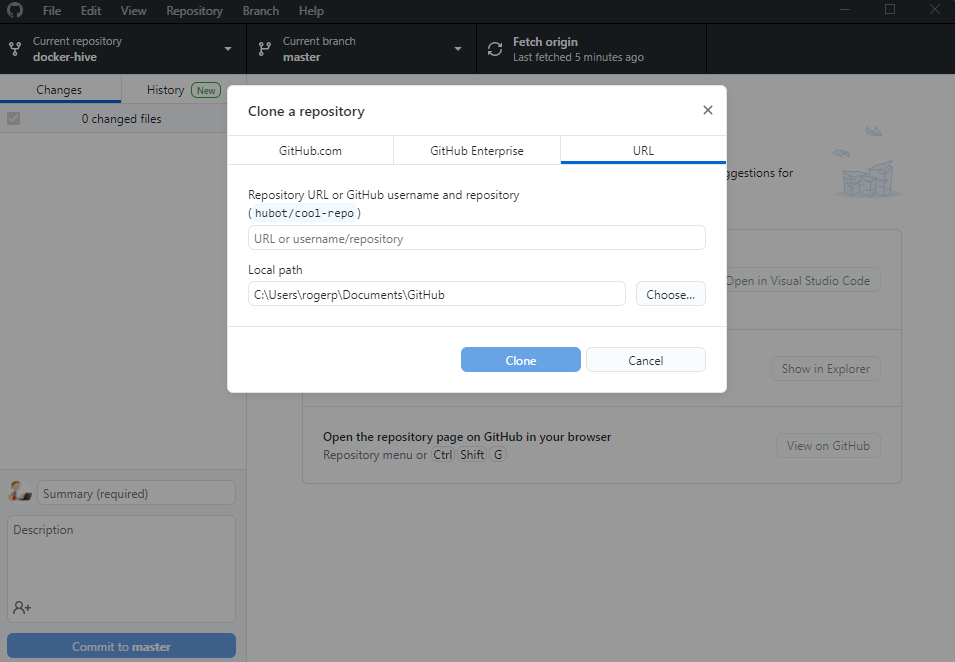
Launch Github desktop and then go to File >> Clone Repository >> URL.

Go to https://github.com/mesmacosta/docker-hive – Click on Code > Copy. Paste URL into Github Desktop. Click Clone.

Now open command prompt or Powershell – AS ADMINISTRATOR – and go to the directory where the docker files are located. In my case its in Documents > Github > docker-hive.

Now let’s start up those containers:

# docker-compose up -d

Note: If you receive this error:
Error response from daemon: Ports are not available: listen tcp 0.0.0.0:50070: bind: An attempt was made to access a socket in a way forbidden by its access permissions.

Run this in command prompt or PS:

net stop winnat
net start winnat

We can see 5 containers:

>docker ps --format "table {{.ID}}\t{{.Status}}\t{{.Names}}"
CONTAINER ID   STATUS                   NAMES
30714f65fc36   Up 2 minutes             docker-hive_hive-metastore_1
cc281caa92ba   Up 2 minutes             docker-hive_hive-server_1
66aed41cdc5e   Up 2 minutes             docker-hive_hive-metastore-postgresql_1
d90c10f7cfe6   Up 2 minutes (healthy)   docker-hive_datanode_1
baf998183015   Up 2 minutes (healthy)   docker-hive_namenode_1

Next let’s check our Docker networks:

>docker network ls
NETWORK ID     NAME                  DRIVER    SCOPE
234dbbb8d381   bridge                bridge    local
d438c2ba7c56   docker-hive_default   bridge    local
e284120f22c7   host                  host      local
019daa8ddd49   none                  null      local

By default docker compose sets up a single network for your app. And your app’s network is given a name based on the “project name”, originated from the name of the directory it lives in.

So since our directory is named docker-hive, this explains the new network.

Getting more information.

Docker inspect can retrieve low-level information on Docker objects. You can pick out any field from the returned JSON.

Let’s get the IP Address from the dockerhive_datanode.

>docker ps --format "table {{.ID}}\t{{.Status}}\t{{.Names}}"
CONTAINER ID   STATUS                   NAMES
30714f65fc36   Up 2 minutes             docker-hive_hive-metastore_1
cc281caa92ba   Up 2 minutes             docker-hive_hive-server_1
66aed41cdc5e   Up 2 minutes             docker-hive_hive-metastore-postgresql_1
d90c10f7cfe6   Up 2 minutes (healthy)   docker-hive_datanode_1
baf998183015   Up 2 minutes (healthy)   docker-hive_namenode_1

Get the container ID from the above command to find the following:

$ docker inspect -f '{{range.NetworkSettings.Networks}}{{.IPAddress}}{{end}}' d90c10f7cfe6
172.20.0.2

Docker Logs

How to check Docker logs
sudo docker logs where is the ID of the docker container

Get Docker Container:

# sudo docker ps --format "table {{.ID}}\t{{.Status}}\t{{.Names}}"

Now view the logs:

$ sudo docker logs d90c10f7cfe6   

Docker Ports

$ docker container ls --format "table {{.ID}}\t{{.Names}}\t{{.Ports}}" -a
CONTAINER ID   NAMES             PORTS
a624f0ae744e   cool_moore
a0d9f2b7ce84   zealous_mclean    0.0.0.0:80->80/tcp, :::80->80/tcp

docker inspect

This method allows one to return low-level information on the container or image.
Syntax

docker inspect Container/Image

Select IP

# docker inspect c52b91aa0dea | grep -i ip

Ports

docker inspect c52b91aa0dea | grep -i port