Memcached (Memcache Daemon) is a caching daemon designed especially for dynamic web applications to decrease database load by storing objects in memory. It is commonly used to speed up dynamic database-driven websites by caching data and objects in server memory to reduce the number of times the data source must be read. Memcached is free and open-source software, licensed under the Revised BSD license. Also, there are PHP extensions which allow you to work with memcached. There are two PHP memcache extensions available from the PHP Extension Community Library, PHP memcached and PHP memcache.

PHP Memcache vs PHP Memcached

These two PHP extensions are not identical. PHP Memcache is older, very stable but has a few limitations. The PHP memcache module utilizes the daemon directly while the PHP memcached module uses the libMemcached client library and also contains some added features.

Installing Memcache Daemon + PHP memcache or PHP memcached

Before selecting a PHP extension be sure to install the memcache daemon.

How-To: Install Memcache on CentOS (WHM/cPanel)

    1. Login into your WHM panel and using easyapache to enable Memcache

Go to Software – Module Installers – PHP Pecl. Search for memcache and then install both memcache and memcached
Restart apache:

# service httpd restart

Check your memcached server is running successfully: ps -eaf | grep memcached

Installing Memcache Daemon + PHP memcache or PHP memcached on CentOS or Ubuntu

Before selecting a PHP extension be sure to install the memcache daemon:

Centos / Red Hat:


# yum install memcached

Ubuntu/ Debian:


# apt-get update
# apt-get install memcached

After installing Memcached, open the configuration file for Memcached and make any changes:

Centos / Red Hat:


# nano /etc/sysconfig/memcached

Ubuntu / Debian:


# nano /etc/memcached.conf

Exit and save the configuration file, and then restart Memcached


# service memcached restart

Remember to set the memcache daemon to start on server boot.
Centos / Red Hat:


# chkconfig memcached on

Ubuntu / Debian:


# update-rc.d memcached enable

Install a PHP memcache extension

PHP memcache

You can browse the version here – https://pecl.php.net/package/memcache The current version as of this writing is 3.0.8


wget https://pecl.php.net/get/memcache-3.0.8.tgz
tar xvf memcache-3.0.8.tgz
cd memcache-3.0.8
phpize
./configure
make 
make install
make test
Then add memcache.so to your php.ini file:

# nano /etc/php.ini
extension="memcache.so"

PHP memcached:

Remember to install libmemcached dependancy (Ubuntu/Debian):


yum install cyrus-sasl-devel zlib-devel gcc-c++
wget https://launchpad.net/libmemcached/1.0/1.0.16/+download/libmemcached-1.0.16.tar.gz
tar -xvf libmemcached-1.0.16.tar.gz
cd libmemcached-1.0.16
./configure --disable-memcached-sasl
make
make install

Then install PHP Memcached:

wget https://pecl.php.net/get/memcached-3.0.8.tgz
tar xf memcached-3.0.8.tgz
cd memcached-3.0.8
phpize
./configure
make 
make install
make test

Then add memcached.so to your php.ini file:


extension="memcached.so"

You will need to connect your PHP application to memcached. For example, using W3 Total Cache with WordPress, memcached module with Drupal, Magento config, etc.

Finally restart memcached, httpd (or apache, apache2 for Ubuntu/Debian)

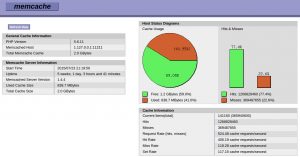
If you would like to view stats of hit rate etc you can download memcachephp stats at GitHub – HERE. Which will look something like this:
The easiest installation method for memcache is to use PECL’s ‘install’ command. This will grab the latest stable release, configure it with the default options, and add it to the server’s php.ini:

pecl install memcache

Un-installation is just as easy:

pecl uninstall memcache

Now add the extension so it will load

nano /etc/php.d/memcache.ini

Add the following

; Enable memcache extension module
extension=memcache.so

Restart apache

service httpd restart

The quick install method for memcache uses the default configuration options and should serve most users’ purposes. However, if you need more control over the installation options, you can manually install from source and add it flags as you need.

1. Download the source package via PECL:

cd /usr/local/src/
pecl download memcache

2. Unpack the tar and enter into the newly extracted directory (be sure to replace the X’s with your downloaded version):

tar -xvzf memcache-X.X.X.tgz
cd memcache-X.X.X

3. Configure and install:

/usr/local/bin/phpize
./configure –with-php-config=/usr/local/bin/php-config

Note: If you are working on a server with cPanel, keep in mind that cPanel itself installs two versions of php:

/usr/bin/php
/usr/local/bin/php

For that reason you have to know which version your web server is actually using. Most of the time it is /usr/local/bin/php. It can get very confusing and can be different from server to server. If you are a ServInt customer, don’t hesistate to fill out a support ticket if you have any questions.

4. Verify the install:

Verify the installation by displaying all the installed PHP modules. See if memcache is listed:

php -m
memcache
Problems with manual installation

The “make install” should load the module into your server’s extension directory automatically. However, if you do not see memcache listed in a “php -m”, you will need to add the module manually.

1. First, verify the location of your server’s extensions directory:

grep extension_dir /usr/local/lib/php.ini

It should return something similar to the following:

extension_dir = “/usr/local/lib/php/extensions/no-debug-non-zts-20060613″

2. Next, copy the memcache module into that directory (be sure to replace the path with the one found on your server):

cp modules/memcache.so /usr/local/lib/php/extensions/no-debug-non-zts-20060613

3. Finally, add the module to your php.ini:

echo ‘extension=memcache.so’ >> /usr/local/lib/php.ini
Final Thoughts

It used to be a common issue that the quick ‘install’ method could not be used for servers where the /tmp partition was mounted “noexec”. The problem was that the “configure” process could not execute because the PECL client downloaded the module into in /tmp. When /tmp is mounted “noexec”, servers cannot execute scripts from /tmp.

Memcached

Memcached is a general-purpose, free and open-source distributed memory caching system. It is one of the most popular caching tools and is used in such popular sites as YouTube, Reddit, Zynga, Facebook, and Twitter. If you also run dynamic, database-driven sites, Memcached may reduce resource consumption and speed up page delivery on your server as well.

Installing Memcached (daemon)

The quickest and easiest method is to install Memcached via Yum on the command line of your server.

1. Grab the RPM that matches your OS:

CentOS 6 (64 bit):

su -c ‘rpm -Uvh http://mirrors.kernel.org/fedora-epel/6/x86_64/epel-release-6-7.noarch.rpm’

CentOS 6 (32 bit):

su -c ‘rpm -Uvh http://mirrors.kernel.org/fedora-epel/6/i386/epel-release-6-7.noarch.rpm’

CentOS 5 (64 bit):

su -c ‘rpm -Uvh http://mirrors.kernel.org/fedora-epel/5/x86_64/epel-release-5-4.noarch.rpm’

CentOS 5 (32 bit):

su -c ‘rpm -Uvh http://mirrors.kernel.org/fedora-epel/5/i386/epel-release-5-4.noarch.rpm’

2. Install it with Yum:

yum install memcached

3. Start the memcached service:

/etc/init.d/memcached start

4. Configure the memcached service to start when the server boots:

chkconfig memcached on

5. Finally, disable the RPM so that it is not used for future Yum functions:

perl -pi -e “s/enabled=1/enabled=0/g;” /etc/yum.repos.d/epel.repo