Docker Network commands

# docker network ls
NETWORK ID     NAME                  DRIVER    SCOPE
234dbbb8d381   bridge                bridge    local
e23bbf6e6a54   docker-hive_default   bridge    local
e284120f22c7   host                  host      local
019daa8ddd49   none                  null      local
$ docker ps --format "table {{.ID}}\t{{.Status}}\t{{.Names}}"
CONTAINER ID   STATUS             NAMES
608fe6f7a1c4   Up About an hour   docker-tutorial

Docker Example

To illustrate this, we will use a Hive and Hadoop environment, containing 5 Docker Containers from – https://github.com/mesmacosta/docker-hive.
Since I am on windows, I use Github desktop.

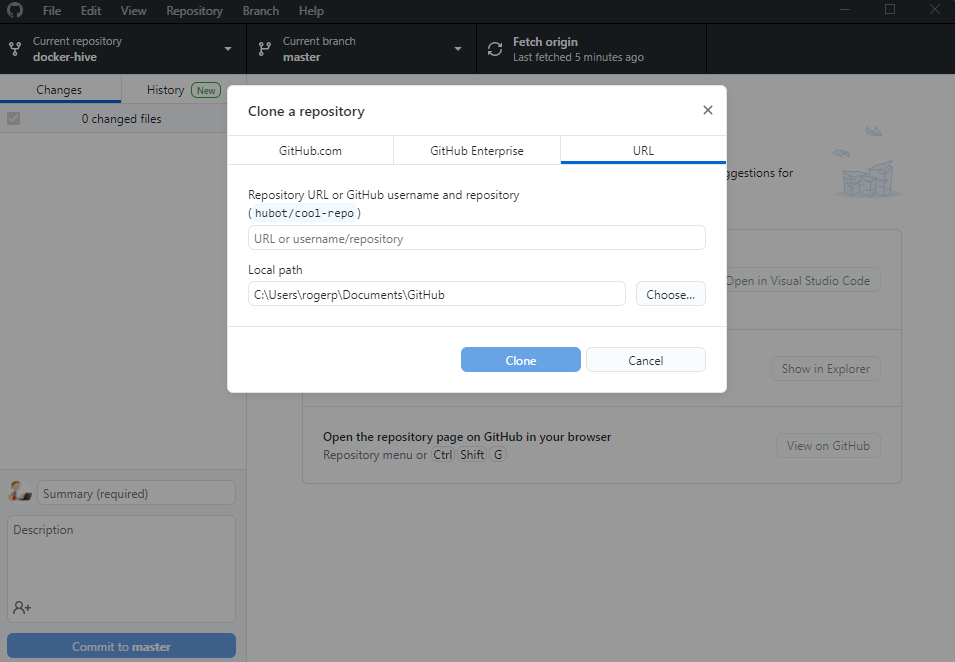
Launch Github desktop and then go to File >> Clone Repository >> URL.

Go to https://github.com/mesmacosta/docker-hive – Click on Code > Copy. Paste URL into Github Desktop. Click Clone.

Now open command prompt or Powershell – AS ADMINISTRATOR – and go to the directory where the docker files are located. In my case its in Documents > Github > docker-hive.

Now let’s start up those containers:

# docker-compose up -d

Note: If you receive this error:
Error response from daemon: Ports are not available: listen tcp 0.0.0.0:50070: bind: An attempt was made to access a socket in a way forbidden by its access permissions.

Run this in command prompt or PS:

net stop winnat
net start winnat

We can see 5 containers:

>docker ps --format "table {{.ID}}\t{{.Status}}\t{{.Names}}"
CONTAINER ID   STATUS                   NAMES
30714f65fc36   Up 2 minutes             docker-hive_hive-metastore_1
cc281caa92ba   Up 2 minutes             docker-hive_hive-server_1
66aed41cdc5e   Up 2 minutes             docker-hive_hive-metastore-postgresql_1
d90c10f7cfe6   Up 2 minutes (healthy)   docker-hive_datanode_1
baf998183015   Up 2 minutes (healthy)   docker-hive_namenode_1

Next let’s check our Docker networks:

>docker network ls
NETWORK ID     NAME                  DRIVER    SCOPE
234dbbb8d381   bridge                bridge    local
d438c2ba7c56   docker-hive_default   bridge    local
e284120f22c7   host                  host      local
019daa8ddd49   none                  null      local

By default docker compose sets up a single network for your app. And your app’s network is given a name based on the “project name”, originated from the name of the directory it lives in.

So since our directory is named docker-hive, this explains the new network.

Getting more information.

Docker inspect can retrieve low-level information on Docker objects. You can pick out any field from the returned JSON.

Let’s get the IP Address from the dockerhive_datanode.

>docker ps --format "table {{.ID}}\t{{.Status}}\t{{.Names}}"
CONTAINER ID   STATUS                   NAMES
30714f65fc36   Up 2 minutes             docker-hive_hive-metastore_1
cc281caa92ba   Up 2 minutes             docker-hive_hive-server_1
66aed41cdc5e   Up 2 minutes             docker-hive_hive-metastore-postgresql_1
d90c10f7cfe6   Up 2 minutes (healthy)   docker-hive_datanode_1
baf998183015   Up 2 minutes (healthy)   docker-hive_namenode_1

Get the container ID from the above command to find the following:

$ docker inspect -f '{{range.NetworkSettings.Networks}}{{.IPAddress}}{{end}}' d90c10f7cfe6
172.20.0.2

Docker Logs

How to check Docker logs
sudo docker logs where is the ID of the docker container

Get Docker Container:

# sudo docker ps --format "table {{.ID}}\t{{.Status}}\t{{.Names}}"

Now view the logs:

$ sudo docker logs d90c10f7cfe6   

Docker Ports

$ docker container ls --format "table {{.ID}}\t{{.Names}}\t{{.Ports}}" -a
CONTAINER ID   NAMES             PORTS
a624f0ae744e   cool_moore
a0d9f2b7ce84   zealous_mclean    0.0.0.0:80->80/tcp, :::80->80/tcp

docker inspect

This method allows one to return low-level information on the container or image.
Syntax

docker inspect Container/Image

Select IP

# docker inspect c52b91aa0dea | grep -i ip

Ports

docker inspect c52b91aa0dea | grep -i port
Run sudo /usr/bin/nvidia-uninstall to uninstall a manually installed driver, if you still got one.

Remove everything of your old NVIDIA driver (simulate first):

<code>sudo apt remove --purge -s nvidia-*
sudo apt remove --purge -s libnvidia-*
</code>

If only nvidia packages are there to be removed, remove really:

<code>sudo apt remove --purge nvidia-*
sudo apt remove --purge libnvidia-*
</code>

Run sudo apt update and ubuntu-drivers devices again.

If nvidia-390 is still recommended, add your output of sudo ubuntu-drivers autoinstall again.

Good Info:
https://www.interserver.net/tips/kb/install-lets-encrypt-cpanel-whm-server/
https://lowendtalk.com/discussion/106071/installing-free-ssl-for-server-hostname-using-letsencrypt

Login to the server via ssh andlLet’s run the following command to install Let’s Encrypt provider:

/scripts/install_lets_encrypt_autossl_provider

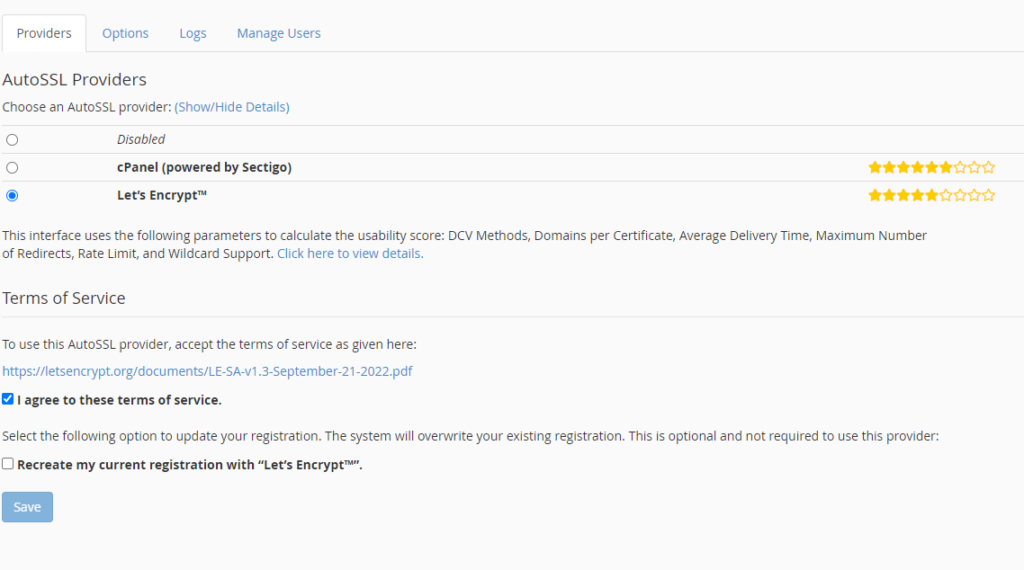
Once you have installed Let’s Encrypt provider, change auto SSL provider to Let’s Encrypt from cPanel (powered by Sectigo).

Login to WHM >> Manage AutoSSL.

Select Let’s Encrypt from cPanel (powered by Sectigo). Check the “I agree to these terms of service.”, and the “Recreate my current registration with “Let’s Encrypt”.

Install Self-Signed Certificate to Hostname.

Login to WHM as a root user. Go to “Service Configuration”.

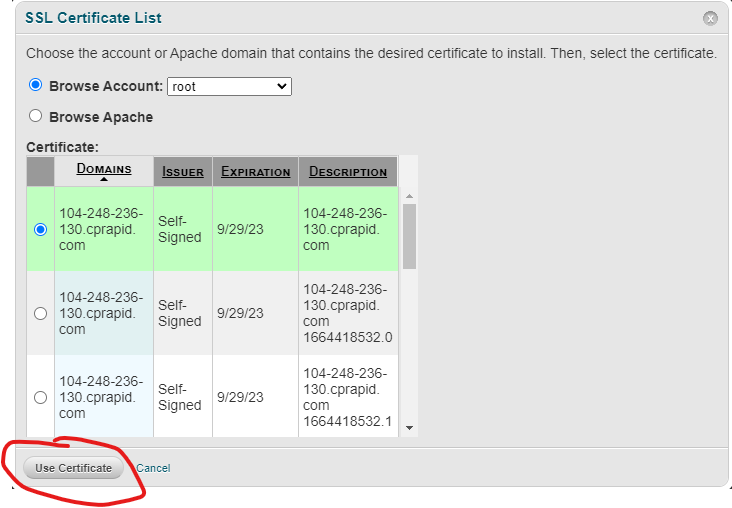
Then select the following services and click on “Browse Certificate”. Calendar, cPanel, WebDisk, Webmail, and WHM Services, Dovecot Mail Server, Exim (SMTP) Server, FTP Server.

Select hostname and click on “Use Certificate”.

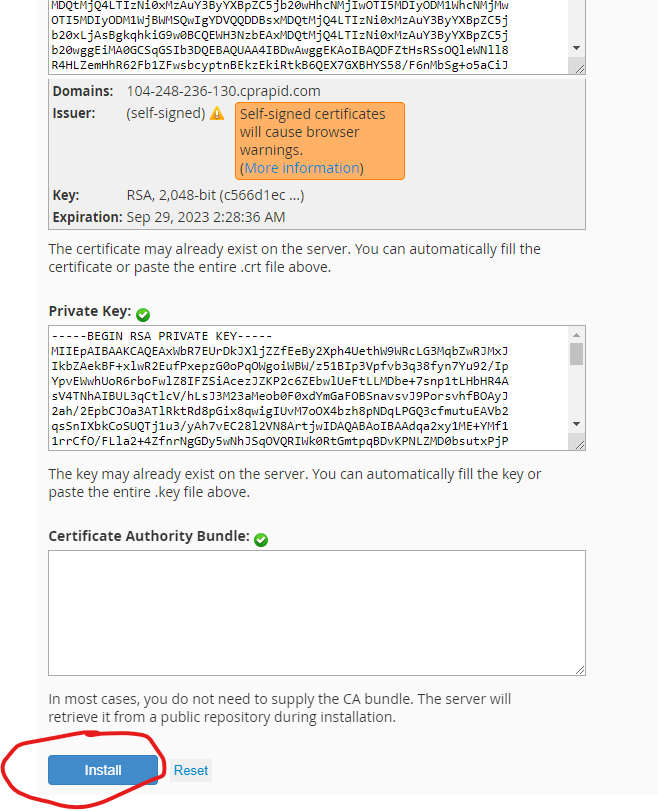
Then click on “Install”.

Restart cpsrvd

Replace Self Signed Certificates with Valid Let’s Encrypt Certificates.

Once you have installed the self-signed certificate, run the following command to check SSL certificates

/usr/local/cpanel/bin/checkallsslcerts --verbose

We can see the SSL CRT’s have been requested for your services. The hostname for the SSL CRT will be with one that is currently defined in cPanel:

# whmapi1 gethostname|grep hostname:
hostname: server1.hostname.com

While the process is not always this fast, after a few moments, we can see the SSL CRT’s are ready for install.
Then re-ran the ‘/usr/local/cpanel/bin/checkallsslcerts –verbose’ command which would have been ran at maintenance time. You may verify at WHM > Service Configuration > Manage Service SSL Certificates.

You can verify SSL installation by running https://server1.hostname.com:2087

Add your keys to github.

Then run the following to set up keys easily for new projects:

# curl https://github.com/github_user_name.keys | tee -a /root/.ssh/authorized_keys && chmod 600 /root/.ssh/authorized_keys

First lets install UFW

$ sudo apt-get install ufw

Check the Status

$ sudo ufw status verbose

By default, UFW is disabled so you should see something like this:

$ Status: inactive

Let’s set your UFW rules back to the defaults so we can be sure that you’ll be able to follow along with this tutorial. To set the defaults used by UFW, use these commands:

$ sudo ufw default deny incoming

Output:
Default incoming policy changed to ‘deny’
(be sure to update your rules accordingly)

$ sudo ufw default allow outgoing

Output:
Default outgoing policy changed to ‘allow’
(be sure to update your rules accordingly)

Allow SSH Connections

To configure your server to allow incoming SSH connections, you can use this UFW command:

$ sudo ufw allow ssh

Output:
Rules updated
Rules updated (v6)
this command works the same as the one above:

$ sudo ufw allow 22

Or if ssh is on a different port

$ sudo ufw allow 2222

Now that your firewall is configured to allow incoming SSH connections, we can enable it

$ sudo ufw enable
Command may disrupt existing ssh connections. Proceed with operation (y|n)? y
Firewall is active and enabled on system startup

Now lets add the port access for IPFS
4001 – default libp2p swarm port – should be open to public for all nodes if possible
5001 – API port – provides write/admin access to the node – should be locked down or only to your IP.
8080 – Gateway

$ sudo ufw allow 4001
$ sudo ufw allow 5001
$ sudo ufw allow 8080/tcp

Reload

$ sudo ufw reload

Remove a Port

$ sudo ufw status numbered
Status: active

     To                         Action      From
     --                         ------      ----
[ 1] 22/tcp                     ALLOW IN    Anywhere
[ 2] 4001                       ALLOW IN    Anywhere
[ 3] 5001                       ALLOW IN    Anywhere
[ 4] 8080/tcp                   ALLOW IN    Anywhere
[ 5] 22/tcp (v6)                ALLOW IN    Anywhere (v6)
[ 6] 4001 (v6)                  ALLOW IN    Anywhere (v6)
[ 7] 5001 (v6)                  ALLOW IN    Anywhere (v6)
[ 8] 8080/tcp (v6)              ALLOW IN    Anywhere (v6)

$ sudo ufw delete 2

Delete all firewall rules

$ sudo ufw reset

To Allow connections for the Webui on a specific IP:

$ sudo ufw allow from 1.2.3.4 to any port 5001
sudo ufw reload