Setting up and Enabling Federation to AWS Using Windows Active Directory, ADFS, and SAML 2.0. This KB assumes that you have a windows server with IIS, Active Directory, Active Directory Federation Services and Certificate Services Installed.
First, perform the following in your domain:
- Create two AD Groups named AWS-Production and AWS-Dev. AWS Production will have users that have administrative access and the AWS-Dev will have S3 , EC2 and RDS servies in AWS.
- Create users that will go into the accounts.
- Give the users email address (e.g., dev@myemail.com).
- Add users to the AWS-Production and AWS-Dev groups.
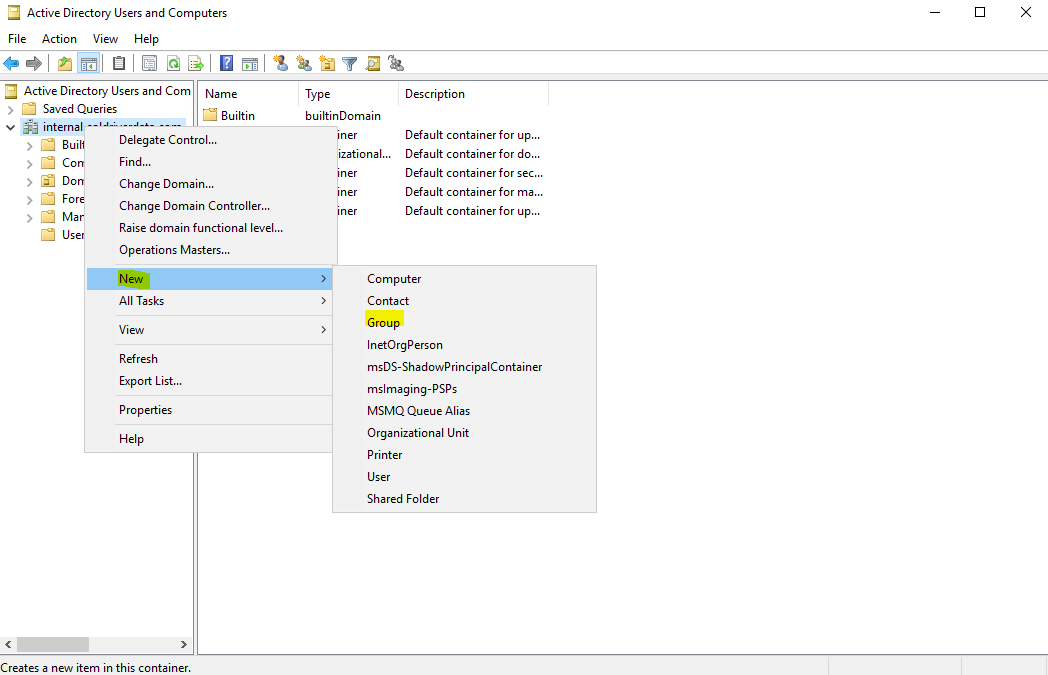
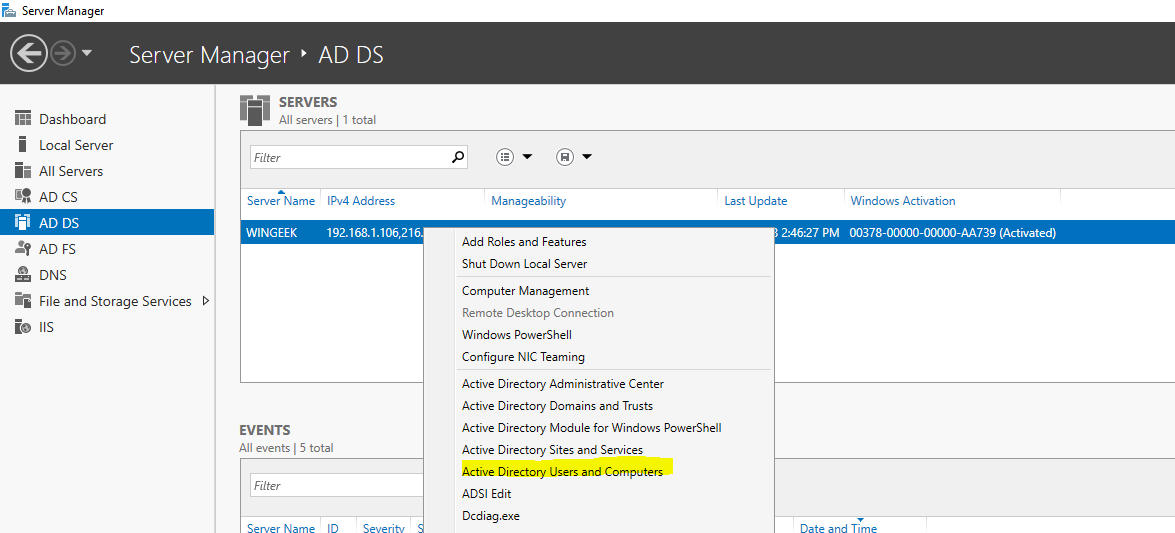
Open Server Manager. Go To AD DS on the left and click. Right click on the server in the middle and go to “Active Directory Users and Computers”.
Create our Groups. Right Click the server name and go to “New” and click “Group”.
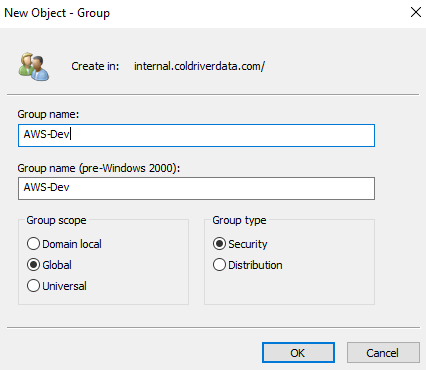
Name the new group – AWS-Dev. Click OK.
Repeat the steps to add the AWS-Production Group.
Create Users for the AWS-Dev Group.
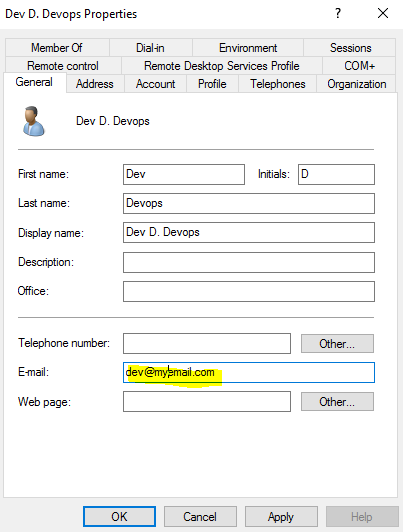
Add a new User called Dev. This user will be in our development Group.

Give a password and click finish. Now right click on the user and go to properties. Add an email to the user. This email will be used to login to the ADFS web page. Click OK.
Now click the “Member Of” Tab.
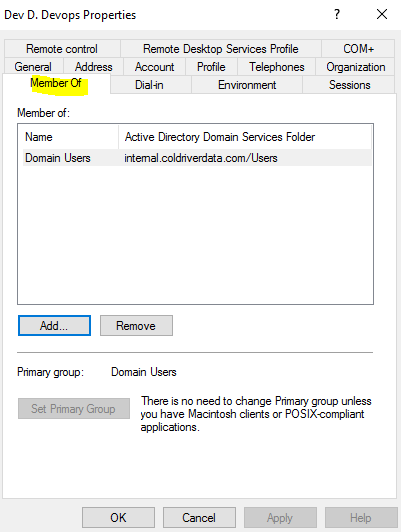
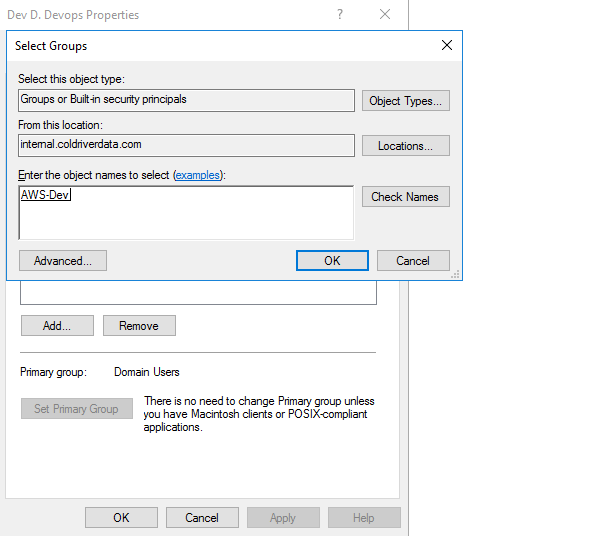
Click Add. Type AWS and click check names. The AWS-Dev should be displayed. Click OK. Click OK again.
Repeat the steps to add the user to the AWS-Production Group.
The Group and User are now added to Active Directory.
Now we need to login to the AWS console and create the SAML Provider and the role for the AWS-Dev group we created in AD.
If you’ve never done this, I recommend taking a look at the IAM user guide. Before you create a SAML provider, you need to download the SAML metadata document for your ADFS federation server. By default, you can download it from following address:
https://<yourservername>/FederationMetadata/2007-06/FederationMetadata.xml
I named my SAML provider ADFS. When you have the SAML metadata document, you can create the SAML provider in AWS.
When I finished creating the SAML provider, I created one IAM role.
I named the role ADFS-Dev. Do these names look familiar? They should. They are the complement to the AD groups created earlier. During the SAML authentication process in AWS, these IAM roles will be matched by name to the AD group (AWS-Dev) via ADFS claim rules.
Note: Remember that if you’re following along with this description, you need to use exactly the same names that we use. Make sure that you name the IAM role ADFS-Dev.
Find the ARNs for the SAML provider and for the roles that you created and record them. You’ll need the ARNs later when you configure claims in the IdP.
That’s it for the AWS configuration steps.
Configuring AWS as a Trusted Relying Party
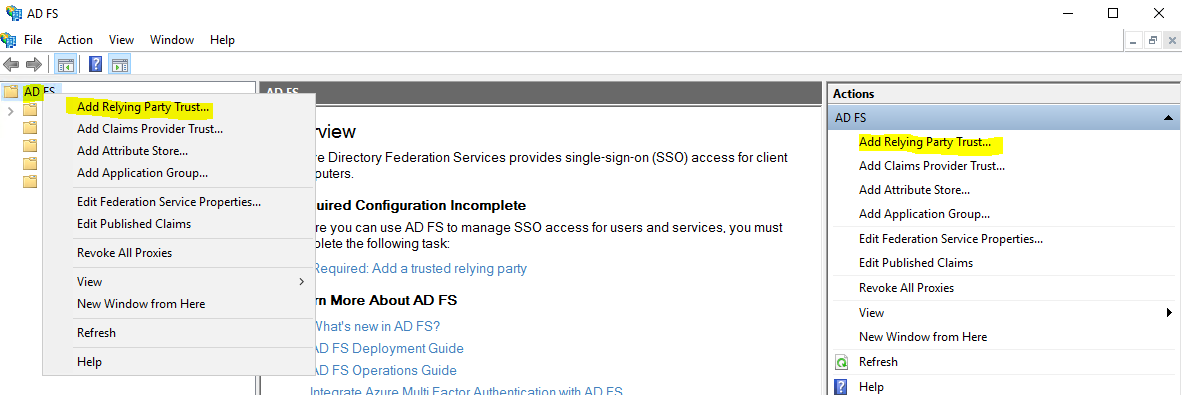
Go to the server manager on the server and select on the right – “Tools” and click “AD FS Management”.

Either right click on the AD FS on the left and choose “Add Relying Party Trust” or on the Right Side.
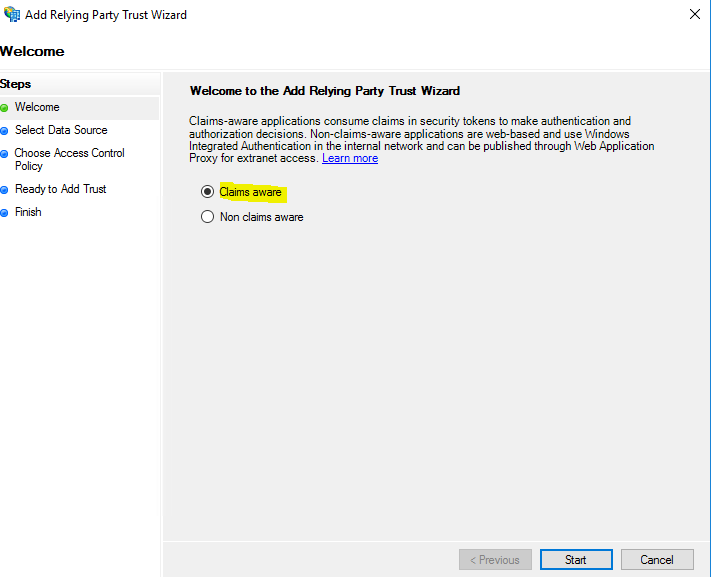
Select “Clams Aware” and “Start”.
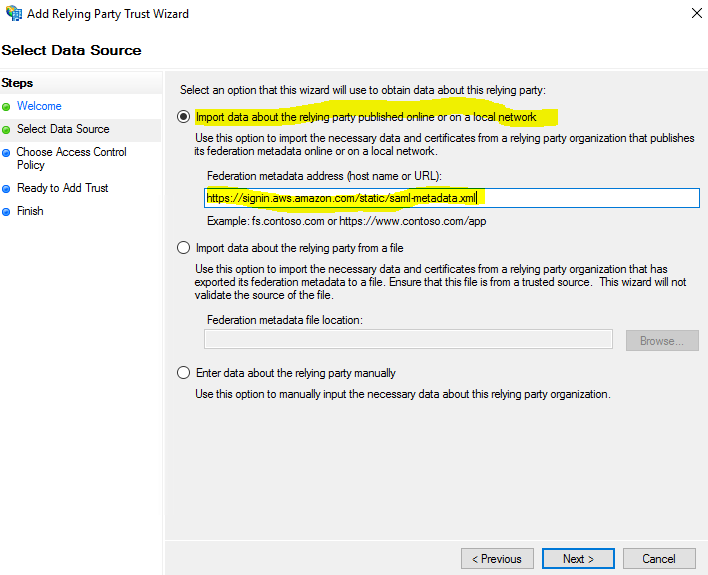
Check on “Import data about the relying party published online or on a local network”, put in
https://signin.aws.amazon.com/static/saml-metadata.xml
and then click Next. The metadata XML file is a standard SAML metadata document that describes AWS as a relying party.
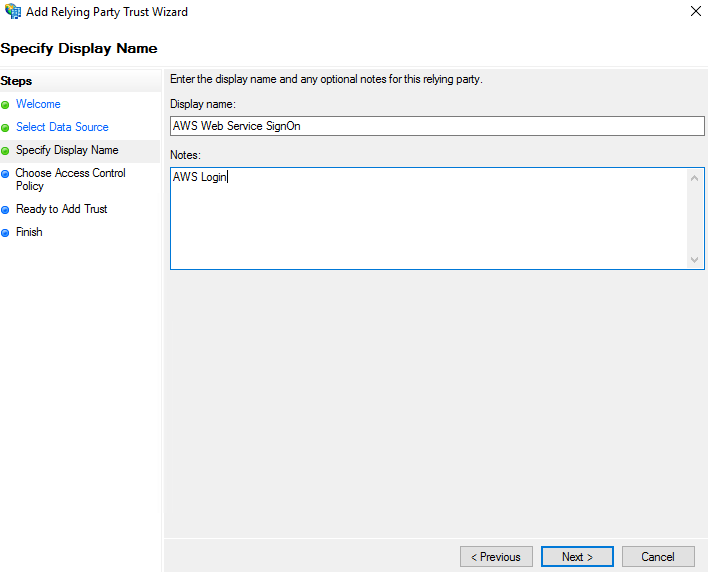
Set the display name for the relying party and then click Next.
Choose your authorization rules. For my scenario, I chose Permit all users to access this relying party. When you’re done, click Next.

Review your settings and then click Next.

Make sure “Configure claims issuance policy for this application” is check on and click Close.

Configuring Claim Rules for the AWS Relying Party
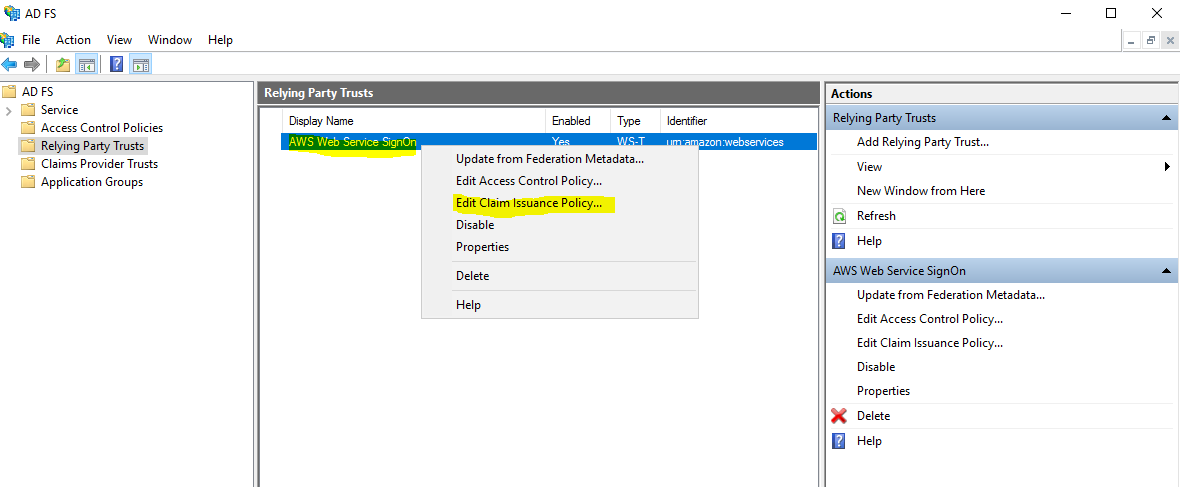
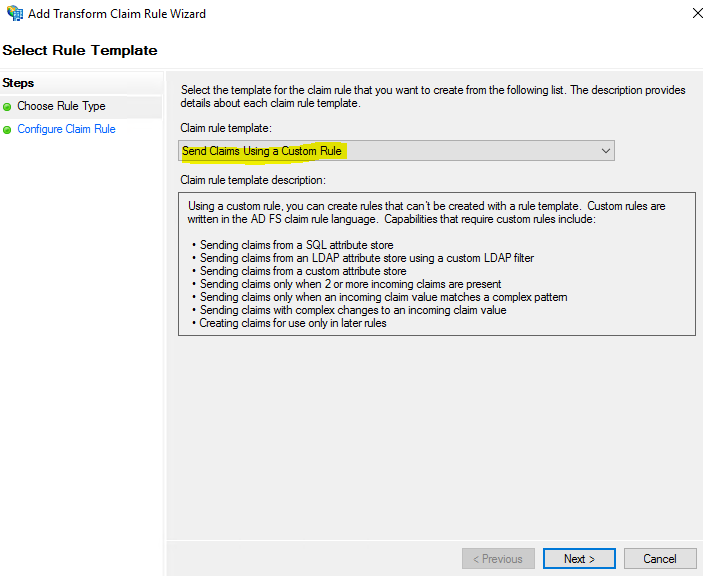
In these steps we’re going to add the claim rules so that the elements AWS requires and ADFS doesn’t provide by default (NameId, RoleSessionName, and Roles) are added to the SAML authentication response. If you forgot to check the box to launch the claim rule dialog, right-click on the relying party (in this case Amazon Web Service SignOn) and then click Edit Claim Issuance Policy.
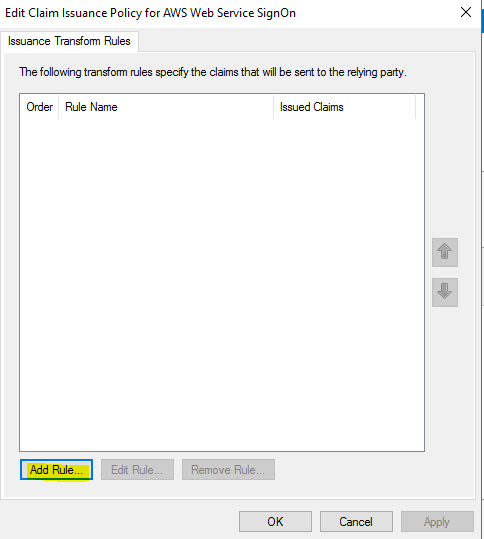
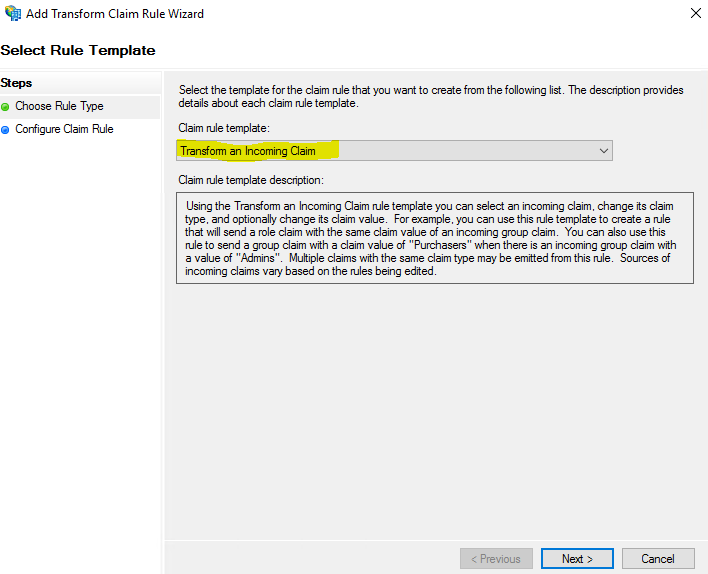
In the Edit Claim Issuance Policy for AWS Web Service SignOn dialog box, click Add Rule.
Select Transform an Incoming Claim and then click Next.
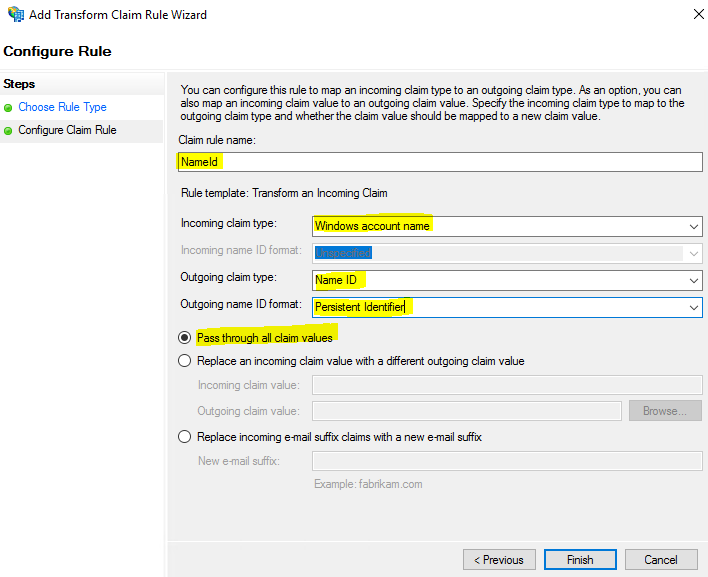
Adding a RoleSessionName

Click Finish
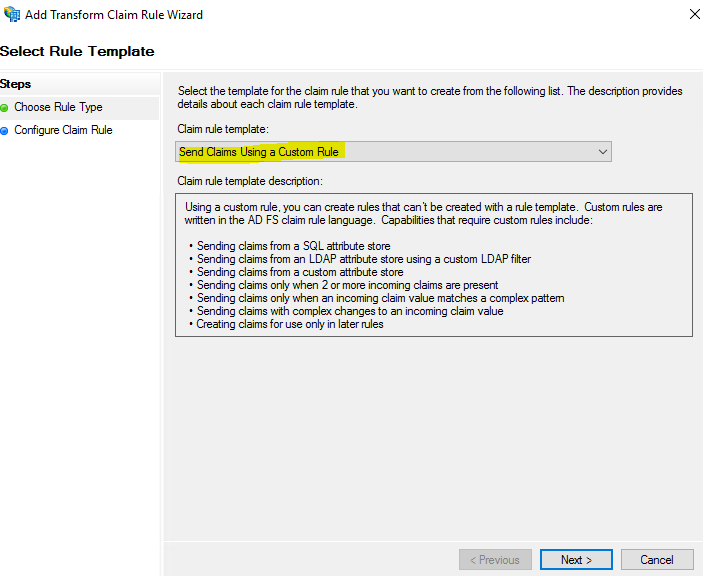
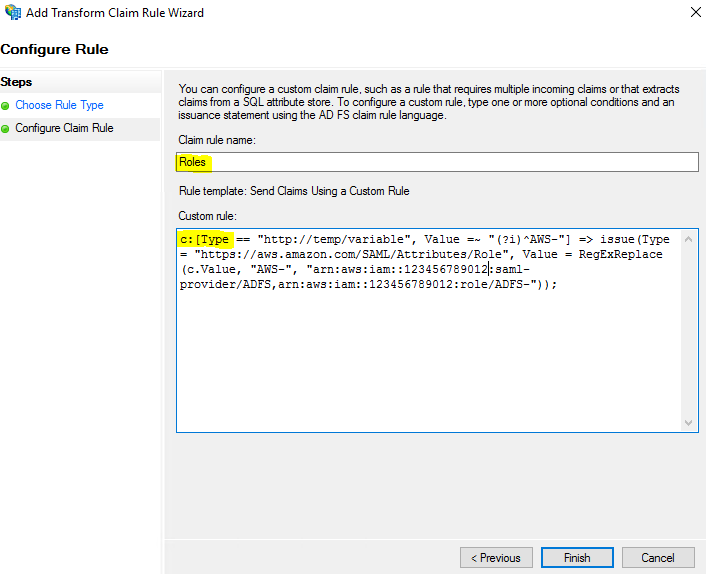
Adding Role Attributes
I’ll pause here to provide a little more context because for these steps it might not be as obvious what’s going on. Unlike the two previous claims, here I used custom rules to send role attributes. This is done by retrieving all the authenticated user’s AD groups and then matching the groups that start with to IAM roles of a similar name. I used the names of these groups to create Amazon Resource Names (ARNs) of IAM roles in my AWS account (i.e., those that start with AWS-).
Sending role attributes required two custom rules. The first rule retrieves all the authenticated user’s AD group memberships and the second rule performs the transformation to the roles claim. Here’s how I did it.
c:[Type == "http://schemas.microsoft.com/ws/2008/06/identity/claims/windowsaccountname", Issuer == "AD AUTHORITY"] => add(store = "Active Directory", types = ("http://temp/variable"), query = ";tokenGroups;{0}", param = c.Value);
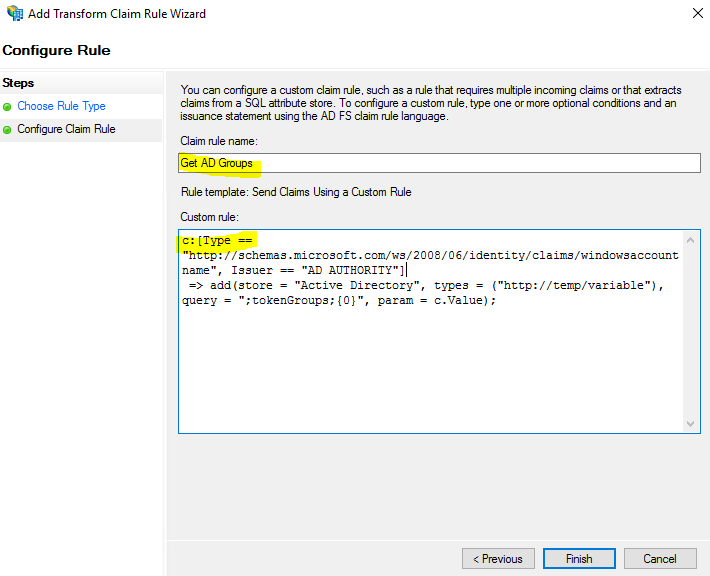
This custom rule uses a script in the claim rule language that retrieves all the groups the authenticated user is a member of and places them into a temporary claim named http://temp/variable. (Think of this as a variable you can access later.) I use this in the next rule to transform the groups into IAM role ARNs.
c:[Type == "http://temp/variable", Value =~ "(?i)^AWS-"] => issue(Type = "https://aws.amazon.com/SAML/Attributes/Role", Value = RegExReplace(c.Value, "AWS-", "arn:aws:iam::123456789012:saml-provider/ADFS,arn:aws:iam::123456789012:role/ADFS-"));
This rule uses a custom script to get all the groups from the temporary claim () and then uses the name of the group to create the principal/role pair, which has this format:
ARN of SAML provider,ARN of role to assume
In my example, it comes out this way:
arn:aws:iam:123456789012:saml-provider/ADFS,arn:aws:iam:123456789012:role/ADFS-
In the example, I used an account number of 123456789012. Make sure you change this to your own AWS account.
7. Click OK.
Testing steps
In your domain, browse to the following address: https://localhost/adfs/ls/IdpInitiatedSignOn.aspx
If you’re using a locally signed certificate from IIS, you might get a certificate warning.

Error. I received and error when I tried the page:
Exception details:
Microsoft.IdentityServer.Web.IdPInitiatedSignonPageDisabledException: MSIS7012: An error occurred while processing the request. Contact your administrator for details.

The event viewer gave me a an error which was not really helping at first.
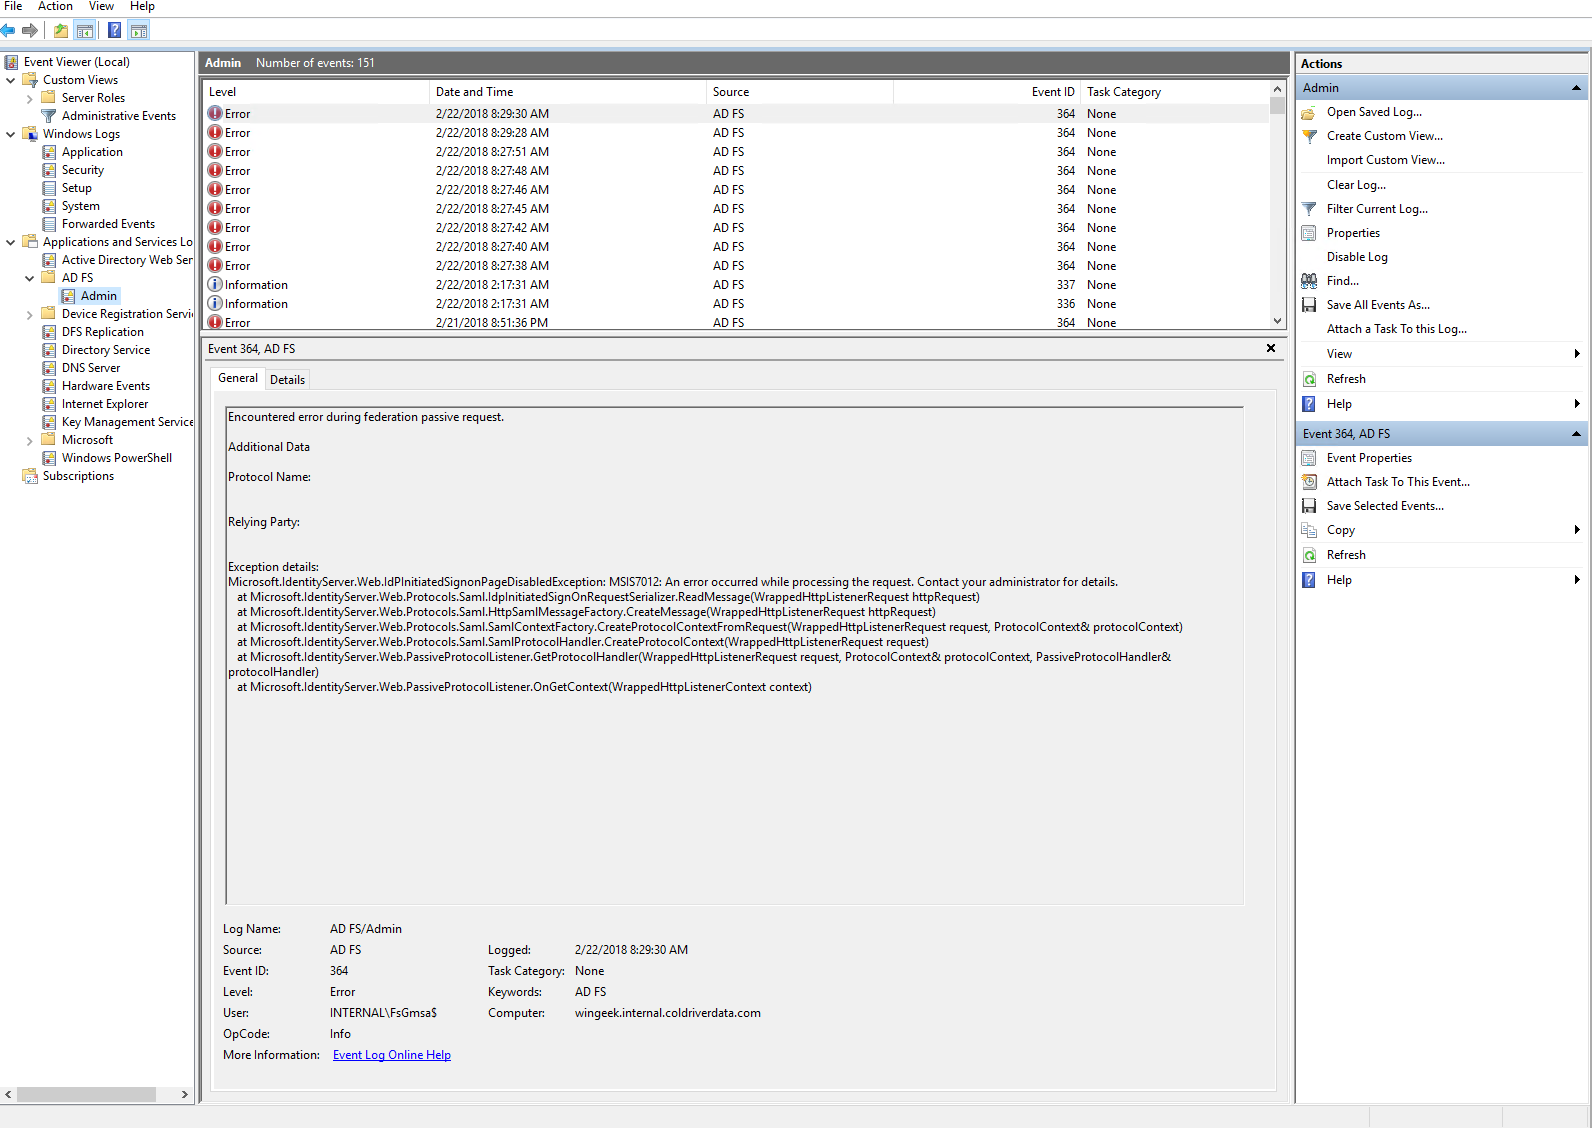
But when I looked closely I noticed the line Microsoft.IdentityServer.Web.IdPInitiatedSignonPageDisabledException.
Well it turns out that this feature is by default disabled in the ADFS properties on Windows Server 2016.
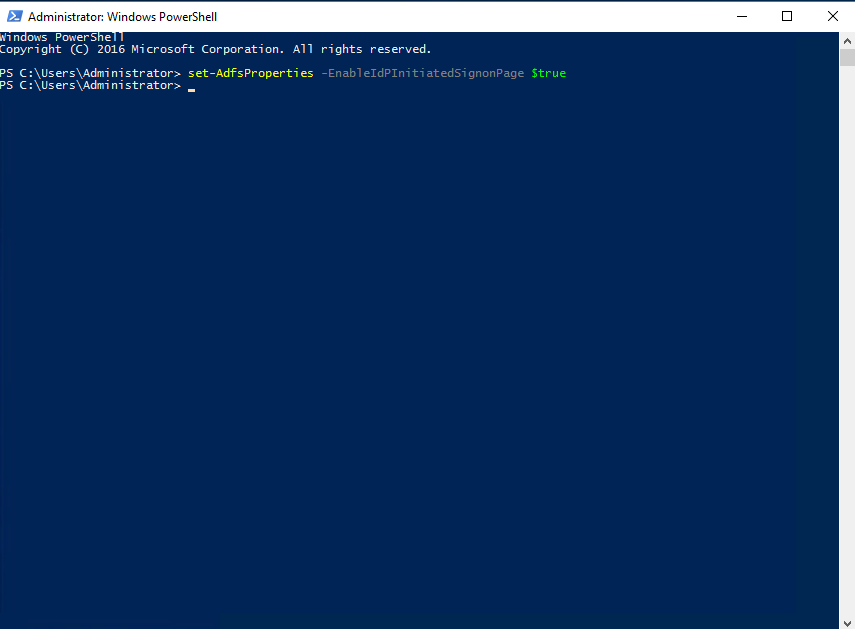
You can enable the test page by using the following powershell command:
set-AdfsProperties -EnableIdPInitiatedSignonPage $true
If we try the https://localhost/adfs/ls/IdpInitiatedSignon.aspx again we now receive a known web page with a Sign In button.
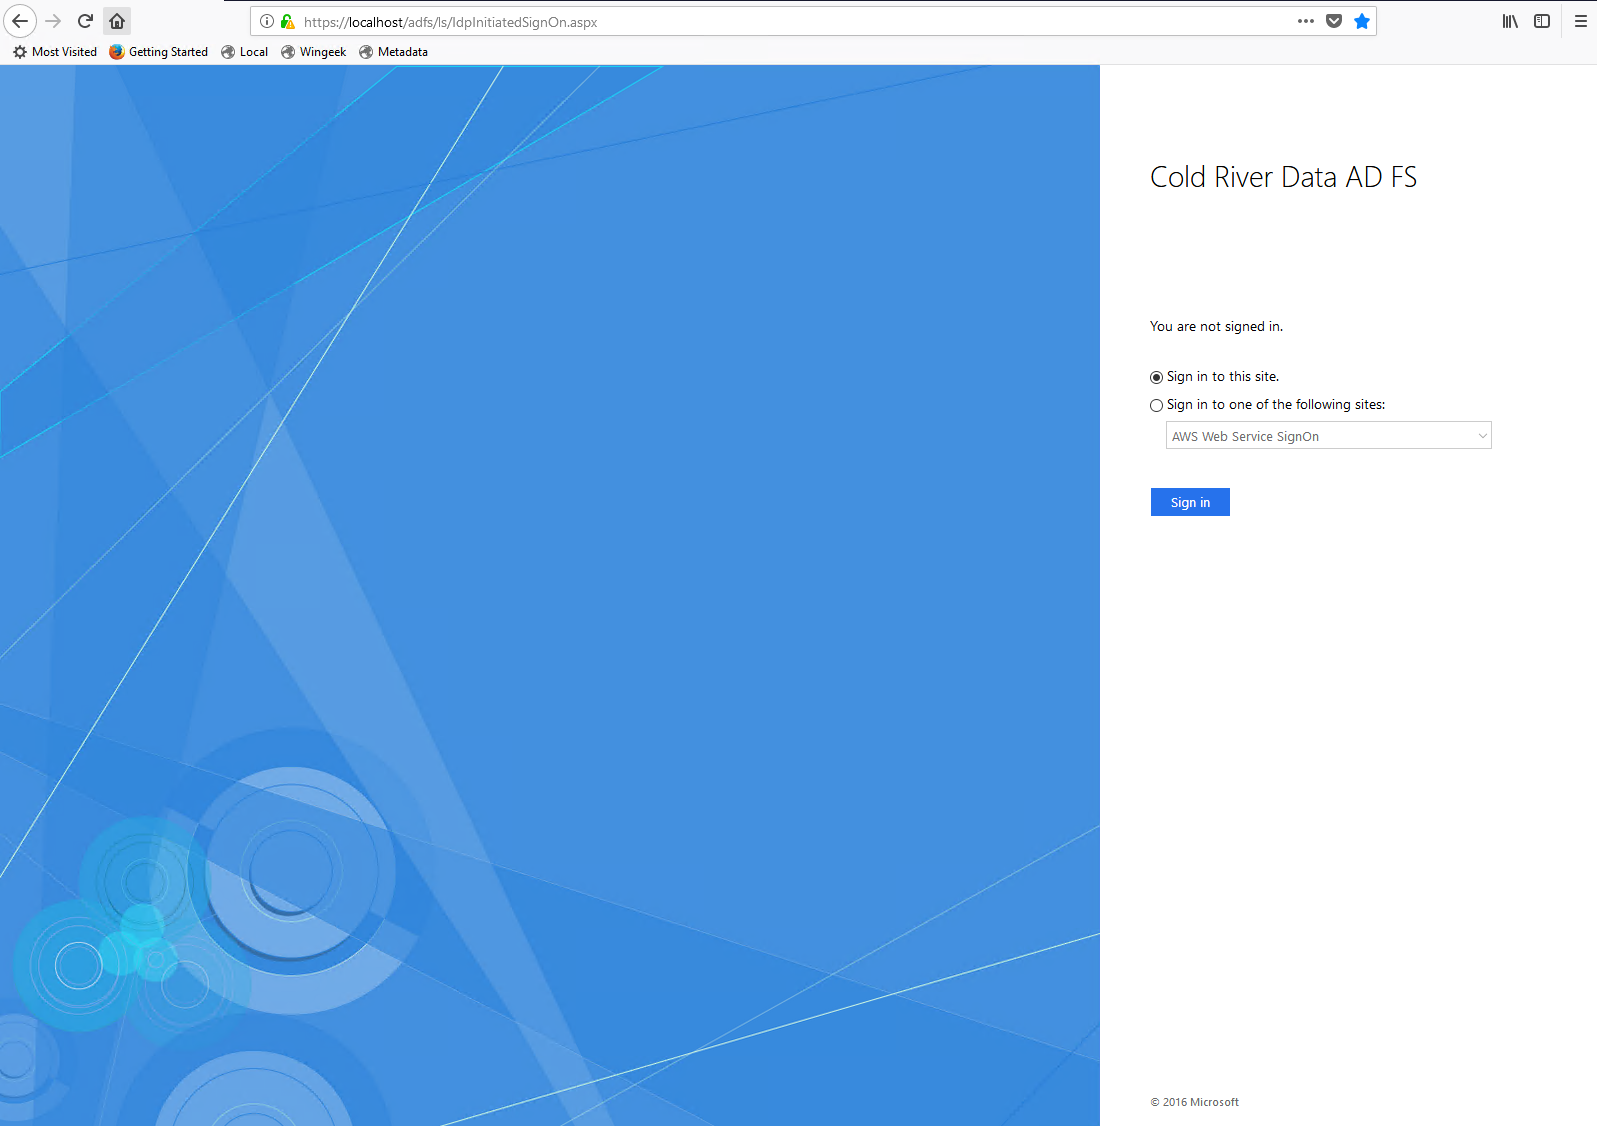
Select Sign in to one of the following sites, select Amazon Web Service SignOn from the list, and then click Sign In.
If prompted, enter in a username and password (remember to use the Dev Account that you setup earlier – dev@myemail.com). You are redirected to the Amazon Web Services Sign-In page.

Select a role and then click Sign In. (If you are mapped to only a single IAM role, you skip the role selection step and are automatically signed into the AWS Management Console.).
Success!
Note: In windows 2016, the users set up in Active directory may have a different sign in domain depending on how you set it up. Check the email vs the User logon name in the Active Directory Users and Computers.