Need to convert a .ppk putty key? This article can help you with the information.
Category: SSH
To test, you will need a client and test server. The client server is where we generate the keys.
When we generate keys, there will be a private key and a public key.
Then we copy the public key to the test server. When we ssh to the test server, the private key we have on the client server matches the public key that we copied to the test server.
To generate a new pair of SSH keys that uses Ed25519 algorithm on the client server, run:
# ssh-keygen -o -a 100 -t ed25519 -f ~/.ssh/id_ed25519 -C "somename"
Generating public/private ed25519 key pair.
Created directory '/root/.ssh'.
Enter passphrase (empty for no passphrase):
Enter same passphrase again:
Your identification has been saved in /root/.ssh/id_ed25519.
Your public key has been saved in /root/.ssh/id_ed25519.pub.
The key fingerprint is:
SHA256:S5mglsGaa7byro5iFvC01VyFt+plsvrt5SLtTTzUHVU geekdecoder
The key's randomart image is:
+--[ED25519 256]--+
|         o.     E|
|   .    o .     .|
|    oo.. . .   . |
|. .o.+o. o.  . ..|
|.ooo+   S.  . . .|
| .oo   .o.oo     |
|  =    ..*  =    |
|+= .    +.o= .   |
|B*+   .o.++.o    |
+----[SHA256]-----+
-f
Specifies filename of the keyfile, used for specifying other than default name
-a
number of primality test while screening DH-GEX candidates
-t
type of key (RSA, ED25519, DSA, etc)
-C
Comment (not used in algorithm, only used in public key)
-o
openSSH key format instead of older PEM (needs OpenSSH 6.5+)
If your account on the remote system doesn’t already contain a ~/.ssh/authorized_keys file, create one; on the command line, enter the following commands:
# mkdir -p ~/.ssh
# touch ~/.ssh/authorized_keys
On Client, Copy Public SSH Key (id_ed25519.pub) to Remote Server
Using the command “ssh-copy-id” is the preferred way. You will need to have ssh access to the server to copy the key.
Here is the command:
# ssh-copy-id -i ~/.ssh/id_ed25519.pub root@server1.server.com -p22
Now try logging into the machine, with:
"ssh -p '22' 'root@server1.server.com'"
Check to make sure that only the key(s) you wanted were added.
Adding Your Key to SSH Agent
You can find your newly generated private key at ~/.ssh/id_ed25519 and your public key at ~/.ssh/id_ed25519.pub. Always remember that your public key is the one that you copy to the target host for authentication.
Before adding your new private key to the SSH agent, make sure that the SSH agent is running by executing the following command:
# eval "$(ssh-agent -s)"
Then run the following command to add your newly generated Ed25519 key to SSH agent:
#ssh-add ~/.ssh/id_ed25519
Or if you want to add all of the available keys under the default .ssh directory, simply run:
# ssh-add
If you want to just login to the server with the hostname vs the full domain like:
ssh “server1” vs “ssh -p ’22’ ‘root@server.com'”, then add a hostname entry to the client with the following:
# nano /etc/hosts
ip.of.the.server  server1.server.com        server1
Now try the short ssh:
# ssh server1
Log into the Linux server as the user you are going to use to connect with ssh. Generate the key.
ssh-keygen -t rsa -b 4096 -C "email@domain.com"
Generating public/private rsa key pair.
Enter file in which to save the key (/home/user/.ssh/id_rsa):
Enter passphrase (empty for no passphrase):
Enter same passphrase again:
Your identification has been saved in /home/user/.ssh/id_rsa.
Your public key has been saved in /home/user/.ssh/id_rsa.pub.
The key fingerprint is:
SHA256:3/dDa9R+zzDpGNt/EU9Jusj/snbKt3+B8F+ULnxXtWk email@domain.com
The key's randomart image is:
+---[RSA 4096]----+
|                 |
|               ..|
|              o *|
|           . . E+|
|        S . = =o=|
|         . + * O=|
|          . + @.*|
|            .@ %=|
|            ++@+#|
+----[SHA256]-----+
Now copy the id_rsa key to your Windows desktop. This can be done by copying and pasting the contents of the file or using an SCP client such as PSCP which is supplied with the PuTTY install or FileZilla.
Generating OpenSSH-compatible Keys for Use with PuTTY
To generate a set of RSA keys with PuTTYgen:
- Start the PuTTYgen utility, by double-clicking on its .exe file;
- For Type of key to generate, select RSA;
- In the Number of bits in a generated key field, specify either 2048 or 4096 (increasing the bits makes it harder to crack the key by brute-force methods);
- Click the Generate button;
- Move your mouse pointer around in the blank area of the Key section, below the progress bar (to generate some randomness) until the progress bar is full;
- A private/ public key pair has now been generated;
- In the Key comment field, enter any comment you’d like, to help you identify this key pair, later (e.g. your e-mail address; home; office; etc.) — the key comment is particularly useful in the event you end up creating more than one key pair;
- Optional: Type a passphrase in the Key passphrase field & re-type the same passphrase in the Confirm passphrase field (if you would like to use your keys for automated processes, however, you should not create a passphrase);
- Click the Save public key button & choose whatever filename you’d like (some users create a folder in their computer named my_keys);
- Click the Save private key button & choose whatever filename you’d like (you can save it in the same location as the public key, but it should be a location that only you can access and that you will NOT lose! If you lose your keys and have disabled username/password logins, you will no longer be able log in!);
- Right-click in the text field labeled Public key for pasting into OpenSSH authorized_keys file and choose Select All;
Right-click again in the same text field and choose Copy. - NOTE: PuTTY and OpenSSH use different formats for public SSH keys. If the SSH Key you copied starts with “—- BEGIN SSH2 PUBLIC KEY …”, it is in the wrong format. Be sure to follow the instructions carefully. Your key should start with “ssh-rsa AAAA ….”
- Save The Public Key On The Server
Using a text editor, create a file in which to store your private key. This example uses the file private_key.txt.
To edit the file in nano, type the following command
# nano deployment_key.txt
Paste the private key into the file. Be sure to include the BEGIN and END lines.
-----BEGIN RSA PRIVATE KEY-----
MIIEowIBAAKCAQEAx9ODcgSZFhPnZmW/VGWy/bXLKFBhOoTP9k4dhcJq17ZuG9KB
...
-----END RSA PRIVATE KEY-----
Run the following command to change the file permissions to 600 to secure the key. You can also set them to 400. This step is required:
# chmod 600 deployment_key.txt
Use the key to log in to the SSH client as shown in the following example, which loads the key in file private_key.txt, and logs in as user demo,to IP 192.237.248.66:
# ssh -i deployment_key.txt demo@192.237.248.66
When the prompt to confirm the connection request is displayed, type yes and then press Enter.
If your SSH key requires a password, enter it when prompted to complete the connection.
Here is how to keep your ssh session from freezing and how to keep ssh alive.
Edit your ssh config file. Change to the following variables
# nano /etc/ssh/sshd_config
TCPKeepAlive yes
ClientAliveInterval 60
ClientAliveCountMax 10000
Then, restart ssh
On CentOS:
# service sshd restart
Stopping sshd:                                             [  OK  ]
Starting sshd:                                             [  OK  ]
- TCPKeepAlive – is there to ensure that certain firewalls don’t drop idle connections.
- ClientAliveInterval – the server will wait 60 seconds before sending a null packet to the client to keep the connection alive.
- ClientAliveCountMax – server will send alive messages to the client even though it has not received any message back from the client.
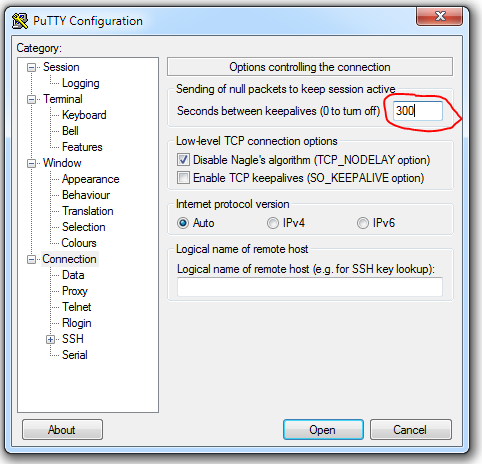
Using Putty Settings
- Start PuTTY.
- Load pone of your saved sessions.
- In the Category pane, click Connection.
- Look for ” Sending of null packets to keep session active”.
- In the Seconds between keepalives (0 to turn off), type 300. (With this configuration, PuTTY sends a packet to the server every 300 seconds -5 minutes – to keep the connection alive.
- In the Category pane, click Session.
- Click Save.
- Connect to your account and monitor the connection. If it still drops, gradually decrease the keepalive interval until the connection is stable.
Also, for CentOS: http://www.tecmint.com/ssh-two-factor-authentication/
Want to secure your SSH server with easy-to-use two-factor authentication? Google provides the necessary software to integrate Google Authenticator’s time-based one-time password (TOTP) system with your SSH server. You’ll have to enter the code from your phone when you connect.
Error
ssh_exchange_identification: Connection closed by remote host
Solution: Restart ssh.
service sshd restart
Want to change the ssh port for ssh? Here is a good tutorial.
(Note: If you are making these changes – ssh to the server and keep the terminal open as you make the changes. Test with a new terminal. This way if something is amiss – you are not locked out.)
Edit /etc/ssh/sshd_config, enter:
# vi /etc/ssh/sshd_config
Note:
The strategy used for options in the default sshd_config shipped with OpenSSH is to specify options with their default value where possible, but leave them commented. Uncommented options change a default value.
Uncomment the following and edit to set the port to 10221:
Port 10221
ListenAddress option
Note: If you have multiple IP address on the server, add you IP addresses.
ListenAddress as follows :
## bind sshd to two ip address on a non-standard port ##
ListenAddress 192.168.1.5:10221
ListenAddress 203.1.2.3:10221
Save and close the file.
Before you restart or reload sshd server. You need to update SELinux configuration or Firewall settings (iptables).
You also need to update firewall settings so that users can login using TCP # 10221. Edit,
/etc/sysconfig/iptables and open sshd port 10221:
# vi /etc/sysconfig/iptables
Edit/append as follows:
## delete or comment out port 22 line ##
## -A INPUT -m state --state NEW -m tcp -p tcp --dport 22 -j ACCEPT
## open port 22
-A INPUT -m state --state NEW -m tcp -p tcp --dport 10221 -j ACCEPT
Save and close the file. If you are using IPv6, edit /etc/sysconfig/ip6tables file too. Temporally, stop the firewall so that you will not loose the connectivity to the server:
# service iptables stop
# service ip6tables stop
Restart sshd on a CentOS
# service sshd restart
Verify new port settings with the following netstat command:
# netstat -tulpn | grep sshd
Finally, start the firewall:
# service iptables start
## IPv6 ##
# service ip6tables start
Now, login with a different terminal to check the settings.