This article will show you how to install macOS Ventura with your Windows PC using VMware Workstation 17 Player
Category: VMware
Download Unlocker and intall it from GitHub HERE
Unzip the archive
Open Power Shell as Administrator and navigate to the directory C:\Users\yourusername\Downloads\unlocker424\windows
Run the following:
c:\Users\rogerp\Downloads\unlocker424\windows>unlock.exe
Unlocker 4.2.4 for VMware Workstation/Player
============================================
© 2014-2022 David Parsons

VMware is installed at:  C:\Program Files (x86)\VMware\VMware Player\
VMware version:  20800274

Stopping VMware services and tasks...
Stopping service  VMUSBArbService
Stopping service  VMAuthdService

Installing unlock patches
Patching...
Patching C:\Program Files (x86)\VMware\VMware Player\vmwarebase.dll
C:\Program Files (x86)\VMware\VMware Player\vmwarebase.dll -> c:\Users\rogerp\Downloads\unlocker424\backup\17.0.0.20800274\vmwarebase.dll
Flag patched @ offset: 0x004e85e0  Flag: 0x3e -> 0x3f.........
Press Enter key to continue...
- Download macOS Catalina ISO
- macOS Catalina 10.15.5 ISO
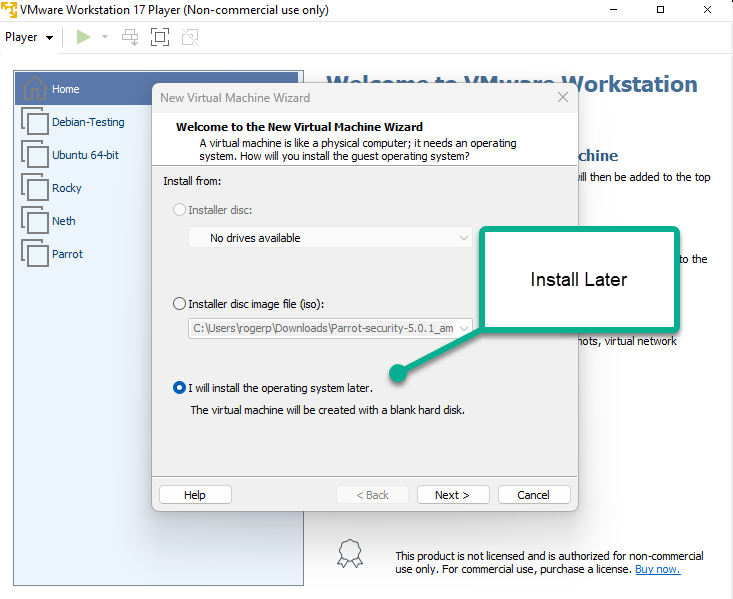
Create a New VM. Choose Install Later.
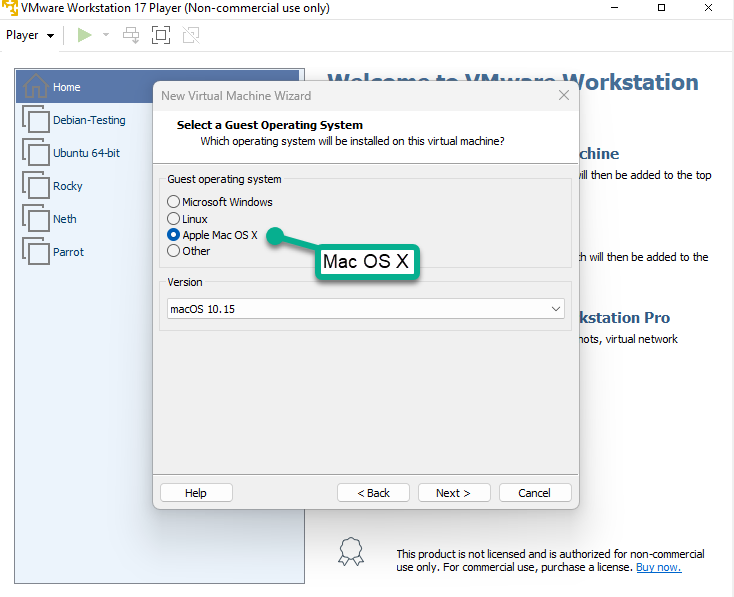
Choose Apple Mac OS X, Version 10.15
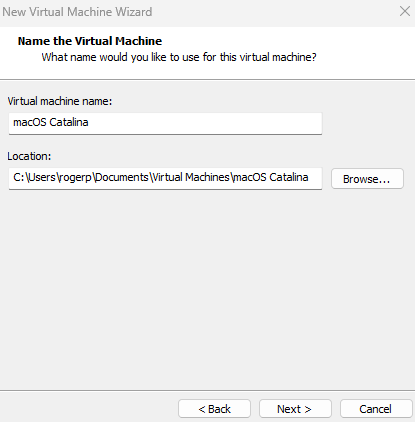
Name the virtual machine as you prefer like macOS Catalina. Click Browse then choose a location to save virtual machine files and click Next, or you may let it as default.
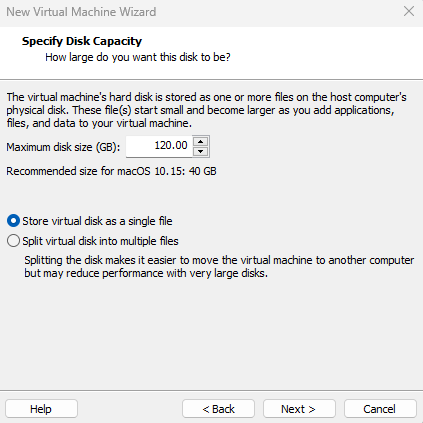
Specify the disk size of 120 GB or more than 50 GB. Then select Store virtual disk as a single file and click Next.
On Ready to Create Virtual Machine, Click Customize Hardware.
Increase the Memory from 4 GB to 8 GB or higher for better performance.
Select Processor menu then increase the CPU processor core from 2 cores to 4 or Higher cores for better performance.
Note: If you don’t have enough resources then you may not increase the Memory and Processor since the minimum requirement is 4 GB Memory and 2 Cores of Processor.
Select New CD/DVD (SATA) from the menu then click Use ISO image file: and click Browse.
Locate the macOS Catalina 10.15.5 (19F101).iso file then click Open. If you don’t have this file then you should download this from Step 1: Download the Prerequisites section.
After selecting the macOS Catalina ISO, to save all the changes click Close.

Finally on the New Virtual Machine Wizard Window, Click Finish.
Edit macOS Catalina VMX File (Optional)
- Do these 2 steps only if you can’t boot into macOS or have other issues. Navigate to the virtual machine folder which you select in step #4.3 of this guide. If you didn’t specify a new location, then the default location is in Document > Virtual Machine. Right-click on macOS Catalina.vmx then open it via Notepad or any third-party text editor of your choice.
- Scroll down to the bottom of texts and add the following code; then click on File > Save. After that, you may close it as you don’t need it anymore.
smbios.reflectHost = "TRUE"
hw.model = "MacBookPro14,3"
board-id = "Mac-551B86E5744E2388"
smc.version = "0"
Install macOS Catalina as VM on VMware
- Open VMware and on the macOS Catalina VM window Click Power on this Virtual Machine.

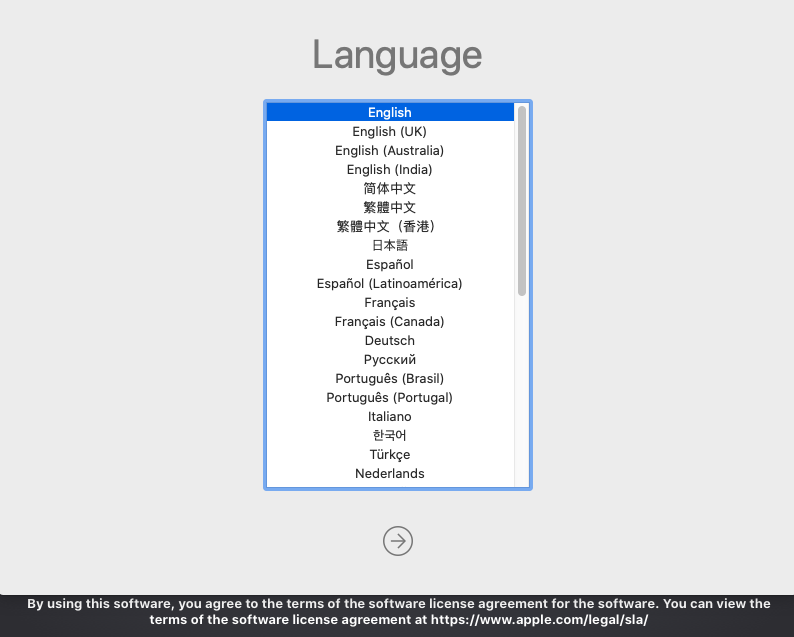
Select English on the language page then click Continue Arrow.
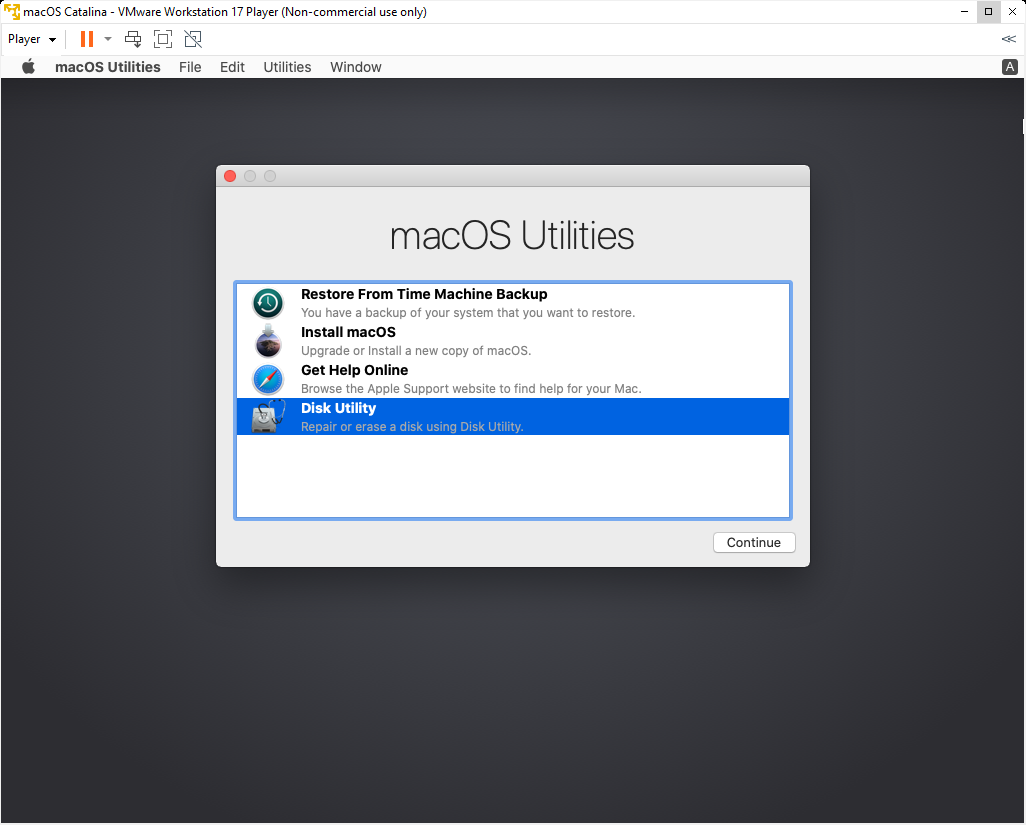
Now, you’ll see macOS Utilities Window. From the list, select Disk Utility and click Continue.
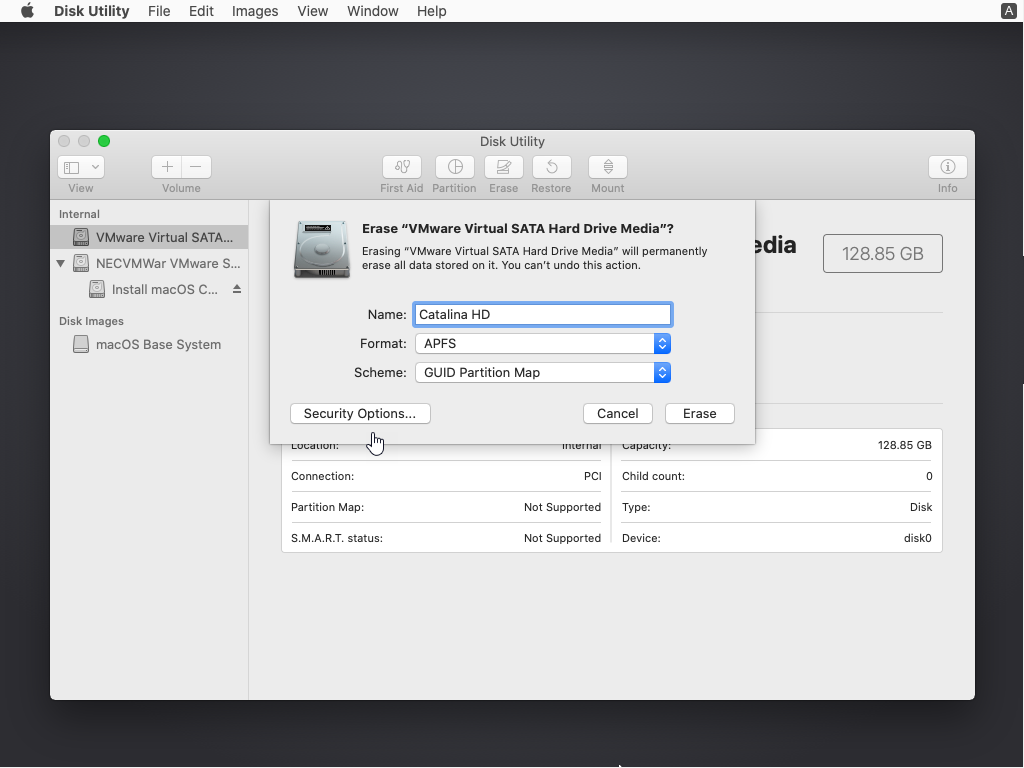
Select VMware Virtual SATA Hard Drive Media then click Erase. Choose the following options and again click Erase.
- Name: Catalina HD (You can type any name you want)
- Format: APFS (If you get an error, select Mac OS X Extended Journaled)
- Scheme: GUID Partition MAP
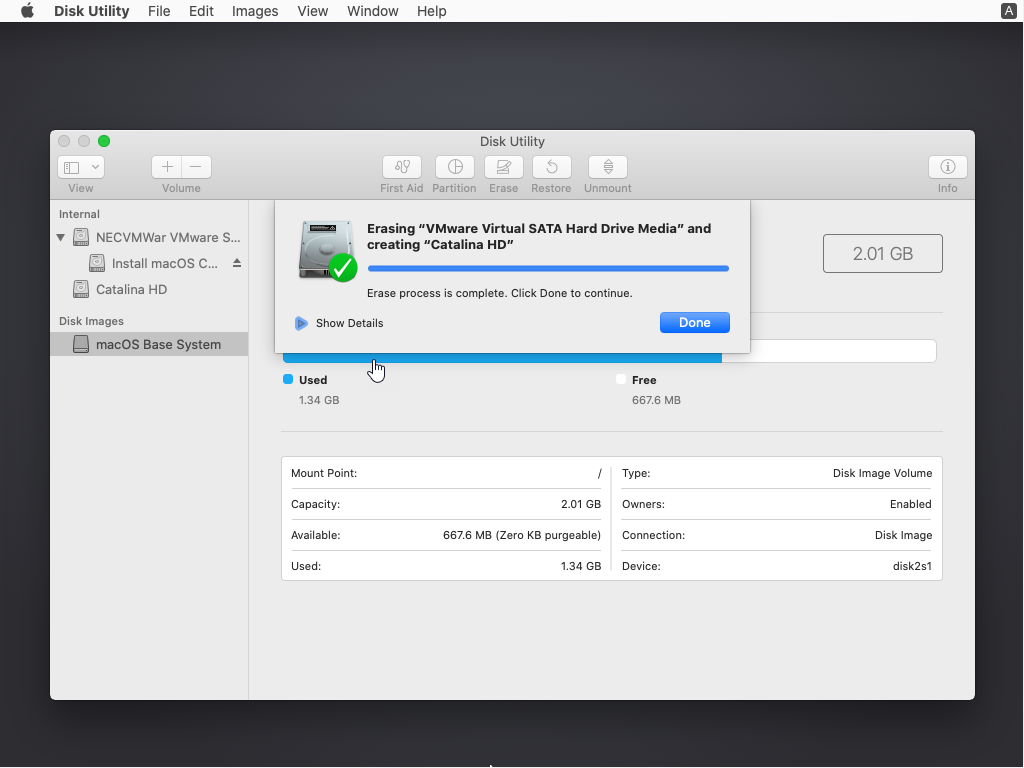
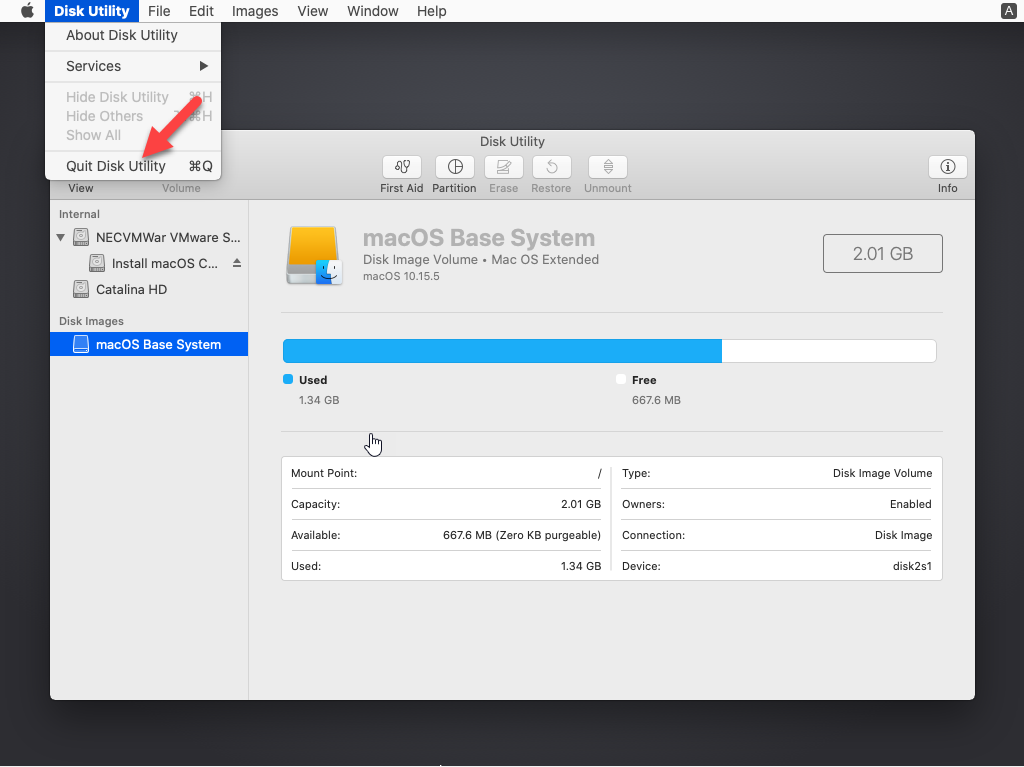
From Disk Utility Tab, click Quit Disk Utility
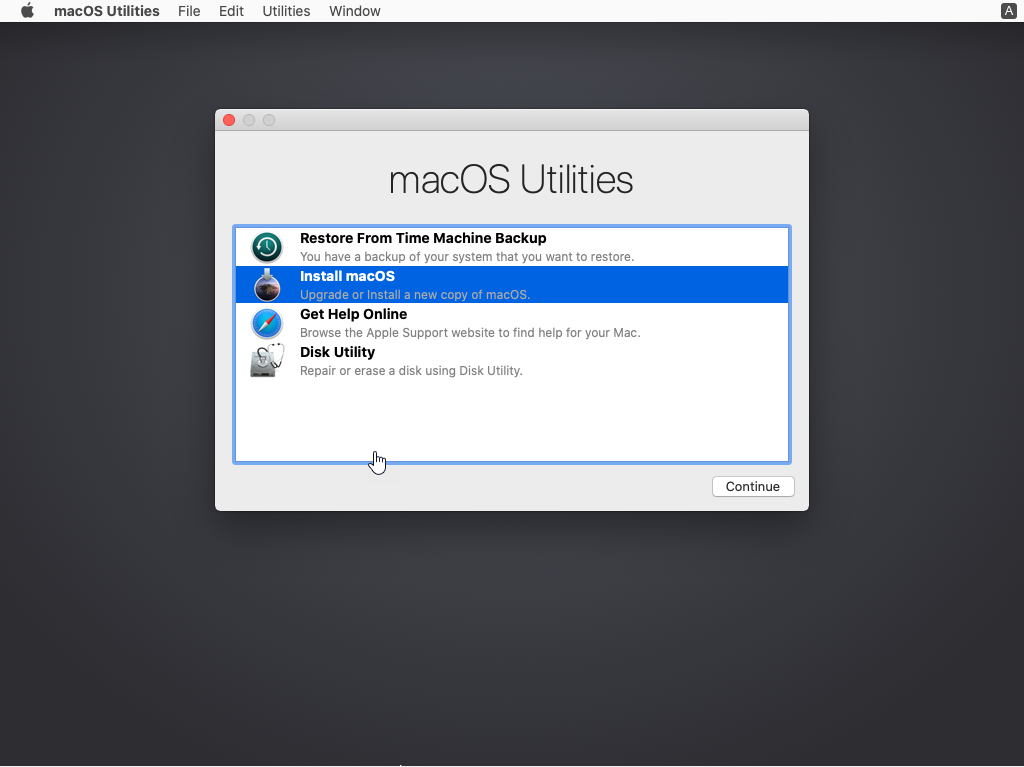
From macOS Utilities, select Install macOS and click Continue.
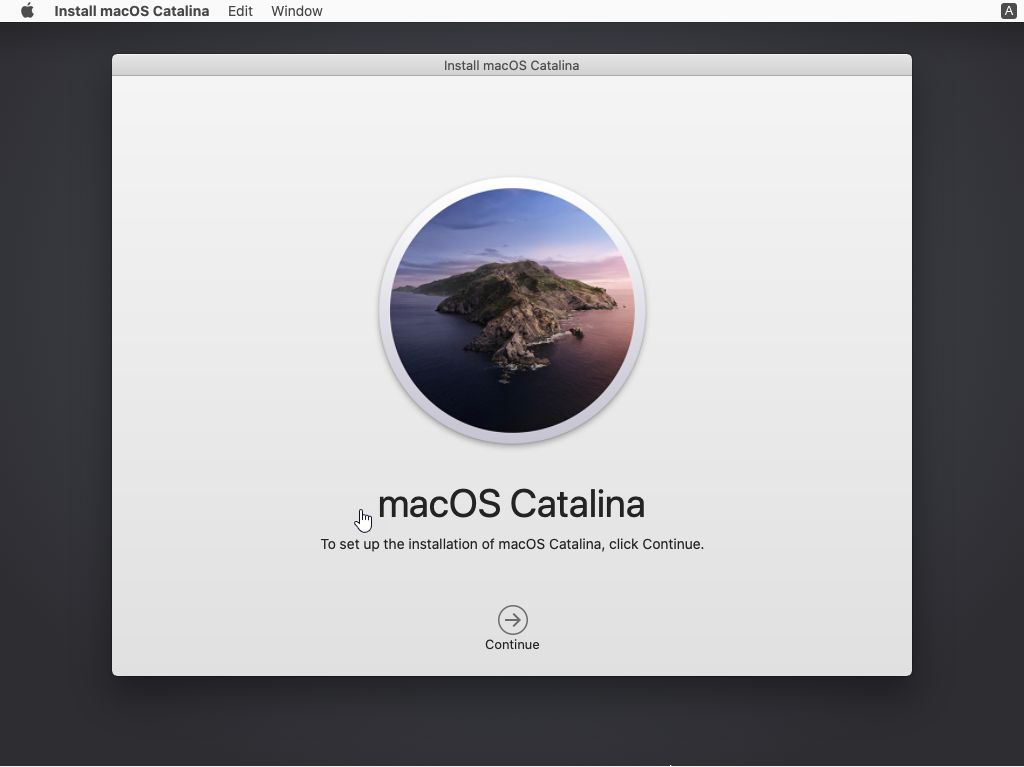
Click Continue on Install macOS Catalina screen.
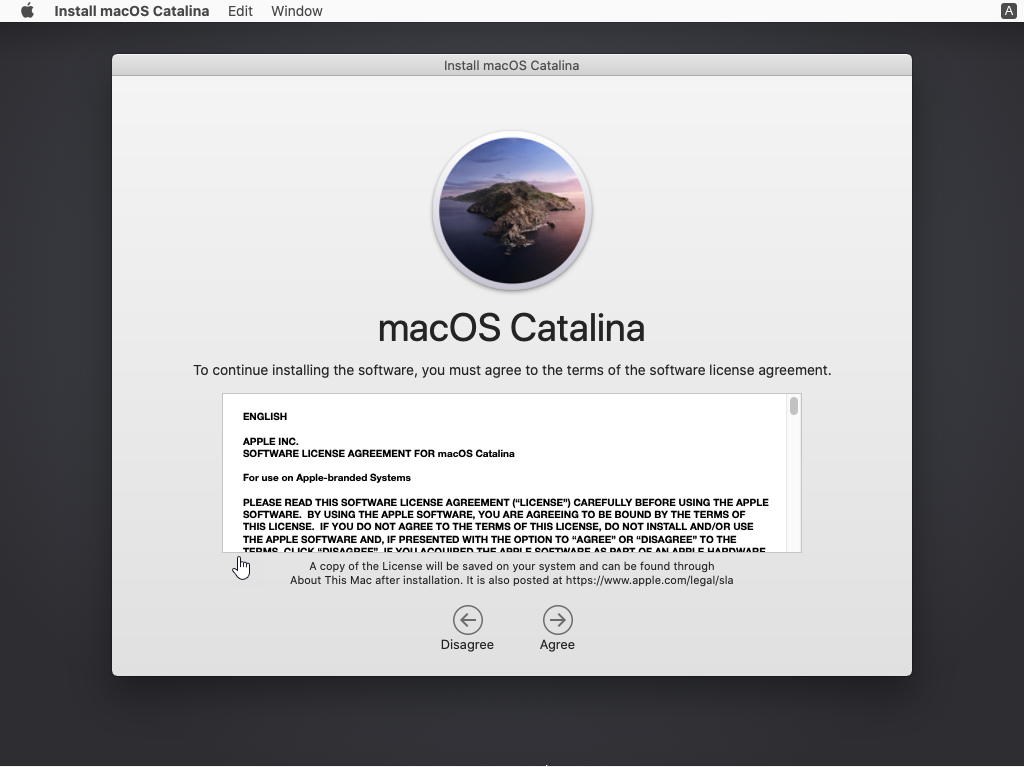
Agree to the macOS Catalina License agreement.
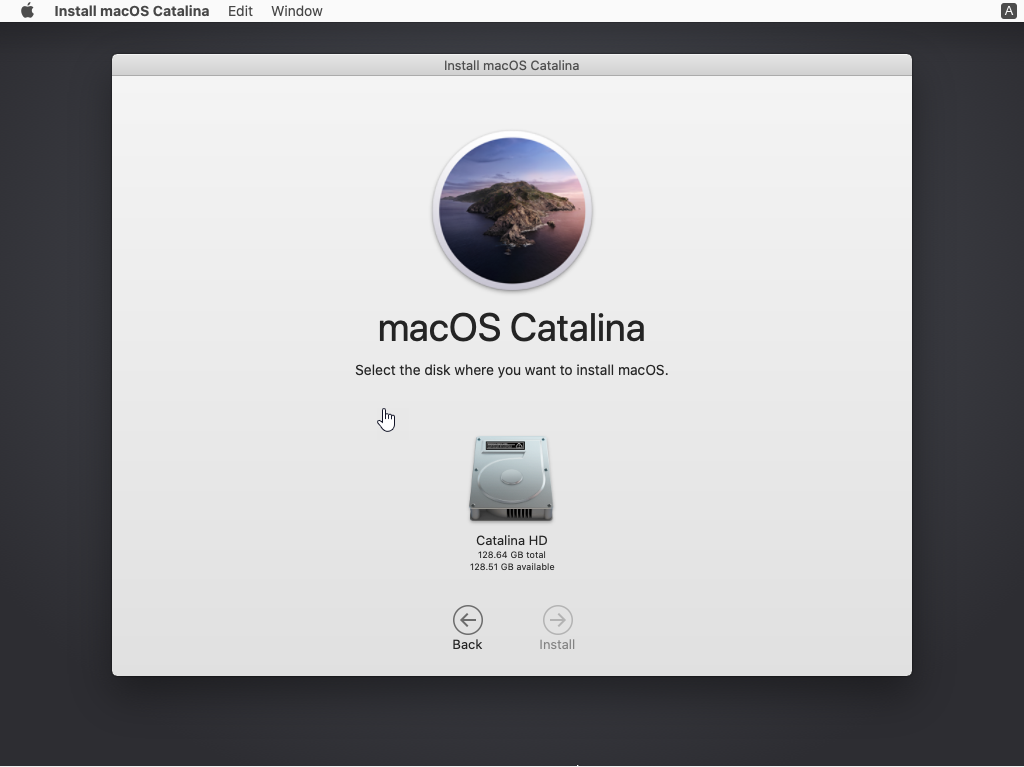
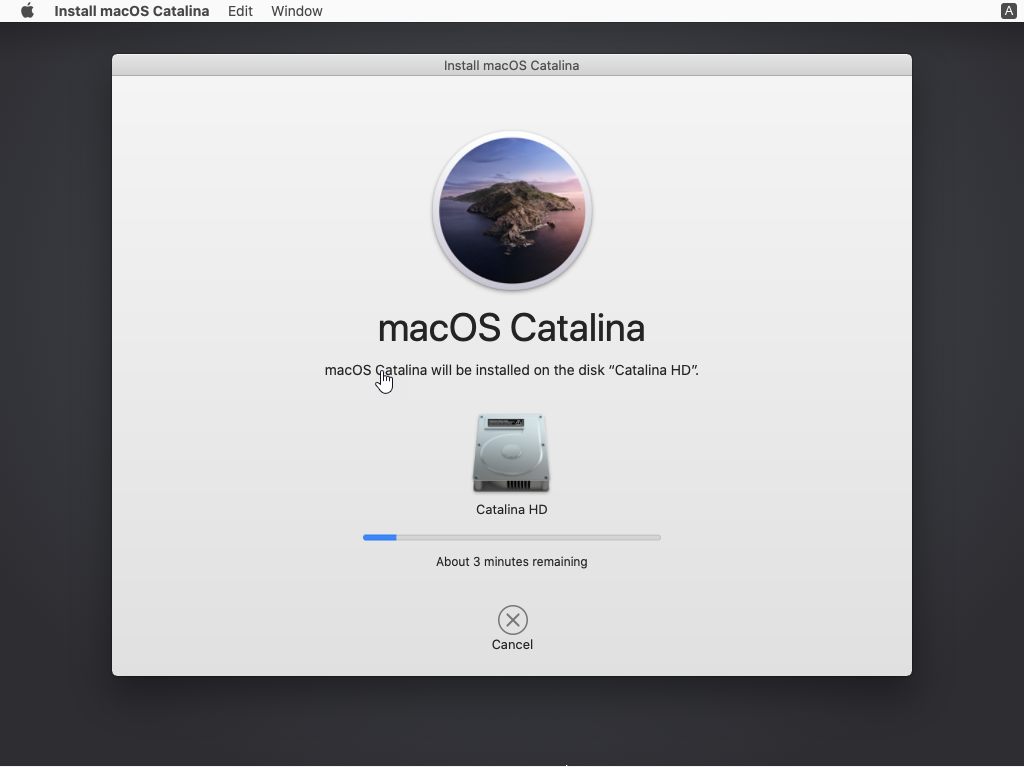
Select Catalina HD and click Install.
Wait for macOS Catalina will restart 2/3 times to complete the installation itself without you touching anything. It will take roughly 15-20 minutes depending on your system, be patient.
Complete Basic macOS Account Settings
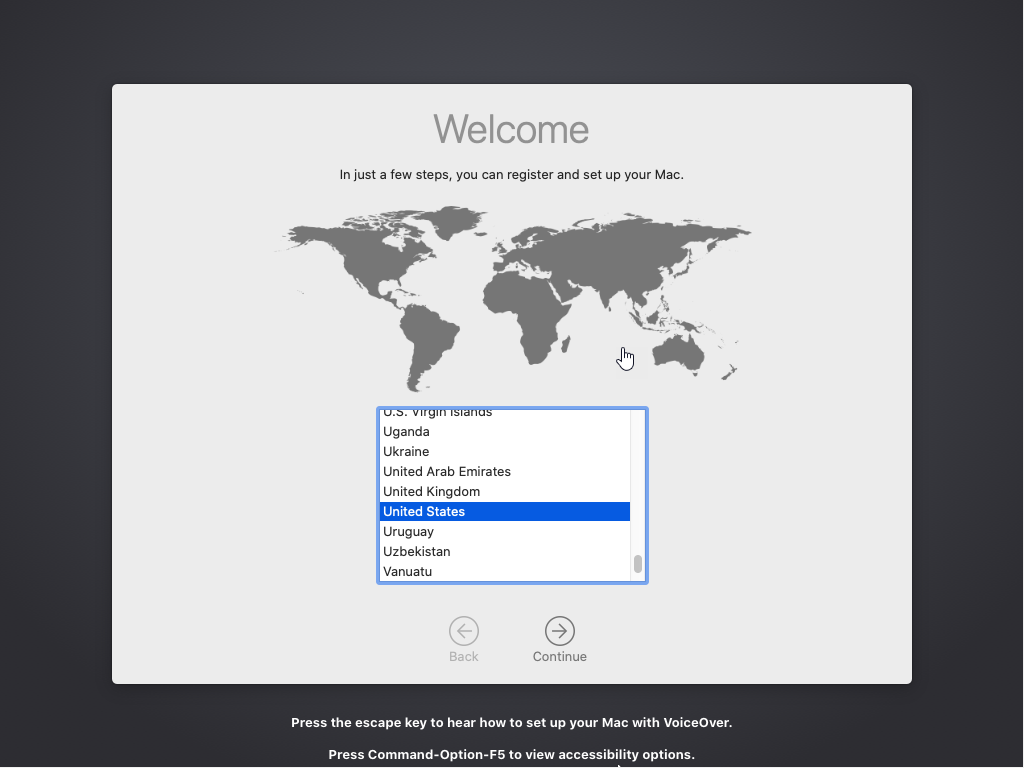
Once the installation part complete, the VM will reboot, and after the reboot, you should see macOS Catalina Welcome page. Complete the setup as needed.
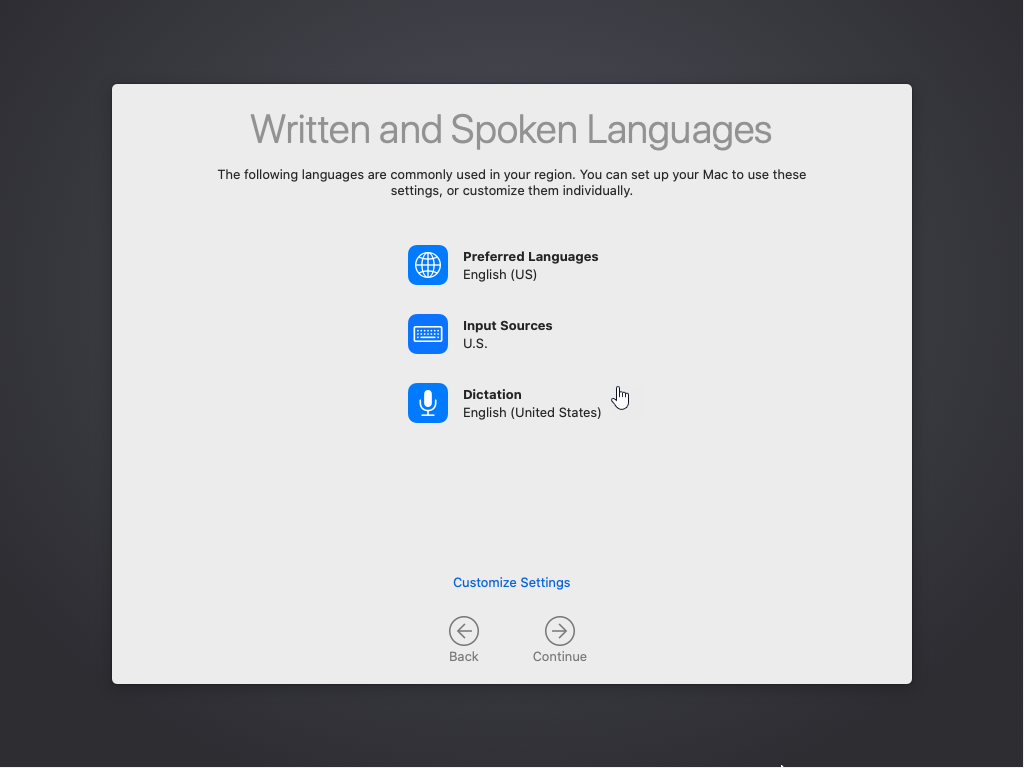
Continue the setup.

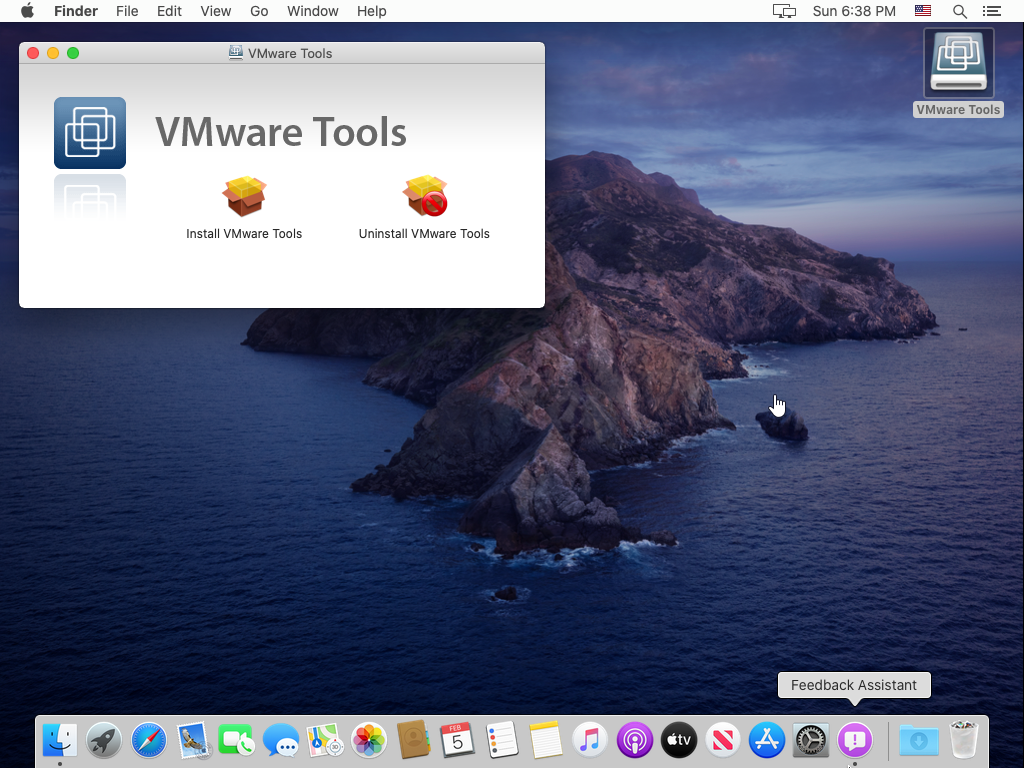
Install VMware Tools (Optional)
Download VMware Tools ISO
Click the link below to download the VMware tools for macOS Catalina.
Step #2. Attach the ISO to macOS Catalina
First, Start Vmware Player. Choose the MacOS VM. Click Settings. Change the CDROM to load the Vmware tools ISO. Click OK. Power on the macOS Catalina. Once logged in Open the Vmware Tool.
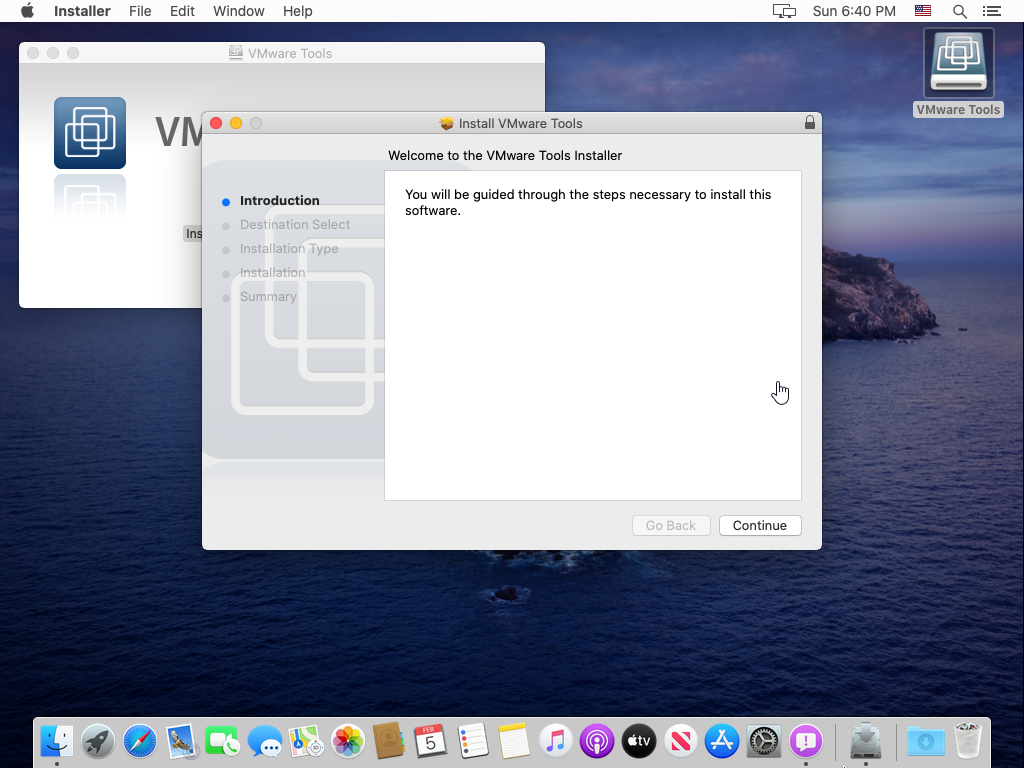
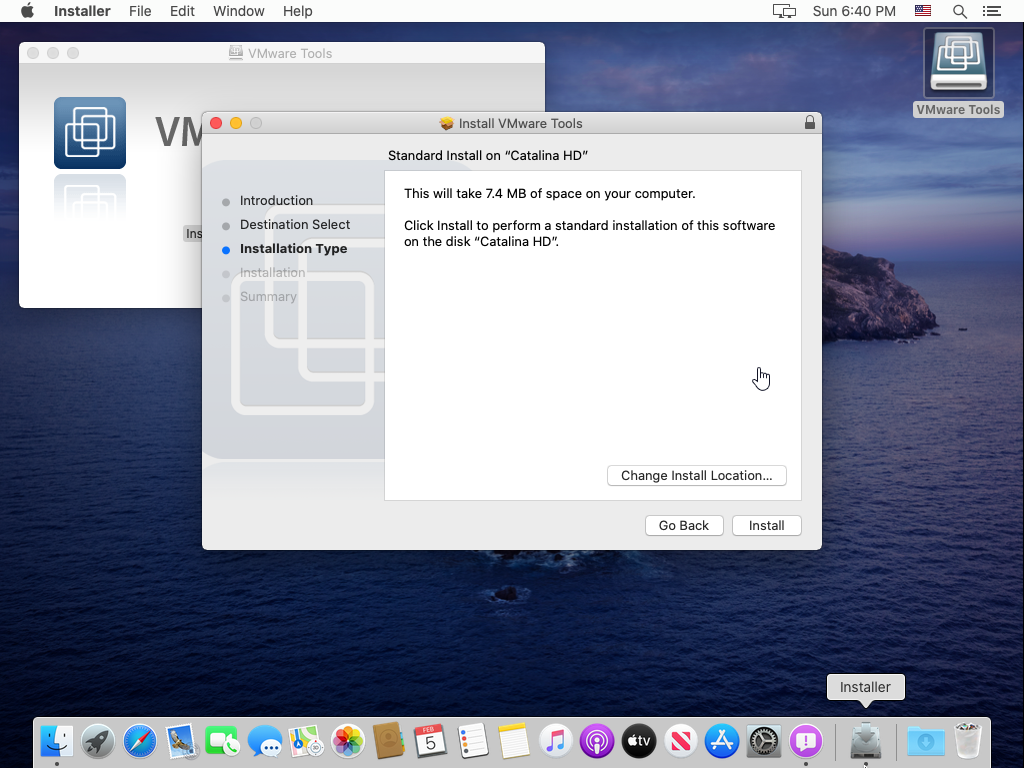
Choose Install
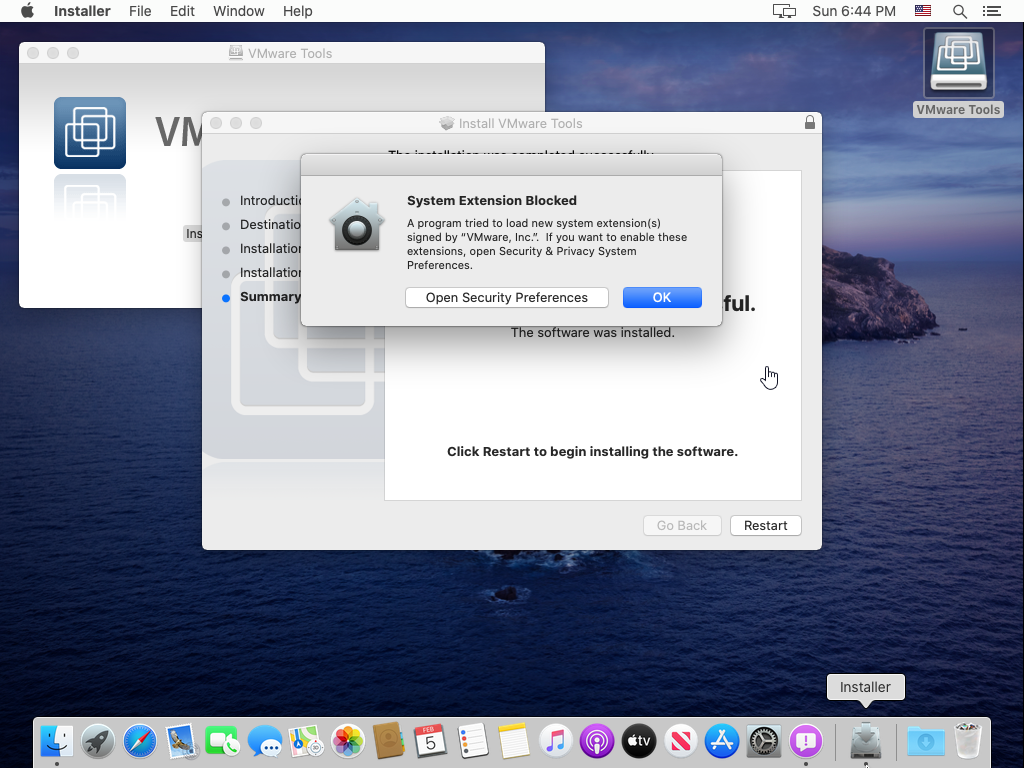
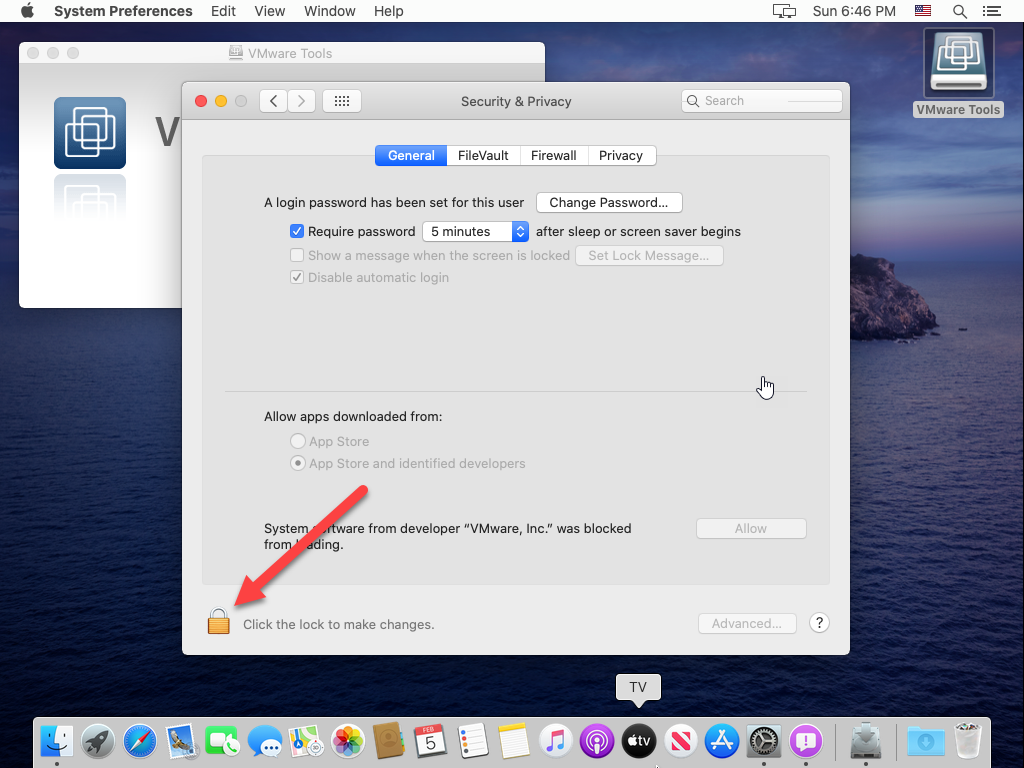
You will a pop-up System Extension Blocked. After the pop-up appears, click Open Security Preferences.
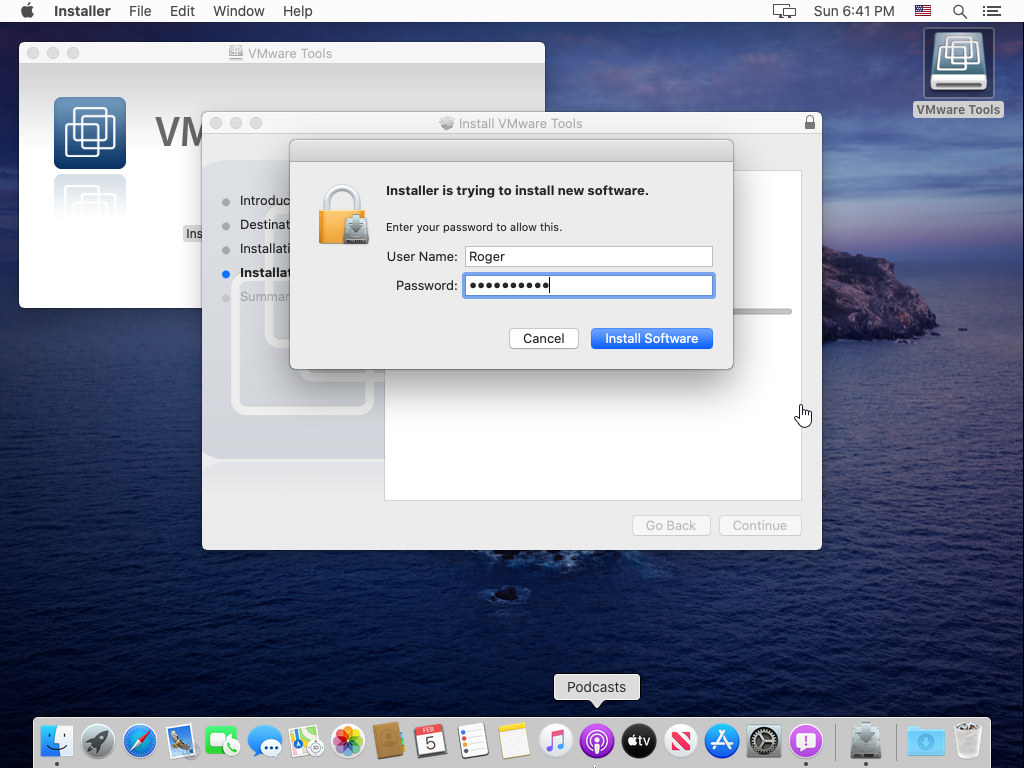
Click on the Padlock icon then type your password. It allows you to make changes.
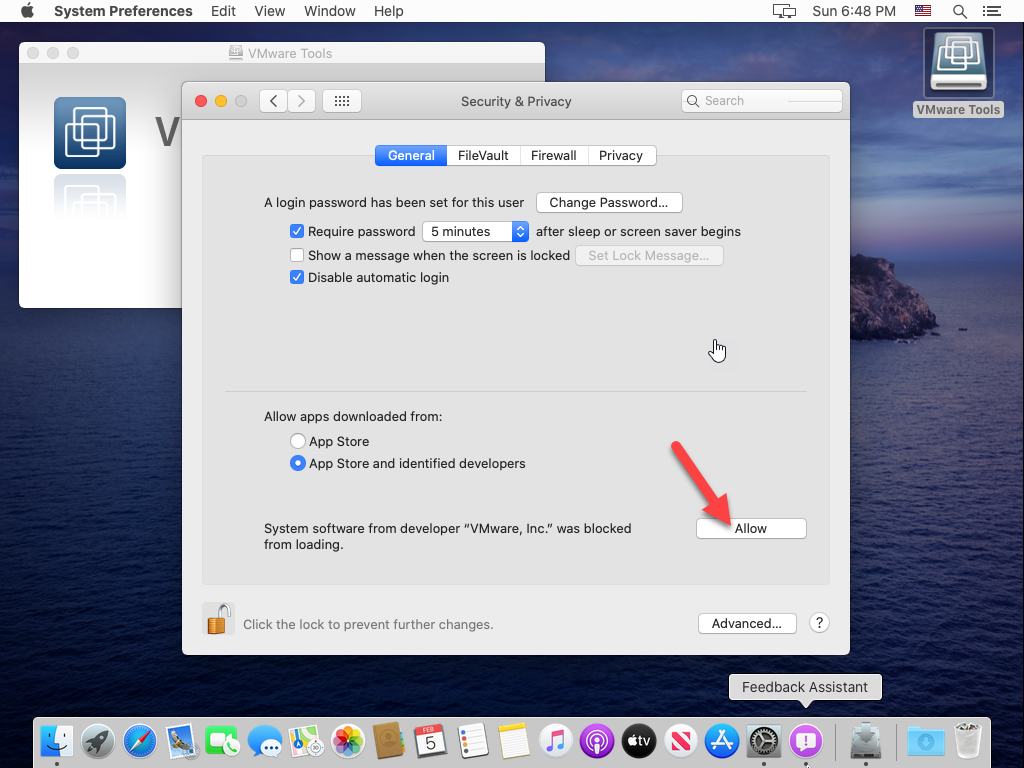
Click Allow to enable the VMware tools extension to be installed from the security & privacy window.
On the Legacy system Extension, click OK.
Click on OK again on the Security and Privacy windows.
Once the installation is successfully done, click the Restart button.
macOS Catalina VM will restart and after the restart login with your Username and Password.
You may see the same System Extension Blocked pop-up again. Click Open Security Preferences.
Click Allow again from the Security & Privacy window.
Restart your VM and test the enhanced features are working.
Installing VMware tools in CentOS involves the following steps:
Install the opem-vm-tools:
yum install open-vm-tools
Output:
================================================================================================================================================
 Package                             Arch                       Version                                       Repository                   Size
================================================================================================================================================
Installing:
 open-vm-tools                       x86_64                     10.1.5-3.el7                                  base                        663 k
Installing for dependencies:
 fuse                                x86_64                     2.9.2-8.el7                                   base                         85 k
 fuse-libs                           x86_64                     2.9.2-8.el7                                   base                         93 k
 libdnet                             x86_64                     1.12-13.1.el7                                 base                         31 k
 libicu                              x86_64                     50.1.2-15.el7                                 base                        6.9 M
 libmspack                           x86_64                     0.5-0.5.alpha.el7                             base                         64 k
 net-tools                           x86_64                     2.0-0.22.20131004git.el7                      base                        305 k
 pciutils                            x86_64                     3.5.1-2.el7                                   base                         93 k
 xmlsec1                             x86_64                     1.2.20-7.el7_4                                updates                     177 k
 xmlsec1-openssl                     x86_64                     1.2.20-7.el7_4                                updates                      76 k

Transaction Summary
================================================================================================================================================
Install  1 Package (+9 Dependent packages)

Total download size: 8.4 M
Installed size: 29 M
Reboot the server:
shutdown -r now
Install with with the Vmware CD:
Login to ESXi.
Select the VM from the Virtual Machine list.
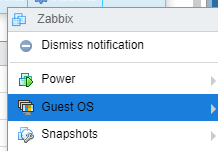
Click the actions wheel for the warning message:
Select Guest OS > Install Vmware Tools
Run the mount command with no arguments to determine whether your Linux distribution automatically mounted the VMware Tools virtual CD-ROM image.
If the CD-ROM device is mounted, the CD-ROM device and its mount point are listed as something like this:
/dev/cdrom on /mnt/cdrom type iso9660 (ro,nosuid,nodev)
If the VMware Tools virtual CD-ROM image is not mounted, mount the CD-ROM drive.
If a mount point directory does not already exist, create it.
mkdir /mnt/cdrom
Some Linux distributions use different mount point names. For example, on some distributions the mount point is /media/VMware Tools rather than /mnt/cdrom. Modify the command to reflect the conventions that your distribution uses.
Mount the CD-ROM drive.
mount /dev/cdrom /mnt/cdrom
Some Linux distributions use different device names or organize the /dev directory differently. If your CD-ROM drive is not /dev/cdrom or if the mount point for a CD-ROM is not /mnt/cdrom, modify the command to reflect the conventions that your distribution uses.
Change to a working directory (for example, /tmp).
cd /tmp
Delete any previous vmware-tools-distrib directory before you install VMware Tools. The location of this directory depends on where you placed it during the previous installation. Often this directory is placed in /tmp/vmware-tools-distrib.
List the contents of the mount point directory and note the filename of the VMware Tools tar installer.
ls /mnt/cdrom/
manifest.txt  run_upgrader.sh  VMwareTools-10.1.0-4449150.tar.gz  vmware-tools-upgrader-32  vmware-tools-upgrader-64
Uncompress the installer.
tar zxpf /mnt/cdrom/VMwareTools-10.1.0-4449150.tar.gz
The value x.x.x is the product version number, and yyyy is the build number of the product release.
If you attempt to install a tar installation over an RPM installation, or the reverse, the installer detects the previous installation and must convert the installer database format before continuing.
If necessary, unmount the CD-ROM image.
umount /dev/cdrom
If your Linux distribution automatically mounted the CD-ROM, you do not need to unmount the image.
Run the installer and configure VMware Tools.
cd vmware-tools-distrib
./vmware-install.pl
open-vm-tools packages are available from the OS vendor and VMware recommends
using open-vm-tools packages. See http://kb.vmware.com/kb/2073803 for more
information.
Usually, the vmware-config-tools.pl configuration file runs after the installer file finishes running. Respond to the prompts by pressing Enter to accept the default values, if appropriate for your configuration. Follow the instructions at the end of the script.
Depending on the features you use, these instructions can include restarting the X session, restarting networking, logging in again, and starting the VMware User process. You can alternatively reboot the guest operating system to accomplish all these tasks.
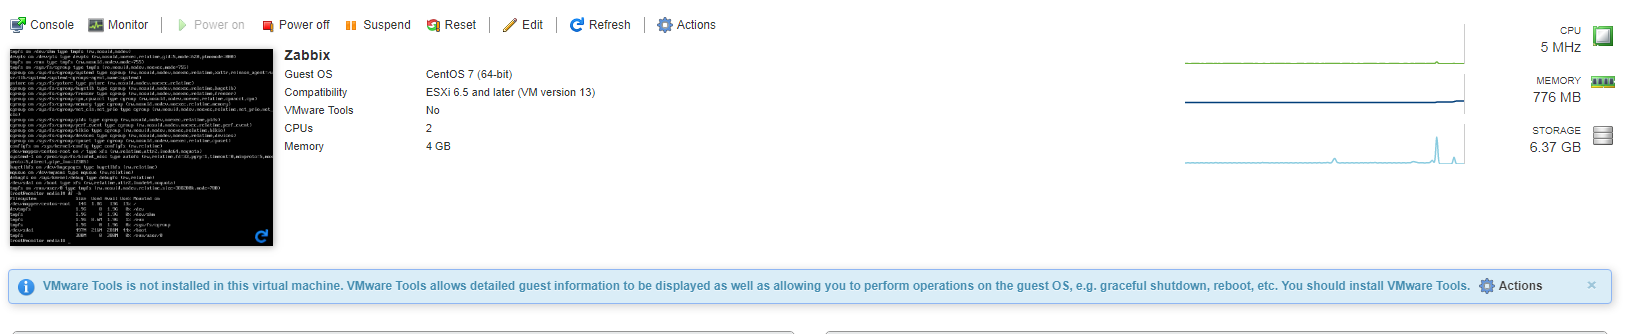
If you are using vCenter Server, the VMware Tools label on the Summary tab changes to OK.
How to find and Start/Stop VM on ESXI.
SSH to the ESXI server.
# esxcli vm process list
# esxcli vm process list
WebHost
   World ID: 35689
   Process ID: 0
   VMX Cartel ID: 35686
   UUID: 56 4d 72 7c da 4c 82 f1-9f 10 9c e3 d6 7d a4 9d
   Display Name: WebHost
   Config File: /vmfs/volumes/54c1dfef-00e03f4b-784e-6805ca0a3085/WebHost/WebHost.vmx

Windows
   World ID: 4150543
   Process ID: 0
   VMX Cartel ID: 4150542
   UUID: 56 4d 49 5f 12 7e 26 96-d8 31 37 05 21 64 5d 46
   Display Name: Windows
   Config File: /vmfs/volumes/54c1dfef-00e03f4b-784e-6805ca0a3085/Windows/Windows.vmx

Monitor
   World ID: 2487010
   Process ID: 0
   VMX Cartel ID: 2487009
   UUID: 56 4d 99 de b0 13 a1 76-bd 2d 95 8a be 25 35 39
   Display Name: Monitor
   Config File: /vmfs/volumes/54c1dfef-00e03f4b-784e-6805ca0a3085/Monitor/Monitor.vmx

Mail
   World ID: 2487029
   Process ID: 0
   VMX Cartel ID: 2487028
   UUID: 56 4d 4f 88 c8 bf a6 37-b5 5b 96 6f b4 23 c5 fb
   Display Name: Mail
   Config File: /vmfs/volumes/54c1dfef-00e03f4b-784e-6805ca0a3085/Mail/Mail.vmx
Stop a VM:
# esxcli vm process kill -t soft --world-id 4150543
Review to verify the VM is off:
 # esxcli vm process list
WebHost
   World ID: 35689
   Process ID: 0
   VMX Cartel ID: 35686
   UUID: 56 4d 72 7c da 4c 82 f1-9f 10 9c e3 d6 7d a4 9d
   Display Name: WebHost
   Config File: /vmfs/volumes/54c1dfef-00e03f4b-784e-6805ca0a3085/WebHost/WebHost.vmx

Monitor
   World ID: 2487010
   Process ID: 0
   VMX Cartel ID: 2487009
   UUID: 56 4d 99 de b0 13 a1 76-bd 2d 95 8a be 25 35 39
   Display Name: Monitor
   Config File: /vmfs/volumes/54c1dfef-00e03f4b-784e-6805ca0a3085/Monitor/Monitor.vmx

Mail
   World ID: 2487029
   Process ID: 0
   VMX Cartel ID: 2487028
   UUID: 56 4d 4f 88 c8 bf a6 37-b5 5b 96 6f b4 23 c5 fb
   Display Name: Mail
   Config File: /vmfs/volumes/54c1dfef-00e03f4b-784e-6805ca0a3085/Mail/Mail.vmx
How to start a Guest VM from Command line:
Get a list of VMs on a host using the command:
# vim-cmd vmsvc/getallvms
Vmid    Name                   File                       Guest OS          Version   Annotation
32     Monitor   [datastore1] Monitor/Monitor.vmx   centos64Guest           vmx-08
44     Mail      [datastore1] Mail/Mail.vmx         ubuntu64Guest           vmx-08
58     WebHost   [datastore1] WebHost/WebHost.vmx   centos64Guest           vmx-08
61     Plesk     [datastore1] Plesk/Plesk.vmx       centos64Guest           vmx-08
62     Windows   [datastore1] Windows/Windows.vmx   windows8Server64Guest   vmx-08
NOTE: The important fields will be the the VMID of your desired VM
Double check the power state of the VM:
vim-cmd vmsvc/power.getstate <vmid>
# vim-cmd vmsvc/power.getstate 62
Retrieved runtime info
Powered off
Start
vim-cmd vmsvc/power.on <vmid>
# vim-cmd vmsvc/power.on 62
Powering on VM:
Virtual machine loses network connectivity intermittently
In the Windows Event Viewer (Expand Windows Logs and select System), you see entries similar to:
Intel(R) 82574L Gigabit Network Connection Network link is disconnected
or
Intel(R) 82574L Gigabit Network Connection Network link has been established at 1Gbps full duplex
This issue would occur in these environments:
The virtual machine is Windows2012 or Windows 2012 R2
The virtual machine is using E1000 or E1000E driver
Cause
This issue occurs due to the driver bundled with Microsoft Windows 2012.
Resolution
VMware is investigating this issue with the partners.
Currently, there is no resolution
To work around this issue, use VMXNET3 instead of E1000 or E1000e driver.
Login to vShpere
File > New > Virtual Machine
Select Custom, choose all thedefaults
Select customize after creation
You don’t have development package for building kernel modules to match the kernel. It is required to build 3rd party modules such as vmware or graphics card drivers.
There is a package called kernel-devel. This package provides kernel headers and makefiles sufficient to build modules against the kernel package.
Login as the root, and use yum command to install the same:
# yum install kernel-devel
So I rebuilt the modules with these commands
vmware-modconfig –console –build-mod vmmon
vmware-modconfig –console –build-mod vmnet
vmware-modconfig –console –build-mod vmci
Then reloaded the modules
# modprobe vmmon

# modprobe vmnet

# modprobe vmci
Now I get;
[root@gemini ~]# service vmware restart

Stopping VMware services:

   VMware Authentication Daemon                            [  OK  ]

   VM communication interface socket family                [  OK  ]

   Virtual machine communication interface                 [  OK  ]

   Virtual machine monitor                                 [  OK  ]

   Blocking file system                                    [  OK  ]

Starting VMware services:

   Virtual machine monitor                                 [  OK  ]

   Virtual machine communication interface                 [  OK  ]

   VM communication interface socket family                [  OK  ]

   Blocking file system                                    [  OK  ]

   Virtual ethernet                                        [  OK  ]

   VMware Authentication Daemon                            [  OK  ]

   Shared Memory Available                                 [  OK  ]