Steps

Purchase this yubico key (YubiKey 5 NFC): https://support.yubico.com/hc/en-us/articles/360013656980-YubiKey-5-NFC

Follow this article first: https://support.yubico.com/hc/en-us/articles/360016649039-Enabling-the-Yubico-PPA-on-Ubuntu

The OS I installed on was Ubuntu 21.04

# lsb_release -a
No LSB modules are available.
Distributor ID:	Ubuntu
Description:	Ubuntu 21.04
Release:	21.04
Codename:	hirsute

Next, this article: https://support.yubico.com/hc/en-us/articles/360016649099-Ubuntu-Linux-Login-Guide-U2F

The original installation of zpool was from a POPOS 20 install. After Installing a new Ubuntu system over the top of POPOS, the zpool was not listed. Here are the steps to restore the zpool.

Install zfsutils

# apt install zfsutils-linux

When trying to import, I received an error:

# zpool import
   pool: myzpool
     id: 13464327419314907931
  state: ONLINE
status: The pool was last accessed by another system.
 action: The pool can be imported using its name or numeric identifier and
	the '-f' flag.
   see: https://openzfs.github.io/openzfs-docs/msg/ZFS-8000-EY
 config:

	myzpool                                         ONLINE
	  mirror-0                                      ONLINE
	    ata-WDC_WD2002FFSX-68PF8N0_WD-WCC6N7PRY8JJ  ONLINE
	    ata-WDC_WD2002FFSX-68PF8N0_WD-WCC6N7PRY1VJ  ONLINE
root@skynet:/home/rogerp# zpool import myzpool
cannot import 'myzpool': pool was previously in use from another system.
Last accessed by pop-os (hostid=b5f0b0a0) at Tue May  4 04:27:02 2021
The pool can be imported, use 'zpool import -f' to import the pool.

Import using the -f flag and the pool name that was created originally.

# zpool import -f myzpool

Resources:

https://openzfs.github.io/openzfs-docs/msg/ZFS-8000-EY/

https://support.surfshark.com/hc/en-us/articles/360017418334-How-to-set-up-Surfshark-VPN-on-Linux-

Useful Commands

Start VPN

# sudo surfshark-vpn

Use this command to print all Surfshark commands in the terminal:

# surfshark-vpn help

Check your connectivity status:

# surfshark-vpn status

Disconnect from Surfshark VPN:

# sudo surfshark-vpn down

Quick-connect to your Optimal location:

# sudo surfshark-vpn attack

To log out of the client:

# sudo surfshark-vpn forget

To connect to a MultiHop location:

# sudo surfshark-vpn multi

To uninstall Surfshark:

# sudo apt-get remove surfshark-vpn

This error show up in Exim mail logs when trying to send email from cpanel email:

2021-01-19 21:38:46 failed to expand "${lookup{$domain}cdb{/etc/domain_secondary_mx_ips.cdb}}" while checking a list: lookup of "test.com" gave DEFER: cdb: corrupt cdb file /etc/domain_secondary_mx_ips.cdb (too short).

Issue: The issue was occurring due to corruption in the /etc/domain_ secondary_mx_ips.cdb file. Check for an extra digit at the IP address.

[23:11:03 user root@94146958 ~]cPs# /scripts/dumpcdb /etc/domain_secondary_mx_ips.cdb
$VAR1 = {
'actionforex.com' => '192.15.25.502'
};
[/bash]

To address this issue, login and run:

# /usr/local/cpanel/bin/servers_queue queue build_secondary_mx_cache, which recreated the file with the correct IP-address information:
[/bash]

[23:30:51 user root@94146958 ~]cPs# /scripts/dumpcdb /etc/domain_secondary_mx_ips.cdb
$VAR1 = {
'actionforex.com' => '192.15.25.50'
};
[/bash]

Check with a test email and view of the file to ensure the correct IP address.

Install Brave Browser on Ubuntu, MintDebian 9+, Ubuntu 14.04+ and Mint 17+

If you get gnutls_handshake() errors after adding the Brave repository on Debian 9, you may need to uninstall old conflicting packages.

# sudo apt install apt-transport-https curl gnupg
# curl -s https://brave-browser-apt-release.s3.brave.com/brave-core.asc | sudo apt-key --keyring /etc/apt/trusted.gpg.d/brave-browser-release.gpg add -
# echo "deb [arch=amd64] https://brave-browser-apt-release.s3.brave.com/ stable main" | sudo tee /etc/apt/sources.list.d/brave-browser-release.list
# sudo apt update
# sudo apt install brave-browser

If you emails are not arriving or you are getting delays or no receipt, here are ways to help improve email delivery.

Google

To keep important email messages out of your Gmail spam folder, you should do the following steps.

  1. Add the sender email address to your Google Contacts. When you add a sender’s email address to your contacts, it tells Google you want to receive email from that sender. This method does not guarantee messages from the desired sender won’t be sent to spam, but it’s an easy way to make it more likely the desired email will arrive in your inbox.
  2. Create a filter rule to prevent messages from specific senders going into the spam folder. This adding to the whitelist or safe sender list. Also, If an email message is already in your spam folder, you can use an option to train the Gmail spam filter to not send those messages to your spam folder.

Add a Gmail Contact on the Computer and on Android or IOS App.

On your computer, go to contacts.google.com, at the top left corner, select Create contact, enter the contact’s information, including the sender email address, select save in the bottom right corner.

On your Android phone or tablet, open the Contacts app, at the bottom right, tap add, enter the contact’s name and email address. Make sure you save the contact to the correct account. Next to your email account, tap the Down arrow and then select the account that will receive the email messages you’re whitelisting. When you’re finished, tap Save.

Create a filter rule to keep desired email out of spam

Gmail’s filters provide a lot of useful ways to manage your email and one of those ways is to set a rule to prevent email from a specific email address from going to your spam folder. Filters are the closest thing Gmail has to a “safe sender” or “whitelist”.

Filters can only be created and modified from the online web version of Gmail, so you’ll need to go to your computer to complete the following.

Open the Gmail website from your computer. In the search box at the top, select the Down arrow.

In the From field, enter the sender email address. At the bottom of the search window, click Create filter.

Select Never send it to Spam. Click Create filter.

Mark an email as Not Spam

On your computer, open the Gmail website and on the left, select More then find Spam.

Open the desired email message. At the top of the page, select “Not spam”. The message will be moved to your inbox.

If you’re an email sender having trouble sending email to Gmail recipients, visit the Gmail Postmaster Tools website. Source: https://www.whitelist.guide/gmail/

Outlook, Office365

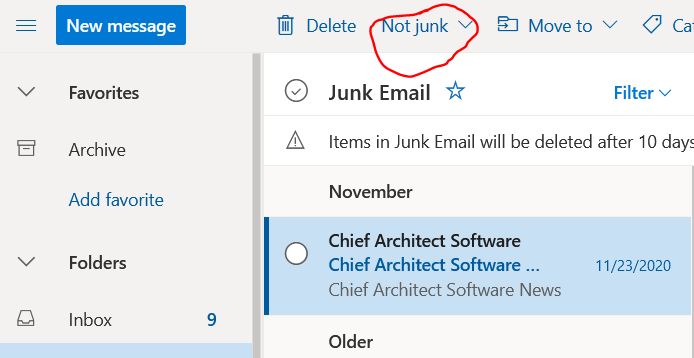
Add an address to your Contacts and the Safe Senders list to ensure you’ll always receive their messages. Email addresses in the Safe Senders List are never treated as junk email. If lands in your junk email folder, you can mark it as “not junk” to teach Outlook that you want to receive that type of email.

Safe Senders list

By default, email addresses in your Outlook contacts are considered safe senders by the Junk Email Filter, but you can change this setting. Email messages from safe senders are never moved to the Junk E-mail folder.

To add people to your Safe Senders List (web), do the following:

Select the Settings icon (gear icon), select View all Outlook settings,


Select Mail, Select Junk email, Enter the sender email address, Hit Enter on Keyboard > Save.
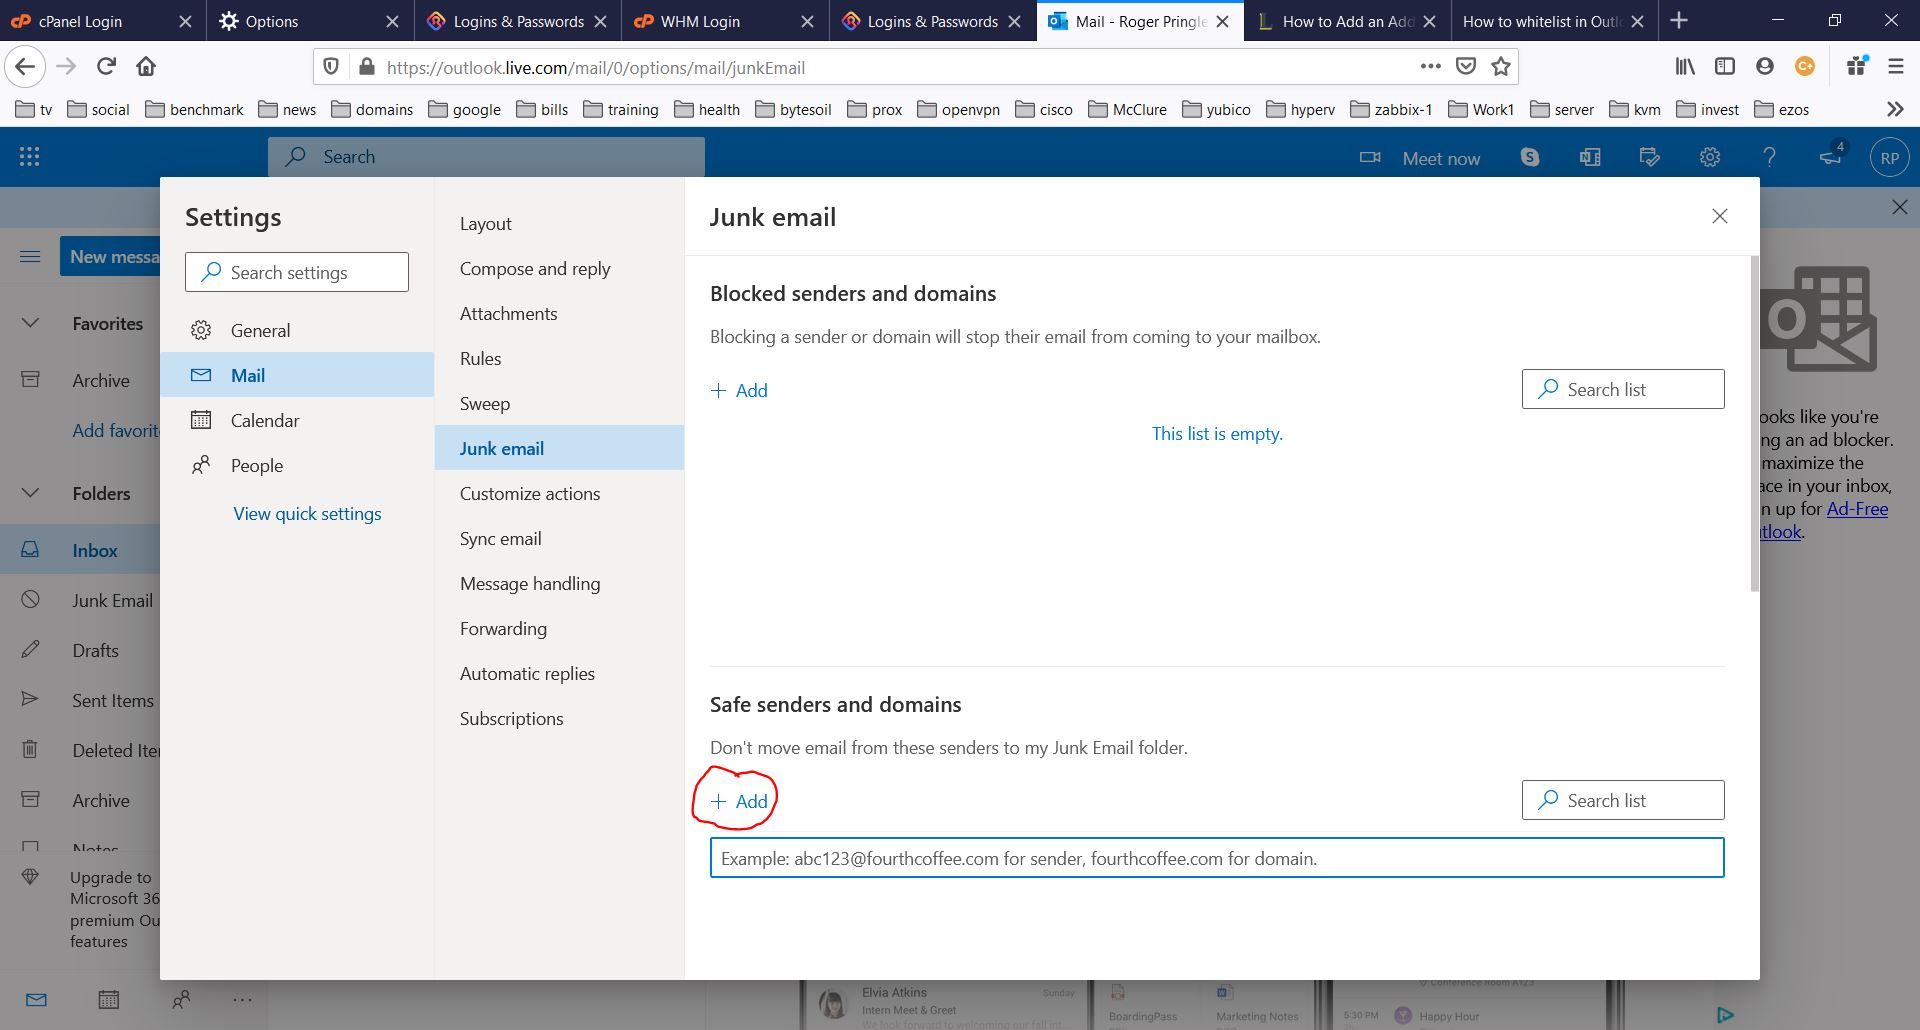
Check blocked senders and safe senders list

Select Settings > View all Outlook settings, Select Mail, and then select Junk email, If you see the sender’s address listed under “Blocked senders and domains”, select the address and then select Remove > Save.

Mark a message as “not junk”. In your Outlook.com folder list, select the Junk Email folder and look for the missing email. Right-click the desired email and then select Mark as not junk. The message will automatically be moved to your inbox.
 

Other resources:
https://www.lifewire.com/add-address-domain-safe-senders-outlook-1173760
whitelist.guide

Installation
https://pve.proxmox.com/wiki/Installation

How to manage USB devices
https://pve.proxmox.com/wiki/USB_Devices_in_Virtual_Machines

Command Line tools
https://pve.proxmox.com/wiki/Command_line_tools

I reciently install proxmox on Debian and the install failed. Here is the error:

 apt-get update
Hit:1 http://download.proxmox.com/debian/pve buster InRelease
Hit:2 http://security.debian.org/debian-security buster/updates InRelease
Hit:3 http://deb.debian.org/debian buster InRelease
Hit:4 http://deb.debian.org/debian buster-updates InRelease
Reading package lists... Done
root@px1:~# apt dist-upgrade
Reading package lists... Done
Building dependency tree
Reading state information... Done
Calculating upgrade... Done
0 upgraded, 0 newly installed, 0 to remove and 0 not upgraded.
2 not fully installed or removed.
After this operation, 0 B of additional disk space will be used.
Do you want to continue? [Y/n] y
Setting up pve-manager (6.3-3) ...
Job for pveproxy.service failed because the control process exited with error code.
See "systemctl status pveproxy.service" and "journalctl -xe" for details.
dpkg: error processing package pve-manager (--configure):
 installed pve-manager package post-installation script subprocess returned error exit status 1
dpkg: dependency problems prevent configuration of proxmox-ve:
 proxmox-ve depends on pve-manager; however:
  Package pve-manager is not configured yet.

dpkg: error processing package proxmox-ve (--configure):
 dependency problems - leaving unconfigured
Errors were encountered while processing:
 pve-manager
 proxmox-ve
E: Sub-process /usr/bin/dpkg returned an error code (1)

The resolution was to make sure the network was set to a static IP:

# The primary network interface
allow-hotplug enp4s0
iface enp4s0 inet static
address 192.168.0.16
        netmask 255.255.255.0
        gateway 192.168.0.1
        # dns-* options are implemented by the resolvconf package, if installed
        dns-nameservers 1.1.1.1 1.0.0.1
        dns-search geekdecoder.com

The second issue was to make sure there was a host entry. Comment out the 127.0.0.1 and make sure to use the full host.domain host as below. Leaving out the end “px1” caused the issue.

#127.0.1.1      px1.geekdecoder.com     px1
192.168.0.16    px1.geekdecoder.com     px1