How to copy to local directory with the same name.
# rsync -avzh /myzpool/backups /media/usb/usb-backup/
Linux, Windows, Software Tips, Articles and Hacks
How to copy to local directory with the same name.
# rsync -avzh /myzpool/backups /media/usb/usb-backup/
Error on update with Debian 11 and MySql 8. On apt update…
# apt-get update
Get:1 http://repo.mysql.com/apt/debian bullseye InRelease [12.9 kB]
Hit:2 http://deb.debian.org/debian bullseye InRelease
Get:3 http://deb.debian.org/debian bullseye-updates InRelease [39.4 kB]
Hit:4 http://security.debian.org/debian-security bullseye-security InRelease
Err:1 http://repo.mysql.com/apt/debian bullseye InRelease
  The following signatures couldn't be verified because the public key is not available: NO_PUBKEY 467B942D3A79BD29
Hit:5 https://repo.zabbix.com/zabbix/6.0/ubuntu focal InRelease
Fetched 52.2 kB in 1s (85.6 kB/s)
Reading package lists... Done
W: An error occurred during the signature verification. The repository is not updated and the previous index files will be used. GPG error: http://repo.mysql.com/apt/debian bullseye InRelease: The following signatures couldn't be verified because the public key is not available: NO_PUBKEY 467B942D3A79BD29
W: Failed to fetch http://repo.mysql.com/apt/debian/dists/bullseye/InRelease  The following signatures couldn't be verified because the public key is not available: NO_PUBKEY 467B942D3A79BD29
W: Some index files failed to download. They have been ignored, or old ones used instead.
Now Run…
# sudo apt-get clean
# sudo apt-key adv --keyserver pgp.mit.edu --recv-keys 3A79BD29
Warning: apt-key is deprecated. Manage keyring files in trusted.gpg.d instead (see apt-key(8)).
Executing: /tmp/apt-key-gpghome.7TRQcyvu7f/gpg.1.sh --keyserver pgp.mit.edu --recv-keys 3A79BD29
gpg: key 467B942D3A79BD29: public key "MySQL Release Engineering <mysql-build@oss.oracle.com>" imported
gpg: Total number processed: 1
gpg:               imported: 1
Then update
# sudo apt-get update
Get:1 http://repo.mysql.com/apt/debian bullseye InRelease [12.9 kB]
Hit:2 http://deb.debian.org/debian bullseye InRelease
Hit:3 http://deb.debian.org/debian bullseye-updates InRelease
Hit:4 http://security.debian.org/debian-security bullseye-security InRelease
Hit:5 https://repo.zabbix.com/zabbix/6.0/ubuntu focal InRelease
Get:6 http://repo.mysql.com/apt/debian bullseye/mysql-8.0 Sources [942 B]
Get:7 http://repo.mysql.com/apt/debian bullseye/mysql-apt-config amd64 Packages [567 B]
Get:8 http://repo.mysql.com/apt/debian bullseye/mysql-8.0 amd64 Packages [8,435 B]
Get:9 http://repo.mysql.com/apt/debian bullseye/mysql-tools amd64 Packages [6,904 B]
Fetched 29.7 kB in 1s (25.3 kB/s)
Reading package lists... Done
Proxmox VE is a complete open-source platform for enterprise virtualization. It’s a great application for virtualization that can compete with VMware, Hyper-V, KVM and Xen.
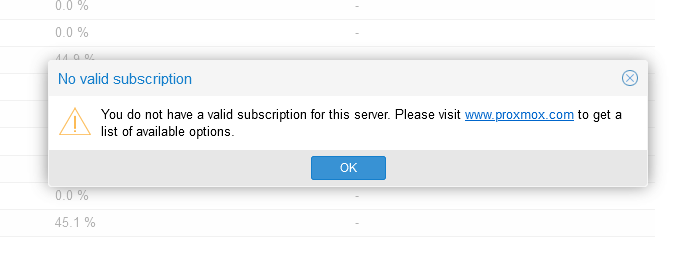
Once installed, you would login to the built-in web interface to manage VMs and containers. So, you have installed Proxmox and when you login you see a pop-up error message:

PVE provides free version. The Paid versions offer support and are highly recommended if you are using Proxmox for production. To see the paid version go here: https://www.proxmox.com/en/proxmox-ve/pricing
This pop-up can get a bit annoying. So, to remove we have researched and put together this article to remove it so we can be pop-up free.:
To start, backup the file “/usr/share/javascript/proxmox-widget-toolkit/proxmoxlib.js” with the following command:
cp /usr/share/javascript/proxmox-widget-toolkit/proxmoxlib.js /usr/share/javascript/proxmox-widget-toolkit/proxmoxlib.js.backup
Now lets edit the file.
nano /usr/share/javascript/proxmox-widget-toolkit/proxmoxlib.js
You can use crtl-w if using nano to search. Search for “No valid subscription.”

Look around for the following string:
if (res === null || res === undefined || !res || res
                        .data.status.toLowerCase() !== 'active') {
                        Ext.Msg.show({
                            title: gettext('No valid subscription'),
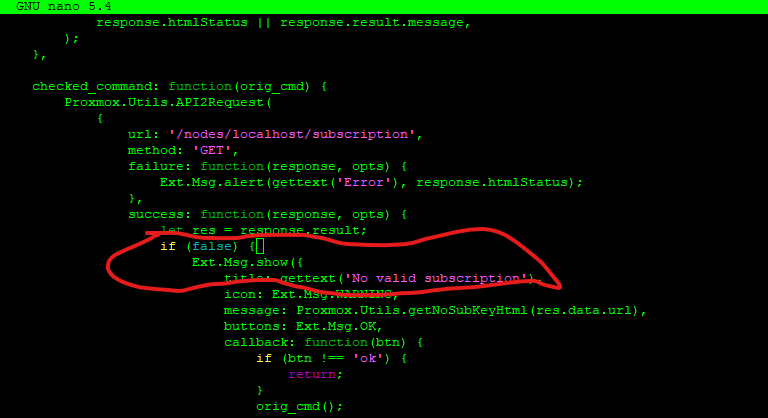
In this instance:
Also, you can check the line where the code starts with the following command Alt + Shift + # will give you line numbers. This will be on line 546 on Proxmox version 7.4-3 -Thank you RELLEK!
Replace the following string with the string below:
if (res === null || res === undefined || !res || res
                        .data.status.toLowerCase() !== 'active') {
Replace with this:
if (false) {
Here is what it should look like:

Now, restart Proxmox service:
systemctl restart pveproxy.service
Log out of Proxmox, clear the browser cache and restart the browser then login again. The popup should be gone.
Switching Between Desktop Environments
To switch between desktop environments on a Debian based distro run the following command:
sudo update-alternatives --config x-session-manager
Then you should be presented with the desktop environments you have installed on your system so you can choose one of them:
There are 7 choices for the alternative x-session-manager (providing /usr/bin/x-session-manager).
Selection Path Priority Status
————————————————————
* 0 /usr/bin/mate-session 50 auto mode
1 /usr/bin/cinnamon-session 50 manual mode
2 /usr/bin/gnome-session 50 manual mode
3 /usr/bin/mate-session 50 manual mode
4 /usr/bin/startplasma-x11 40 manual mode
5 /usr/bin/startxfce4 50 manual mode
6 /usr/bin/xfce4-session 40 manual mode
7 /usr/libexec/gnome-flashback-metacity 40 manual mode
Press
update-alternatives: using /usr/bin/gnome-session to provide /usr/bin/x-session-manager (x-session-manager) in manual mode
Then you can fill in the number corresponding to the desktop environment that you want and press enter.
Then you can logout and log back in, and the desktop launched should be the one that you selected.
In Ubuntu 21.04, you will not see and files at /etc/network/interfaces. Also, in checking /etc/neteplan/01-network-manager-all.yaml there is a message:
# Let NetworkManager manage all devices on this system
network:
  version: 2
  renderer: NetworkManager
Change to static IP address if you use Ubuntu as a server. The interface name [enp1s0] is different on each environment, replace it to your own one.
Rename to disable default setting
# mv /etc/netplan/00-installer-config.yaml /etc/netplan/00-installer-config.yaml.org
Create new
root@localhost:~# vi /etc/netplan/01-netcfg.yaml
Edits:
network:
  ethernets:
    # interface name
    enp1s0:
      dhcp4: no
      # IP address/subnet mask
      addresses: [192.168.0.45/24]
      # default gateway
      gateway4: 192.168.0.1
      nameservers:
        # name server to bind
        addresses: [8.8.8.8,1.1.1.1]
      dhcp6: no
  version: 2
# apply changes
root@localhost:~# netplan apply
Check networking
root@localhost:~# ip addr

1: lo: <LOOPBACK,UP,LOWER_UP> mtu 65536 qdisc noqueue state UNKNOWN group default qlen 1000
    link/loopback 00:00:00:00:00:00 brd 00:00:00:00:00:00
    inet 127.0.0.1/8 scope host lo
       valid_lft forever preferred_lft forever
    inet6 ::1/128 scope host
       valid_lft forever preferred_lft forever
2: enp1s0: <BROADCAST,MULTICAST,UP,LOWER_UP> mtu 1500 qdisc fq_codel state UP group default qlen 1000
    link/ether 52:54:00:37:5a:11 brd ff:ff:ff:ff:ff:ff
    inet 10.0.0.30/24 brd 10.0.0.255 scope global enp1s0
       valid_lft forever preferred_lft forever
    inet6 fe80::5054:ff:fe37:5a11/64 scope link
       valid_lft forever preferred_lft forever
Fail2ban is an intrusion prevention software framework that protects computer servers from primarily brute-force attacks, banning bad user agents, banning URL scanners, and much more.
A vulnerability in Apache Log4j, a widely used logging package for Java has been found. The vulnerability, which can allow an attacker to execute arbitrary code by sending crafted log messages, has been identified as CVE-2021-44228 and given the name Log4Shell. It was first reported privately to Apache on November 24 and was patched with version 2.15.0 of Log4j on December 9. It affects Apache Struts, Apache Solr, Apache Druid, Elasticsearch, Apache Dubbo, and VMware vCenter. Since then, it has been disclosed that in certain non-default conditions, the original patch was incomplete; this was designated as CVE-2021-45046 and a new version of Log4j, 2.16.0, has been released.
The installation of a supported Proxmox VE server should be done via bare-metal ISO installer. In some cases it makes sense to install Proxmox VE on top of a running Debian Bullseye 64-bit, especially if you want a custom partition layout. For this How-To any official Bullseye installation medium should work.
For this Demo, I am installing 3 KVM VM’s. As you can do VM nesting. Also, you can do this on Vmware or Hyper V. Here is the Architecture.

ScreenFetch and Neofetch ares a system information tools designed primarily for Bash Shell but function with other shell environment as well. The tools are smart enough to auto-detect the Linux distribution you are using and generate the ASCII logo of the distribution with certain valuable information to the right of logo. They are also cool to look at on login.
Install clamav
$ sudo apt-get install clamav clamav-daemon
Install this script to run a scan daily. Change the varables as needed.
#!/bin/bash
LOGFILE="/var/log/clamav/clamav-$(date +'%Y-%m-%d').log";
EMAIL_MSG="Please see the log file attached.";
EMAIL_FROM="clamav-daily@example.com";
EMAIL_TO="username@example.com";
DIRTOSCAN="/var/www /etc /root /home";

for S in ${DIRTOSCAN}; do
 DIRSIZE=$(du -sh "$S" 2>/dev/null | cut -f1);

 echo "Starting a daily scan of "$S" directory.
 Amount of data to be scanned is "$DIRSIZE".";

 clamscan -ri "$S" >> "$LOGFILE";

 # get the value of "Infected lines"
 MALWARE=$(tail "$LOGFILE"|grep Infected|cut -d" " -f3);

 # if the value is not equal to zero, send an email with the log file attached
 if [ "$MALWARE" -ne "0" ];then
 # using heirloom-mailx below
 echo "$EMAIL_MSG"|mail -a "$LOGFILE" -s "Malware Found" -r "$EMAIL_FROM" "$EMAIL_TO";
 fi
done

exit 0