Removes all but config files:

$ sudo apt-get remove nginx nginx-common

or remove everything:

$ sudo apt-get purge nginx nginx-common

After using any of the above commands, use this in order to remove dependencies used by nginx which are no longer required:

$ sudo apt-get autoremove

At first, let’s update the packages:

# apt update

Next, download MySQL from the offical page or use wget command: Get the repo package

wget https://dev.mysql.com/get/mysql-apt-config_0.8.20-1_all.deb
dpkg -i mysql-apt-config_0.8.20-1_all.deb
apt install  gnupg
dpkg -i mysql-apt-config_0.8.20-1_all.deb

When you attempt to install the package, it will ask you what product and version you want to install. Here you can select The MySQL version, Tools, Connectors (like MySQL Workbench), and preview packages. To select the version, hit the first option:

Select the version you will use. Once selected, it will bring you to the previous menu — press Ok button:

apt-get update

Install the MySQL Server using the command:

sudo apt-get install mysql-community-server

When apt finishes downloading, the installer will ask for a root password:

You have two options:

  1. Leave the password blank: the server will use unix sockets authentication. It means you can only access the server as a root user or as a user with sudo
  2. Set a password: the authentication method will be the same for other users.

If you set a password, the installer will ask which authentication plugin to use, strongly encrypted password (MySQL 8.x), or legacy method (MySQL 7.x and earlier).

Now, check the service status with systemctl:

systemctl status mysql.service
# systemctl status mysql.service
● mysql.service - MySQL Community Server
     Loaded: loaded (/lib/systemd/system/mysql.service; enabled; vendor preset: enabled)
     Active: active (running) since Wed 2021-11-17 09:57:21 CST; 38s ago
       Docs: man:mysqld(8)
             http://dev.mysql.com/doc/refman/en/using-systemd.html
    Process: 4290 ExecStartPre=/usr/share/mysql-8.0/mysql-systemd-start pre (code=exited, status=0/SUCCESS)
   Main PID: 4325 (mysqld)
     Status: "Server is operational"
      Tasks: 38 (limit: 2341)
     Memory: 358.6M
        CPU: 736ms
     CGroup: /system.slice/mysql.service
             └─4325 /usr/sbin/mysqld

Nov 17 09:57:19 redis-004 systemd[1]: Starting MySQL Community Server...
Nov 17 09:57:21 redis-004 systemd[1]: Started MySQL Community Server.

Next, run the command as a root user to safely configure the SQL service:

mysql_secure_installation

Output:

Securing the MySQL server deployment.
Enter password for user root:

VALIDATE PASSWORD COMPONENT can be used to test passwords
and improve security. It checks the strength of password
and allows the users to set only those passwords which are
secure enough. Would you like to setup VALIDATE PASSWORD component?

Press y|Y for Yes, any other key for No:
Using existing password for root.
Change the password for root ? ((Press y|Y for Yes, any other key for No) :

 ... skipping.
By default, a MySQL installation has an anonymous user,
allowing anyone to log into MySQL without having to have
a user account created for them. This is intended only for
testing, and to make the installation go a bit smoother.
You should remove them before moving into a production
environment.

Remove anonymous users? (Press y|Y for Yes, any other key for No) : y
Success.

Normally, root should only be allowed to connect from
'localhost'. This ensures that someone cannot guess at
the root password from the network.

Disallow root login remotely? (Press y|Y for Yes, any other key for No) : y
Success.

By default, MySQL comes with a database named 'test' that
anyone can access. This is also intended only for testing,
and should be removed before moving into a production
environment.

Remove test database and access to it? (Press y|Y for Yes, any other key for No) : y
 - Dropping test database...
Success.

 - Removing privileges on test database...
Success.

Reloading the privilege tables will ensure that all changes
made so far will take effect immediately.

Reload privilege tables now? (Press y|Y for Yes, any other key for No) : y
Success.

All done!

Login and Check the version

# mysql -uroot -p
Enter password:
Welcome to the MySQL monitor.  Commands end with ; or \g.
Your MySQL connection id is 12
Server version: 8.0.27 MySQL Community Server - GPL

Copyright (c) 2000, 2021, Oracle and/or its affiliates.

Oracle is a registered trademark of Oracle Corporation and/or its
affiliates. Other names may be trademarks of their respective
owners.

Type 'help;' or '\h' for help. Type '\c' to clear the current input statement.

Installing Nginx

sudo apt update
sudo apt install nginx
systemctl status nginx

Output:

nginx.service - A high performance web server and a reverse proxy server
     Loaded: loaded (/lib/systemd/system/nginx.service; enabled; vendor preset: enabled)
     Active: active (running) since Wed 2021-11-17 10:09:21 CST; 18s ago
       Docs: man:nginx(8)
    Process: 5735 ExecStartPre=/usr/sbin/nginx -t -q -g daemon on; master_process on; (code=exited, status=0/SUCCESS)
    Process: 5736 ExecStart=/usr/sbin/nginx -g daemon on; master_process on; (code=exited, status=0/SUCCESS)
   Main PID: 5951 (nginx)
      Tasks: 2 (limit: 2341)
     Memory: 5.9M
        CPU: 34ms
     CGroup: /system.slice/nginx.service
             ├─5951 nginx: master process /usr/sbin/nginx -g daemon on; master_process on;
             └─5954 nginx: worker process

Nov 17 10:09:21 redis-004 systemd[1]: Starting A high performance web server and a reverse proxy server...
Nov 17 10:09:21 redis-004 systemd[1]: nginx.service: Failed to parse PID from file /run/nginx.pid: Invalid argument
Nov 17 10:09:21 redis-004 systemd[1]: Started A high performance web server and a reverse proxy server.

Check Nginx by IP address – http://192.168.0.33

When using the Nginx web server, server blocks (similar to virtual hosts in Apache) can be used to encapsulate configuration details and host more than one domain on a single server. We will set up a domain called your_domain.

Install and configure Zabbix server for your platform
Install Zabbix repository

# wget https://repo.zabbix.com/zabbix/5.4/debian/pool/main/z/zabbix-release/zabbix-release_5.4-1+debian11_all.deb
# dpkg -i zabbix-release_5.4-1+debian11_all.deb
# apt update

Install Zabbix server, frontend, agent

# apt install zabbix-server-mysql zabbix-frontend-php zabbix-nginx-conf zabbix-sql-scripts zabbix-agent2

c. Create initial database
Run the following on your database host.

# mysql -uroot -p
password
mysql> create database zabbix character set utf8 collate utf8_bin;
mysql> create user zabbix@localhost identified by 'Stx12WsaB';
mysql> grant all privileges on zabbix.* to zabbix@localhost;
mysql> quit; 

On Zabbix server host import initial schema and data. You will be prompted to enter your newly created password.

# zcat /usr/share/doc/zabbix-sql-scripts/mysql/create.sql.gz | mysql -uzabbix -p zabbix

Configure the database for Zabbix server. Edit file /etc/zabbix/zabbix_server.conf

DBPassword=Stx12WsaB

Configure PHP for Zabbix frontend
Edit file /etc/zabbix/nginx.conf, uncomment and set ‘listen’ and ‘server_name’ directives.

nano /etc/zabbix/nginx.conf
# listen 80;
# server_name example.com;

Start Zabbix server and agent processes and make it start at system boot.

# systemctl restart zabbix-server zabbix-agent2 nginx php7.4-fpm
# systemctl enable zabbix-server zabbix-agent2 nginx php7.4-fpm

Configure Zabbix frontend
Connect to your newly installed Zabbix frontend: http://server_ip_or_name

Redis Sentinel is a dedicated process to automate and simplify the Redis replication failover and switchover.

In this article, we will start with 3 Nodes. We will have two Redis instances on two different nodes – 1 master and 1 replica (or slave). Sentinel will be co-located on those 2 nodes, plus an additional node on one of our web servers.

Normally you would co-locate a Redis instance on the web/application server and access it via localhost or through a UNIX socket file. This is the straightforward way to incorporate Redis into the application.

Read More

Generate a key:

# openssl rand -hex 32
c68a0164045a04ea2f1d821e3d3275e782d671a166613b3d81c07f99e3b92843

Configuring PSK for server-agent communication
On the hos, edit the zabbix agent file

nano /etc/zabbix/zabbix_agentd.conf

Add:

####### TLS-RELATED PARAMETERS #######
TLSConnect=psk
TLSAccept=psk
TLSPSKIdentity=PSK 001
TLSPSKFile=/etc/zabbix/zabbix.psk

Create the /etc/zabbix/zabbix.psk file:

echo c68a0164045a04ea2f1d821e3d3275e782d671a166613b3d81c07f99e3b92843 > /etc/zabbix/zabbix.psk

Restart the agent.

systemctl restart  zabbix-agent.service

Now you can test the connection using zabbix_get, for example:

$ zabbix_get -s 127.0.0.1 -k "system.cpu.load[all,avg1]" --tls-connect=psk \
            --tls-psk-identity="PSK 001" --tls-psk-file=/etc/zabbix/zabbix.psk

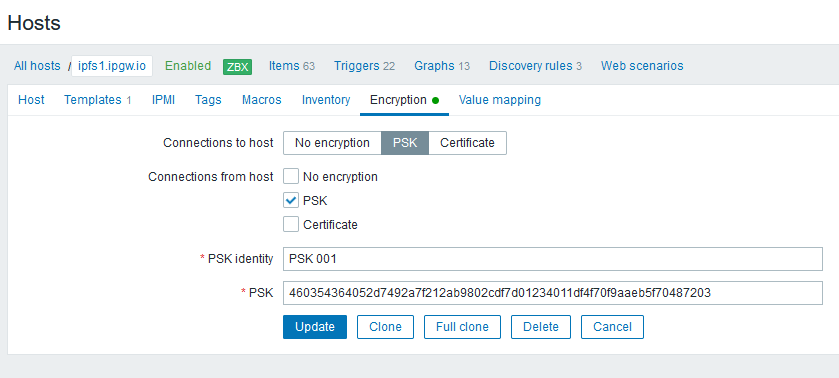
Configure PSK encryption for this agent in Zabbix frontend:

Go to: Configuration → Hosts
Select host and click on Encryption tab

Get the package for Debian 10 Buster:

wget https://repo.zabbix.com/zabbix/5.4/debian/pool/main/z/zabbix-release/zabbix-release_5.4-1%2Bdebian10_all.deb

Install the repo for Debian 10 Buster

dpkg -i zabbix-release_5.4-1+debian10_all.deb

Get the package for Debian 11 Bulleye

wget https://repo.zabbix.com/zabbix/5.4/debian/pool/main/z/zabbix-release/zabbix-release_5.4-1%2Bdebian11_all.deb

Install the repo for Debian 11 Bullseye

dpkg -i zabbix-release_5.4-1+debian11_all.deb
apt update
apt full-upgrade

For Agent 2

apt install zabbix-agent2

We now need to edit the configuration file to tell the agent where to find the server. Open /etc/zabbix/zabbix_agent2.conf in your preferred text editor and make the following changes to tell the agent which Zabbix servers are allowed to talk to it:

nano /etc/zabbix/zabbix_agent2.conf
Server=[IP or hostname of your Zabbix server]
ServerActive=[IP or hostname of your Zabbix server]

We also need to tell Zabbix the hostname of the system. This doesn’t have to be the actual hostname, it is the display name we will use within Zabbix for the system. Comment out the default value of Hostname=Zabbix server and replace it with the following:

HostnameItem=system.hostname

This will tell the agent to automatically populate the hostname value with the system hostname. You could just set the hostname within the configuration file. However, automatically populating it allows you to reuse the same configuration file across all your hosts, simplifying automation if you have a lot of hosts to monitor.

Start Agent 2

systemctl enable zabbix-agent2
sudo systemctl start zabbix-agent2

Add FW rule:

ufw allow from [Zabbix server IP] to any port 10050 proto tcp

Installing and configuring an OpenVPN server manually is not a simple task from my experience. For this reason, we will be using a script that lets you set up your own secure OpenVPN server in a matter of seconds.

Before downloading and running the script, note that the script will auto-detect your server’s private IP address. But you need to take note of your server public IP address especially if it is running behind NAT.

To find out your server’s public IP address, run the following wget command or dig command.

wget -qO - icanhazip.com

Or Dig.

Install DNSUtils

apt install dnsutils 
dig +short myip.opendns.com @resolver1.opendns.com

Now lets run the script (https://github.com/Nyr/openvpn-install)

wget https://git.io/vpn -O openvpn-install.sh && bash openvpn-install.sh

Output:

Welcome to this OpenVPN road warrior installer!

This server is behind NAT. What is the public IPv4 address or hostname?
Public IPv4 address / hostname [233.xxx.xxx.112]:

Which protocol should OpenVPN use?
   1) UDP (recommended)
   2) TCP
Protocol [1]: 1

What port should OpenVPN listen to?
Port [1194]:

Select a DNS server for the clients:
   1) Current system resolvers
   2) Google
   3) 1.1.1.1
   4) OpenDNS
   5) Quad9
   6) AdGuard
DNS server [1]: 3

Enter a name for the first client:
Name [client]: user1

OpenVPN installation is ready to begin.
Press any key to continue...
Hit:1 http://cdn-aws.deb.debian.org/debian bullseye InRelease
Hit:2 http://cdn-aws.deb.debian.org/debian bullseye-updates InRelease
Hit:3 http://cdn-aws.deb.debian.org/debian bullseye-backports InRelease
Hit:4 http://security.debian.org/debian-security bullseye-security InRelease
Reading package lists... Done
Building dependency tree... Done
Reading state information... Done
ca-certificates is already the newest version (20210119).
openssl is already the newest version (1.1.1n-0+deb11u3).
openssl set to manually installed.
Suggested packages:
  resolvconf openvpn-systemd-resolved
Recommended packages:
  easy-rsa
The following NEW packages will be installed:
  liblzo2-2 libpkcs11-helper1 openvpn
0 upgraded, 3 newly installed, 0 to remove and 0 not upgraded.
Need to get 703 kB of archives.
After this operation, 1990 kB of additional disk space will be used.
Get:1 http://cdn-aws.deb.debian.org/debian bullseye/main amd64 liblzo2-2 amd64 2.10-2 [56.9 kB]
Get:2 http://cdn-aws.deb.debian.org/debian bullseye/main amd64 libpkcs11-helper1 amd64 1.27-1 [                                                                                                                                              47.5 kB]
Get:3 http://cdn-aws.deb.debian.org/debian bullseye/main amd64 openvpn amd64 2.5.1-3 [599 kB]
Fetched 703 kB in 0s (23.7 MB/s)
Preconfiguring packages ...
Selecting previously unselected package liblzo2-2:amd64.
(Reading database ... 30816 files and directories currently installed.)
Preparing to unpack .../liblzo2-2_2.10-2_amd64.deb ...
Unpacking liblzo2-2:amd64 (2.10-2) ...
Selecting previously unselected package libpkcs11-helper1:amd64.
Preparing to unpack .../libpkcs11-helper1_1.27-1_amd64.deb ...
Unpacking libpkcs11-helper1:amd64 (1.27-1) ...
Selecting previously unselected package openvpn.
Preparing to unpack .../openvpn_2.5.1-3_amd64.deb ...
Unpacking openvpn (2.5.1-3) ...
Setting up liblzo2-2:amd64 (2.10-2) ...
Setting up libpkcs11-helper1:amd64 (1.27-1) ...
Setting up openvpn (2.5.1-3) ...
Created symlink /etc/systemd/system/multi-user.target.wants/openvpn.service → /lib/systemd/syst                                                                                                                                              em/openvpn.service.
Processing triggers for man-db (2.9.4-2) ...
Processing triggers for libc-bin (2.31-13+deb11u5) ...
..........................+++++
...............+++++
Generating a RSA private key
....................+++++
.....................................................+++++
writing new private key to '/etc/openvpn/server/easy-rsa/pki/685ac808/temp.d98e14bd'
-----
Using configuration from /etc/openvpn/server/easy-rsa/pki/685ac808/temp.ac88dfea
Check that the request matches the signature
Signature ok
The Subject's Distinguished Name is as follows
commonName            :ASN.1 12:'server'
Certificate is to be certified until Nov 14 00:34:28 2032 GMT (3650 days)

Write out database with 1 new entries
Data Base Updated
Generating a RSA private key
.................................+++++
..........................+++++
writing new private key to '/etc/openvpn/server/easy-rsa/pki/3e0fbb2b/temp.3a3753f7'
-----
Using configuration from /etc/openvpn/server/easy-rsa/pki/3e0fbb2b/temp.863607a1
Check that the request matches the signature
Signature ok
The Subject's Distinguished Name is as follows
commonName            :ASN.1 12:'user1'
Certificate is to be certified until Nov 14 00:34:29 2032 GMT (3650 days)

Write out database with 1 new entries
Data Base Updated
Using configuration from /etc/openvpn/server/easy-rsa/pki/e0fdb7ad/temp.8b5b7aba
2022-11-17 00:34:29 WARNING: Using --genkey --secret filename is DEPRECATED.  Use --genkey secr                                                                                                                                              et filename instead.
Created symlink /etc/systemd/system/multi-user.target.wants/openvpn-iptables.service → /etc/sys                                                                                                                                              temd/system/openvpn-iptables.service.
Created symlink /etc/systemd/system/multi-user.target.wants/openvpn-server@server.service → /li                                                                                                                                              b/systemd/system/openvpn-server@.service.

Finished!

The client configuration is available in: /root/user1.ovpn
New clients can be added by running this script again.

Now that the server is installed, download openVPN.

Download the OPVN file and connect.

Install Wireguard

sudo apt update
sudo apt install wireguard

Now that you have WireGuard installed, the next step is to generate a private and public keypair for the server.

Use the following umask command to ensure new directories and files (in your current terminal session only) get created with limited read and write permissions:

umask 077

Now you can proceed and create the private key for WireGuard using the following command:

wg genkey | sudo tee /etc/wireguard/private.key

The next step is to create the corresponding public key, which is derived from the private key. Use the following command to create the public key file:

sudo cat /etc/wireguard/private.key | wg pubkey | sudo tee /etc/wireguard/public.key

When you run the command you will again receive a single line of base64 enpred output, which is the public key for your WireGuard Server. Copy it somewhere for reference, since you will need to distribute the public key to any peer that connects to the server.

Choosing an IPv4 Range

You can choose any range of IP addresses from the following reserved blocks of addresses:

10.0.0.0 to 10.255.255.255 (10/8 prefix)
172.16.0.0 to 172.31.255.255 (172.16/12 prefix)
192.168.0.0 to 192.168.255.255 (192.168/16 prefix)

For the purposes of this tutorial we’ll use 10.8.0.0/24 as a block of IP addresses from the first range of reserved IPs.

Creating a WireGuard Server Configuration

Once you have the required private key and IP address(es), create a new configuration file using nano or your preferred editor by running the following command:

sudo nano /etc/wireguard/wg0.conf

Add the following lines to the file, substituting your private key in place of the highlighted base64_enpred_private_key_goes_here value, and the IP address(es) on the Address line. You can also change the ListenPort line if you would like WireGuard to be available on a different port:

nano /etc/wireguard/wg0.conf
[Interface]
PrivateKey = base64_enpred_private_key_goes_here
Address = 10.8.0.1/24, fd0d:86fa:c3bc::1/64
ListenPort = 51820
SaveConfig = true

Starting the WireGuard Server

sudo systemctl enable wg-quick@wg0.service

Now start the service:

sudo systemctl start wg-quick@wg0.service

Double check that the WireGuard service is active with the following command. You should see active (running) in the output:

sudo systemctl status wg-quick@wg0.service

Configuring a WireGuard Peer

You can add as many peers as you like to your VPN by generating a key pair and configuration using the following steps. If you add multiple peers to the VPN be sure to keep track of their private IP addresses to prevent collisions.

To configure the WireGuard Peer, ensure that you have the WireGuard package installed using the following apt commands. On the WireGuard peer run:

sudo apt update
sudo apt install wireguard

Creating the WireGuard Peer’s Key Pair

umask 077

create the private key for the peer using the following command:

wg genkey | sudo tee /etc/wireguard/private.key

Next use the following command to create the public key file:

sudo cat /etc/wireguard/private.key | wg pubkey | sudo tee /etc/wireguard/public.key

Copy it somewhere for reference, since you will need to distribute the public key to the WireGuard Server in order to establish an encrypted connection.

Creating the WireGuard Peer’s Configuration File

sudo nano /etc/wireguard/wg0.conf
[Interface]
PrivateKey = base64_enpred_peer_private_key_goes_here
Address = 10.8.0.2/24
[Peer]
PublicKey = The base64 enpred public key from the WireGuard Server.
AllowedIPs = 10.8.0.0/24
Endpoint = 159.65.164.142:51820

Adding the Peer’s Public Key to the WireGuard Server

Ensure that you have a copy of the base64 enpred public key for the WireGuard Peer by running:

sudo cat /etc/wireguard/public.key
7ybiQ/5mQijU87xa2ozd0a73Ix5ABQ9mzwCGX2OPrkI=

Now log into the WireGuard server, and run the following command:

sudo wg set wg0 peer 7ybiQ/5mQijU87xa2ozd0a73Ix5ABQ9mzwCGX2OPrkI= allowed-ips 10.8.0.2

If you would like to update the allowed-ips for an existing peer, you can run the same command again, but change the IP addresses. Multiple IP addresses are supported. For example, to change the WireGuard Peer that you just added to add an IP like 10.8.0.100 to the existing 10.8.0.2, you would run the following:

sudo wg set wg0 peer 7ybiQ/5mQijU87xa2ozd0a73Ix5ABQ9mzwCGX2OPrkI= allowed-ips 10.8.0.2,10.8.0.100

Once you have run the command to add the peer, check the status of the tunnel on the server using the wg command:

sudo wg
interface: wg0
public key: 2KOvl8HbUz1rxTJ/l46o/Yz4G34Q6rfFsmvOROu9HAY=
private key: (hidden)
listening port: 51820

peer: 7ybiQ/5mQijU87xa2ozd0a73Ix5ABQ9mzwCGX2OPrkI=
endpoint: 70.112.179.47:49999
allowed ips: 10.8.0.2/32
latest handshake: 10 minutes, 58 seconds ago
transfer: 20.80 KiB received, 25.17 KiB sent

Connecting the WireGuard Peer to the Tunnel

To start the tunnel, run the following on the WireGuard Peer:

sudo wg-quick up wg0

You will receive output like the following:

[#] ip link add wg0 type wireguard
[#] wg setconf wg0 /dev/fd/63
[#] ip -4 address add 10.8.0.2/24 dev wg0
[#] ip link set mtu 1420 up dev wg0

You can check the status of the tunnel on the peer using the wg command:

sudo wg

You can also check the status on the server again, and you will receive similar output.

Verify that your peer is using the VPN by using the ip route command.

ip route get 10.8.0.1
10.8.0.1 via 167.99.48.1 dev eth0 src 167.99.62.37 uid 0
cache

If your peer has a browser installed, you can also visit ipleak.net and ipv6-test.com to confirm that your peer is routing its traffic over the VPN.

Once you are ready to disconnect from the VPN on the peer, use the wg-quick command:

sudo wg-quick down wg0

Re:
https://www.digitalocean.com/community/tutorials/how-to-set-up-wireguard-on-ubuntu-20-04
https://www.wireguard.com/install/
https://linuxize.com/post/how-to-set-up-wireguard-vpn-on-debian-10/

Training Videos

A Technical Introduction To IPFS

IPFS Simply Explained. Let’s take a look at how IPFS works, how it can solve issue’s like censorship and if it would really work across multiple planets!

DEVCON1: IPFS – Juan Batiz-Benet