At first, let’s update the packages:

# apt update

Next, download MySQL from the offical page or use wget command: Get the repo package

wget https://dev.mysql.com/get/mysql-apt-config_0.8.20-1_all.deb
dpkg -i mysql-apt-config_0.8.20-1_all.deb
apt install  gnupg
dpkg -i mysql-apt-config_0.8.20-1_all.deb

When you attempt to install the package, it will ask you what product and version you want to install. Here you can select The MySQL version, Tools, Connectors (like MySQL Workbench), and preview packages. To select the version, hit the first option:

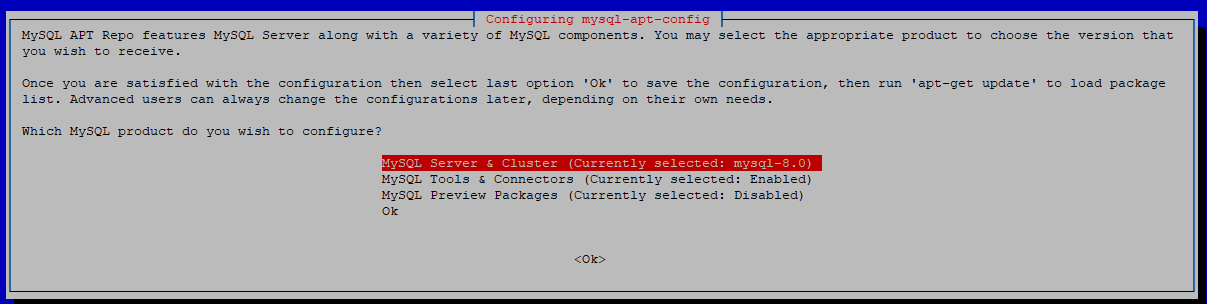
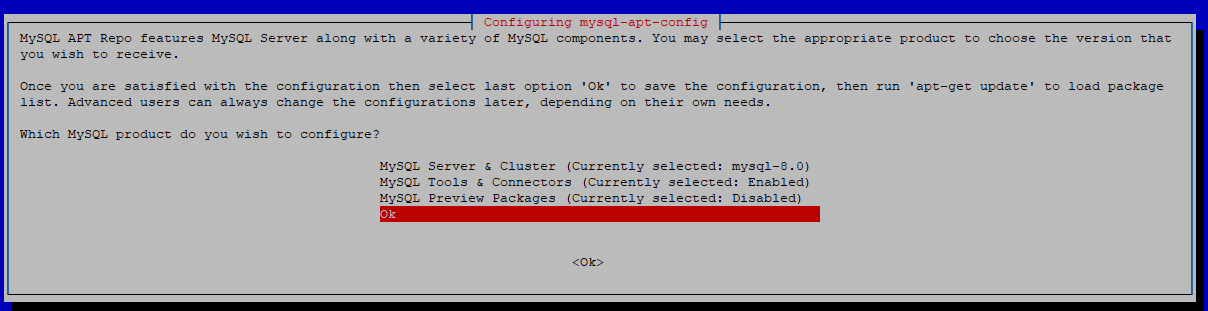
Select the version you will use. Once selected, it will bring you to the previous menu — press Ok button:

apt-get update

Install the MySQL Server using the command:

sudo apt-get install mysql-community-server

When apt finishes downloading, the installer will ask for a root password:

You have two options:

  1. Leave the password blank: the server will use unix sockets authentication. It means you can only access the server as a root user or as a user with sudo
  2. Set a password: the authentication method will be the same for other users.

If you set a password, the installer will ask which authentication plugin to use, strongly encrypted password (MySQL 8.x), or legacy method (MySQL 7.x and earlier).

Now, check the service status with systemctl:

systemctl status mysql.service
# systemctl status mysql.service
● mysql.service - MySQL Community Server
     Loaded: loaded (/lib/systemd/system/mysql.service; enabled; vendor preset: enabled)
     Active: active (running) since Wed 2021-11-17 09:57:21 CST; 38s ago
       Docs: man:mysqld(8)
             http://dev.mysql.com/doc/refman/en/using-systemd.html
    Process: 4290 ExecStartPre=/usr/share/mysql-8.0/mysql-systemd-start pre (code=exited, status=0/SUCCESS)
   Main PID: 4325 (mysqld)
     Status: "Server is operational"
      Tasks: 38 (limit: 2341)
     Memory: 358.6M
        CPU: 736ms
     CGroup: /system.slice/mysql.service
             └─4325 /usr/sbin/mysqld

Nov 17 09:57:19 redis-004 systemd[1]: Starting MySQL Community Server...
Nov 17 09:57:21 redis-004 systemd[1]: Started MySQL Community Server.

Next, run the command as a root user to safely configure the SQL service:

mysql_secure_installation

Output:

Securing the MySQL server deployment.
Enter password for user root:

VALIDATE PASSWORD COMPONENT can be used to test passwords
and improve security. It checks the strength of password
and allows the users to set only those passwords which are
secure enough. Would you like to setup VALIDATE PASSWORD component?

Press y|Y for Yes, any other key for No:
Using existing password for root.
Change the password for root ? ((Press y|Y for Yes, any other key for No) :

 ... skipping.
By default, a MySQL installation has an anonymous user,
allowing anyone to log into MySQL without having to have
a user account created for them. This is intended only for
testing, and to make the installation go a bit smoother.
You should remove them before moving into a production
environment.

Remove anonymous users? (Press y|Y for Yes, any other key for No) : y
Success.

Normally, root should only be allowed to connect from
'localhost'. This ensures that someone cannot guess at
the root password from the network.

Disallow root login remotely? (Press y|Y for Yes, any other key for No) : y
Success.

By default, MySQL comes with a database named 'test' that
anyone can access. This is also intended only for testing,
and should be removed before moving into a production
environment.

Remove test database and access to it? (Press y|Y for Yes, any other key for No) : y
 - Dropping test database...
Success.

 - Removing privileges on test database...
Success.

Reloading the privilege tables will ensure that all changes
made so far will take effect immediately.

Reload privilege tables now? (Press y|Y for Yes, any other key for No) : y
Success.

All done!

Login and Check the version

# mysql -uroot -p
Enter password:
Welcome to the MySQL monitor.  Commands end with ; or \g.
Your MySQL connection id is 12
Server version: 8.0.27 MySQL Community Server - GPL

Copyright (c) 2000, 2021, Oracle and/or its affiliates.

Oracle is a registered trademark of Oracle Corporation and/or its
affiliates. Other names may be trademarks of their respective
owners.

Type 'help;' or '\h' for help. Type '\c' to clear the current input statement.
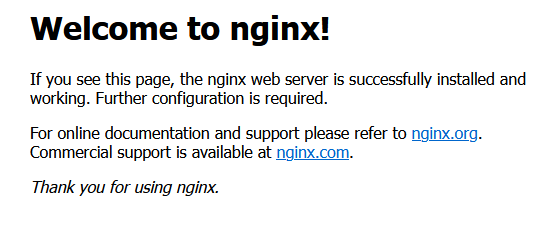
Installing Nginx

sudo apt update
sudo apt install nginx
systemctl status nginx

Output:

nginx.service - A high performance web server and a reverse proxy server
     Loaded: loaded (/lib/systemd/system/nginx.service; enabled; vendor preset: enabled)
     Active: active (running) since Wed 2021-11-17 10:09:21 CST; 18s ago
       Docs: man:nginx(8)
    Process: 5735 ExecStartPre=/usr/sbin/nginx -t -q -g daemon on; master_process on; (code=exited, status=0/SUCCESS)
    Process: 5736 ExecStart=/usr/sbin/nginx -g daemon on; master_process on; (code=exited, status=0/SUCCESS)
   Main PID: 5951 (nginx)
      Tasks: 2 (limit: 2341)
     Memory: 5.9M
        CPU: 34ms
     CGroup: /system.slice/nginx.service
             ├─5951 nginx: master process /usr/sbin/nginx -g daemon on; master_process on;
             └─5954 nginx: worker process

Nov 17 10:09:21 redis-004 systemd[1]: Starting A high performance web server and a reverse proxy server...
Nov 17 10:09:21 redis-004 systemd[1]: nginx.service: Failed to parse PID from file /run/nginx.pid: Invalid argument
Nov 17 10:09:21 redis-004 systemd[1]: Started A high performance web server and a reverse proxy server.

Check Nginx by IP address – http://192.168.0.33

When using the Nginx web server, server blocks (similar to virtual hosts in Apache) can be used to encapsulate configuration details and host more than one domain on a single server. We will set up a domain called your_domain.

Install and configure Zabbix server for your platform
Install Zabbix repository

# wget https://repo.zabbix.com/zabbix/5.4/debian/pool/main/z/zabbix-release/zabbix-release_5.4-1+debian11_all.deb
# dpkg -i zabbix-release_5.4-1+debian11_all.deb
# apt update

Install Zabbix server, frontend, agent

# apt install zabbix-server-mysql zabbix-frontend-php zabbix-nginx-conf zabbix-sql-scripts zabbix-agent2

c. Create initial database
Run the following on your database host.

# mysql -uroot -p
password
mysql> create database zabbix character set utf8 collate utf8_bin;
mysql> create user zabbix@localhost identified by 'Stx12WsaB';
mysql> grant all privileges on zabbix.* to zabbix@localhost;
mysql> quit; 

On Zabbix server host import initial schema and data. You will be prompted to enter your newly created password.

# zcat /usr/share/doc/zabbix-sql-scripts/mysql/create.sql.gz | mysql -uzabbix -p zabbix

Configure the database for Zabbix server. Edit file /etc/zabbix/zabbix_server.conf

DBPassword=Stx12WsaB

Configure PHP for Zabbix frontend
Edit file /etc/zabbix/nginx.conf, uncomment and set ‘listen’ and ‘server_name’ directives.

nano /etc/zabbix/nginx.conf
# listen 80;
# server_name example.com;

Start Zabbix server and agent processes and make it start at system boot.

# systemctl restart zabbix-server zabbix-agent2 nginx php7.4-fpm
# systemctl enable zabbix-server zabbix-agent2 nginx php7.4-fpm

Configure Zabbix frontend
Connect to your newly installed Zabbix frontend: http://server_ip_or_name

Generate a key:

# openssl rand -hex 32
c68a0164045a04ea2f1d821e3d3275e782d671a166613b3d81c07f99e3b92843

Configuring PSK for server-agent communication
On the hos, edit the zabbix agent file

nano /etc/zabbix/zabbix_agentd.conf

Add:

####### TLS-RELATED PARAMETERS #######
TLSConnect=psk
TLSAccept=psk
TLSPSKIdentity=PSK 001
TLSPSKFile=/etc/zabbix/zabbix.psk

Create the /etc/zabbix/zabbix.psk file:

echo c68a0164045a04ea2f1d821e3d3275e782d671a166613b3d81c07f99e3b92843 > /etc/zabbix/zabbix.psk

Restart the agent.

systemctl restart  zabbix-agent.service

Now you can test the connection using zabbix_get, for example:

$ zabbix_get -s 127.0.0.1 -k "system.cpu.load[all,avg1]" --tls-connect=psk \
            --tls-psk-identity="PSK 001" --tls-psk-file=/etc/zabbix/zabbix.psk

Configure PSK encryption for this agent in Zabbix frontend:

Go to: Configuration → Hosts
Select host and click on Encryption tab

Get the package for Debian 10 Buster:

wget https://repo.zabbix.com/zabbix/5.4/debian/pool/main/z/zabbix-release/zabbix-release_5.4-1%2Bdebian10_all.deb

Install the repo for Debian 10 Buster

dpkg -i zabbix-release_5.4-1+debian10_all.deb

Get the package for Debian 11 Bulleye

wget https://repo.zabbix.com/zabbix/5.4/debian/pool/main/z/zabbix-release/zabbix-release_5.4-1%2Bdebian11_all.deb

Install the repo for Debian 11 Bullseye

dpkg -i zabbix-release_5.4-1+debian11_all.deb
apt update
apt full-upgrade

For Agent 2

apt install zabbix-agent2

We now need to edit the configuration file to tell the agent where to find the server. Open /etc/zabbix/zabbix_agent2.conf in your preferred text editor and make the following changes to tell the agent which Zabbix servers are allowed to talk to it:

nano /etc/zabbix/zabbix_agent2.conf
Server=[IP or hostname of your Zabbix server]
ServerActive=[IP or hostname of your Zabbix server]

We also need to tell Zabbix the hostname of the system. This doesn’t have to be the actual hostname, it is the display name we will use within Zabbix for the system. Comment out the default value of Hostname=Zabbix server and replace it with the following:

HostnameItem=system.hostname

This will tell the agent to automatically populate the hostname value with the system hostname. You could just set the hostname within the configuration file. However, automatically populating it allows you to reuse the same configuration file across all your hosts, simplifying automation if you have a lot of hosts to monitor.

Start Agent 2

systemctl enable zabbix-agent2
sudo systemctl start zabbix-agent2

Add FW rule:

ufw allow from [Zabbix server IP] to any port 10050 proto tcp

When installing windows servers, there are constant alerts for:

Service “sppsvc” (Software Protection) is not running (startup type automatic delayed)
Service “RemoteRegistry” (Remote Registry) is not running (startup type automatic)
Service “MapsBroker” (Downloaded Maps Manager) is not running (startup type automatic delayed)
Service “IaasVmProvider” (IaasVmProvider) is not running (startup type automatic)
Service “WbioSrvc” (Windows Biometric Service) is not running (startup type automatic)
Service “VSS” (Volume Shadow Copy) is not running (startup type automatic)

Check Configuraton > Hosts > Server Name > Click on Discovery inline with server namre > Mounted filesystem discovery. Find “Keep lost resources period:. Change from 31d to 0d.

Reference: https://www.zabbix.com/documentation/3.2/manual/discovery/low_level_discovery#discovery_of_file_systems

this has to do with the “Specifically to the Keep lost resources period” (in days) parameter.

Explanation:
If an entity is discovered by LLD, and then is either: removed; lost; or excluded by a filter, it is still kept in Zabbix for the duration of time defined by the Keep Lost Resources parameter (default is 30 days).

So, the changes were recognized in the next LLD cycle (1 hour), but the filtered entity was then considered “lost”, so would be kept for an additional 30 days. If I had waited that long, it would have finally disappeared.

Fortunately you can set that parameter to “0” and it will disappear after the next LLD cycle. Best not to leave that setting at “0” though, so reset back to “30” after LLD.

Install Zabbix Agent

First, log into Zabbix agent instance and add the Zabbix repository with the following command:
Change version number for your zabbix version.


# wget http://repo.zabbix.com/zabbix/3.4/debian/pool/main/z/zabbix-release/zabbix-release_3.0-2+stretch_all.deb
# sudo dpkg -i zabbix-release_3.0-2+stretch_all.deb
# sudo apt-get update -y

Install the Zabbix agent by just running the following command:


# sudo apt-get install zabbix-agent -y

Once the Zabbix agent is installed, you will need to configure Zabbix agent to communicate with Zabbix server. You can do this by editing the Zabbix agent configuration file:


# sudo nano /etc/zabbix/zabbix_agentd.conf

Change the file as shown below:


    #Zabbix Server IP Address / Hostname

    Server=192.168.0.103

    #Zabbix Agent Hostname

    Hostname=zabbix-agent

Save and close the file when you are finished, then restart the Zabbix agent service and enable it to start on boot time with the following command:


# sudo systemctl restart zabbix-agent
# sudo systemctl enable zabbix-agent

Source: https://www.howtoforge.com/tutorial/install-zabbix-monitoring-server-and-agent-on-debian-9/

How to Install Zabbix Agent on Windows 2016 and avoid the: Windows error service could not be started. Error 1053: The service did not respond to the start or control request in a timely fashion.

Download – https://www.zabbix.com/download_agents

If you have the agent service installed incorrectly now, you can remove it by running “zabbix_agentd.exe –uninstall”.

cd c:\zabbix
zabbix_agentd.exe --uninstall

New Install

  1. Create directory C:\zabbix and place zabbix_agentd.exe and zabbix_agentd.win.conf files there.
  2. Edit the zabbix_agentd.win.conf file and set the values:

LogFile=C:\zabbix\zabbix_agentd.log
Server = IP address of your Zabbix server
# ListenPort = 10050 Leave it commented as is if you don’t change the defaults
ServerActive = IP of your Zabbix server
Hostname = computer that will be monitored as listed in the zabbix server hosts setup

3. Open command prompt and execute:

C:\zabbix\zabbix_agentd.exe --config C:\zabbix\zabbix_agentd.win.conf --install
zabbix_agentd.exe [5584]: service [Zabbix Agent] installed successfully
zabbix_agentd.exe [5584]: event source [Zabbix Agent] installed successfully


4. Start Windows service.

If you receive an error – Windows Agent – Error 1053 – that the service could not be started, run the uninstall above and restart the installation and make sure the files are in the correct directory and the config file changes match what you need.

Please find more info here: https://www.zabbix.com/documentation/4.0/manual/appendix/install/windows_agent

Adding a firewall rule in Windows.

Go to Windows Firewall. Add new rule. Choose port, TCP, Specific Local Ports. Add port 10050.