This article describes how to connect a PHP script to a MySQL database.
Category: MySQL
This article describes How to install LAMP (Linux, Apache, MySql-Maria, PHP) on Debian 11. The first step is to install a Devian server.
Mysql import error was shown when exporting a database from cPanel to a local server.
During the migration of a web application, I got the below error while restoring a database on another server. The collation id may differ based on the MySQL version.
Error message:
mysql backup.sql < backup.sql
ERROR 1253 (42000) at line 31: COLLATION 'utf8mb4_unicode_ci' is not valid for CHARACTER SET 'utf8'
The MySQL server running on the new server is an older version than the source server. The destination server doesn’t contain the required database collation.
To resolve, edit the database backup file in text editor and replace “utf8mb4_0900_ai_ci” with “utf8mb4_general_ci” and “CHARSET=utf8mb4” with “CHARSET=utf8“.
Replace the below string:
ENGINE=InnoDB DEFAULT CHARSET=utf8mb4 COLLATE=utf8mb4_0900_ai_ci;
with:
ENGINE=InnoDB DEFAULT CHARSET=utf8 COLLATE=utf8_general_ci;
Save your file and restore the database.
The Linux system users can use the sed command to replace text in files directly.
sed -i 's/utf8mb4_0900_ai_ci/utf8_general_ci/g' backup.sql
sed -i 's/CHARSET=utf8mb4/CHARSET=utf8/g' backup.sql
That it. after the above changes, the database was successfully restored!
Locate mariadb config files:
# cd /etc/mysql/mariadb.conf.d
# ls -la
total 28
drwxr-xr-x 2 root root 4096 Sep 23 22:52 .
drwxr-xr-x 4 root root 4096 Sep 30 18:20 ..
-rw-r--r-- 1 root root  575 Feb 17  2022 50-client.cnf
-rw-r--r-- 1 root root  231 Feb 17  2022 50-mysql-clients.cnf
-rw-r--r-- 1 root root  927 Feb 17  2022 50-mysqld_safe.cnf
-rw-r--r-- 1 root root 3666 Feb 19  2022 50-server.cnf
-rw-r--r-- 1 root root  570 Feb 17  2022 60-galera.cnf
Tweaking mariadb
To optimize the server, edit 50-server.cnf
root@webserver:/etc/mysql/mariadb.conf.d# nano 50-server.cnf
my.cnf Files
MariaDB is normally configured by editing the my.cnf file.

The following my.cnf example files were included with MariaDB until MariaDB 10.3.0. If present, you can examine them to see more complete examples of some of the many ways to configure MariaDB and use the one that fits you best as a base. Note that these files are now quite outdated, so what was huge a few years ago may no longer be seen as such.

my-small.cnf
my-medium.cnf
my-large.cnf
my-huge.cnf
Run the tuner
wget http://mysqltuner.pl/ -O mysqltuner.pl
Then execute it:
perl mysqltuner.pl
Create a simple bash script to check if MySQL is running and if not to restart it.
#!/bin/bash

# Check if MySQL is running
sudo service mysql status > /dev/null 2>&1

# Restart the MySQL service if it's not running.
if [ $? != 0 ]; then
    sudo service mysql restart
fi
Run this script every 5 minutes using a cron job like this one:
*/5 * * * * /home/user/scripts/monitor.sh > /dev/null 2>&1
At first, let’s update the packages:
# apt update
Next, download MySQL from the offical page or use wget command: Get the repo package
wget https://dev.mysql.com/get/mysql-apt-config_0.8.20-1_all.deb
dpkg -i mysql-apt-config_0.8.20-1_all.deb
apt install gnupg
dpkg -i mysql-apt-config_0.8.20-1_all.deb
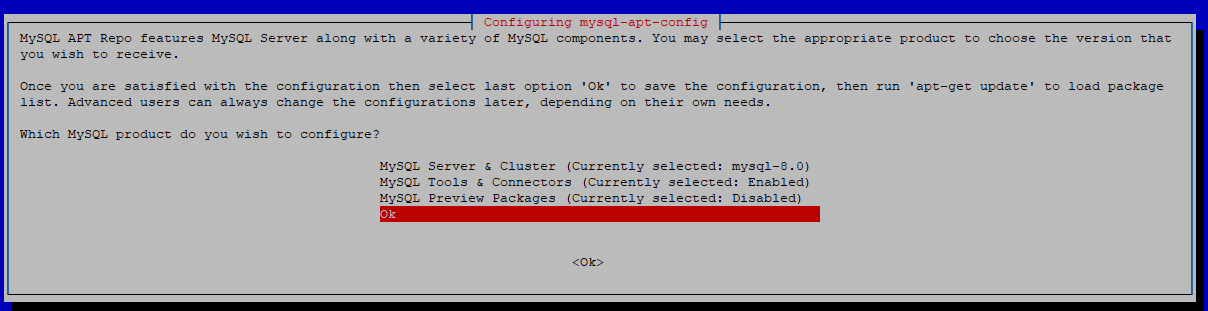
When you attempt to install the package, it will ask you what product and version you want to install. Here you can select The MySQL version, Tools, Connectors (like MySQL Workbench), and preview packages. To select the version, hit the first option:
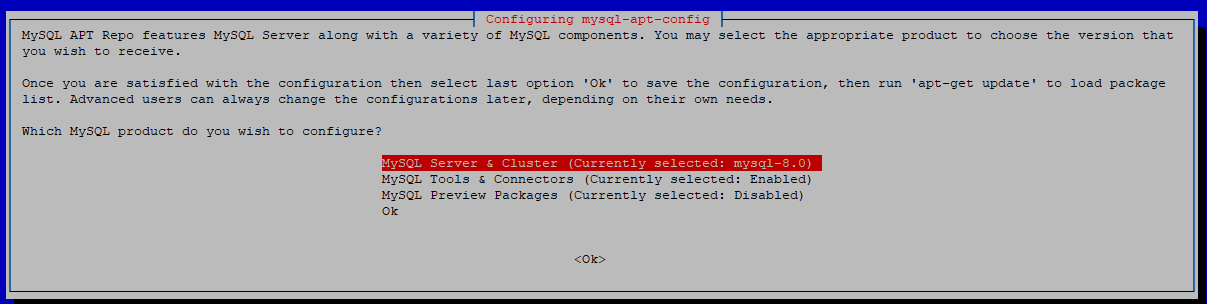
Select the version you will use. Once selected, it will bring you to the previous menu — press Ok button:
apt-get update
Install the MySQL Server using the command:
sudo apt-get install mysql-community-server
When apt finishes downloading, the installer will ask for a root password:

You have two options:
- Leave the password blank: the server will use unix sockets authentication. It means you can only access the server as a root user or as a user with sudo
- Set a password: the authentication method will be the same for other users.
If you set a password, the installer will ask which authentication plugin to use, strongly encrypted password (MySQL 8.x), or legacy method (MySQL 7.x and earlier).
Now, check the service status with systemctl:
systemctl status mysql.service
# systemctl status mysql.service
● mysql.service - MySQL Community Server
     Loaded: loaded (/lib/systemd/system/mysql.service; enabled; vendor preset: enabled)
     Active: active (running) since Wed 2021-11-17 09:57:21 CST; 38s ago
       Docs: man:mysqld(8)
             http://dev.mysql.com/doc/refman/en/using-systemd.html
    Process: 4290 ExecStartPre=/usr/share/mysql-8.0/mysql-systemd-start pre (code=exited, status=0/SUCCESS)
   Main PID: 4325 (mysqld)
     Status: "Server is operational"
      Tasks: 38 (limit: 2341)
     Memory: 358.6M
        CPU: 736ms
     CGroup: /system.slice/mysql.service
             └─4325 /usr/sbin/mysqld

Nov 17 09:57:19 redis-004 systemd[1]: Starting MySQL Community Server...
Nov 17 09:57:21 redis-004 systemd[1]: Started MySQL Community Server.
Next, run the command as a root user to safely configure the SQL service:
mysql_secure_installation
Output:
Securing the MySQL server deployment.
Enter password for user root:

VALIDATE PASSWORD COMPONENT can be used to test passwords
and improve security. It checks the strength of password
and allows the users to set only those passwords which are
secure enough. Would you like to setup VALIDATE PASSWORD component?

Press y|Y for Yes, any other key for No:
Using existing password for root.
Change the password for root ? ((Press y|Y for Yes, any other key for No) :

 ... skipping.
By default, a MySQL installation has an anonymous user,
allowing anyone to log into MySQL without having to have
a user account created for them. This is intended only for
testing, and to make the installation go a bit smoother.
You should remove them before moving into a production
environment.

Remove anonymous users? (Press y|Y for Yes, any other key for No) : y
Success.

Normally, root should only be allowed to connect from
'localhost'. This ensures that someone cannot guess at
the root password from the network.

Disallow root login remotely? (Press y|Y for Yes, any other key for No) : y
Success.

By default, MySQL comes with a database named 'test' that
anyone can access. This is also intended only for testing,
and should be removed before moving into a production
environment.

Remove test database and access to it? (Press y|Y for Yes, any other key for No) : y
 - Dropping test database...
Success.

 - Removing privileges on test database...
Success.

Reloading the privilege tables will ensure that all changes
made so far will take effect immediately.

Reload privilege tables now? (Press y|Y for Yes, any other key for No) : y
Success.

All done!
Login and Check the version
# mysql -uroot -p
Enter password:
Welcome to the MySQL monitor.  Commands end with ; or \g.
Your MySQL connection id is 12
Server version: 8.0.27 MySQL Community Server - GPL

Copyright (c) 2000, 2021, Oracle and/or its affiliates.

Oracle is a registered trademark of Oracle Corporation and/or its
affiliates. Other names may be trademarks of their respective
owners.

Type 'help;' or '\h' for help. Type '\c' to clear the current input statement.
Installing Nginx
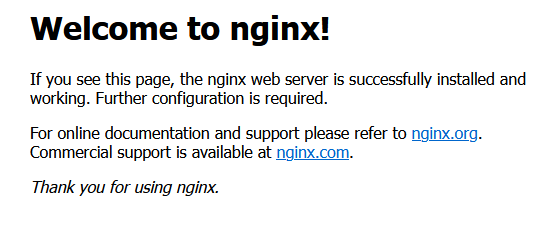
sudo apt update
sudo apt install nginx
systemctl status nginx
Output:
nginx.service - A high performance web server and a reverse proxy server
     Loaded: loaded (/lib/systemd/system/nginx.service; enabled; vendor preset: enabled)
     Active: active (running) since Wed 2021-11-17 10:09:21 CST; 18s ago
       Docs: man:nginx(8)
    Process: 5735 ExecStartPre=/usr/sbin/nginx -t -q -g daemon on; master_process on; (code=exited, status=0/SUCCESS)
    Process: 5736 ExecStart=/usr/sbin/nginx -g daemon on; master_process on; (code=exited, status=0/SUCCESS)
   Main PID: 5951 (nginx)
      Tasks: 2 (limit: 2341)
     Memory: 5.9M
        CPU: 34ms
     CGroup: /system.slice/nginx.service
             ├─5951 nginx: master process /usr/sbin/nginx -g daemon on; master_process on;
             └─5954 nginx: worker process

Nov 17 10:09:21 redis-004 systemd[1]: Starting A high performance web server and a reverse proxy server...
Nov 17 10:09:21 redis-004 systemd[1]: nginx.service: Failed to parse PID from file /run/nginx.pid: Invalid argument
Nov 17 10:09:21 redis-004 systemd[1]: Started A high performance web server and a reverse proxy server.
Check Nginx by IP address – http://192.168.0.33
When using the Nginx web server, server blocks (similar to virtual hosts in Apache) can be used to encapsulate configuration details and host more than one domain on a single server. We will set up a domain called your_domain.
Install and configure Zabbix server for your platform
Install Zabbix repository
# wget https://repo.zabbix.com/zabbix/5.4/debian/pool/main/z/zabbix-release/zabbix-release_5.4-1+debian11_all.deb
# dpkg -i zabbix-release_5.4-1+debian11_all.deb
# apt update
Install Zabbix server, frontend, agent
# apt install zabbix-server-mysql zabbix-frontend-php zabbix-nginx-conf zabbix-sql-scripts zabbix-agent2
c. Create initial database
Run the following on your database host.
# mysql -uroot -p
password
mysql> create database zabbix character set utf8 collate utf8_bin;
mysql> create user zabbix@localhost identified by 'Stx12WsaB';
mysql> grant all privileges on zabbix.* to zabbix@localhost;
mysql> quit;
On Zabbix server host import initial schema and data. You will be prompted to enter your newly created password.
# zcat /usr/share/doc/zabbix-sql-scripts/mysql/create.sql.gz | mysql -uzabbix -p zabbix
Configure the database for Zabbix server. Edit file /etc/zabbix/zabbix_server.conf
DBPassword=Stx12WsaB
Configure PHP for Zabbix frontend
Edit file /etc/zabbix/nginx.conf, uncomment and set ‘listen’ and ‘server_name’ directives.
nano /etc/zabbix/nginx.conf
# listen 80;
# server_name example.com;
Start Zabbix server and agent processes and make it start at system boot.
# systemctl restart zabbix-server zabbix-agent2 nginx php7.4-fpm
# systemctl enable zabbix-server zabbix-agent2 nginx php7.4-fpm
Configure Zabbix frontend
Connect to your newly installed Zabbix frontend: http://server_ip_or_name
Here is a simple lamp install script for CentOS 8.
#!/bin/bash
#update system
dnf update
#install apache
dnf install httpd httpd-tools -y
systemctl enable httpd
systemctl start httpd
systemctl status httpd
#update firewall
firewall-cmd --permanent --zone=public --add-service=http
firewall-cmd --permanent --zone=public --add-service=https
firewall-cmd --reload
#install mariadb
dnf install mariadb-server mariadb -y
systemctl start mariadb
systemctl enable mariadb
systemctl status mariadb
mysql_secure_installation
# Install PHP 7 on CentOS 8
dnf install https://dl.fedoraproject.org/pub/epel/epel-release-latest-8.noarch.rpm
#dnf install dnf-utils http://rpms.remirepo.net/enterprise/remi-release-8.rpm
#dnf module list php
dnf install php php-opcache php-gd php-curl php-mysqlnd -y
systemctl start php-fpm
systemctl enable php-fpm
systemctl status php-fpm
setsebool -P httpd_execmem 1
systemctl restart httpd
Check the installation
# nano /var/www/html/info.php
Insert the PHP code below and save the file.
[/bash]

Then head out to your browser, and type the URL below. Remember to replace the server IP address with your server’s actual IP address.
http://server-ip-address/info.php
How to import a very large SQL dump file (6 Gb) to a MySQL database using windows command line. If you are using linux it is the same. The process is the following:
Open a command prompt (or shell in Linux) with administrative privilleges
Connect to a mysql instance using command line:
# mysql -h 192.168.1.1 --port=3306 -u root -p
if you are in localhost you do not need host and port
# mysql -u root -p
Or if plesk,
# mysql -uadmin -p`cat /etc/psa/.psa.shadow`
You are now in mysql shell. Set network buffer length to a large byte number. The default value may throw errors for such large data files
mysql> set global net_buffer_length=1000000;
Set maximum allowed packet size to a large byte number.The default value may throw errors for such large data files.
mysql> set global max_allowed_packet=1000000000;
Disable foreign key checking to avoid delays,errors and unwanted behaviour
mysql> SET foreign_key_checks = 0;
mysql> SET UNIQUE_CHECKS = 0;
mysql> SET AUTOCOMMIT = 0;
Import your sql dump file
mysql> use db_name;
mysql> source backup-file.sql;
Remember to enable foreign key checks when procedure is complete!
 mysql> SET foreign_key_checks = 1;
 mysql> SET UNIQUE_CHECKS = 1;
 mysql> SET AUTOCOMMIT = 1;
If you are in Linux you can create a Bash script which will do the dirty job and write to stdout start and end time of import:
  #!/bin/sh

  # store start date to a variable
  imeron=`date`

  echo "Import started: OK"
  dumpfile="/home/bob/bobiras.sql"

  ddl="set names utf8; "
  ddl="$ddl set global net_buffer_length=1000000;"
  ddl="$ddl set global max_allowed_packet=1000000000; "
  ddl="$ddl SET foreign_key_checks = 0; "
  ddl="$ddl SET UNIQUE_CHECKS = 0; "
  ddl="$ddl SET AUTOCOMMIT = 0; "
  # if your dump file does not create a database, select one
  ddl="$ddl USE jetdb; "
  ddl="$ddl source $dumpfile; "
  ddl="$ddl SET foreign_key_checks = 1; "
  ddl="$ddl SET UNIQUE_CHECKS = 1; "
  ddl="$ddl SET AUTOCOMMIT = 1; "
  ddl="$ddl COMMIT ; "

  echo "Import started: OK"

  time mysql -h 127.0.0.1 -u root -proot -e "$ddl"

  # store end date to a variable
  imeron2=`date`

  echo "Start import:$imeron"
  echo "End import:$imeron2"
Other solutions:
Big Dump
http://www.ozerov.de/bigdump/ seems good
Split Files
http://www.rusiczki.net/2007/01/24/sql-dump-file-splitter/
I am using mariadb and I to investigate some issue I wanted to check the logs. To my surprise, log file is not generated for mariadb.
I suspect this cannot be the case so I am doubting my search skills.
MariaDB [(none)]> show variables like 'log_error'
    -> ;
+---------------+-------+
| Variable_name | Value |
+---------------+-------+
| log_error     |       |
+---------------+-------+
1 row in set (0.00 sec)
I have added the entry in my.cnf still above field is coming to be empty.
[root@cslcodev11-oem ~]# cat /etc/my.cnf
[mysqld]
!includedir /etc/mysqld/conf.d
datadir=/mnt/mgmt/var/lib/mysql
socket=/var/lib/mysql/mysql.sock
tmpdir=/mnt/mgmt/var/lib/mysql_tmp
user=mysql
# Disabling symbolic-links is recommended to prevent assorted security risks
symbolic-links=0
### TRT-3229 #####
sync_binlog=1
innodb_flush_method=O_DIRECT
innodb_support_xa = 1
myisam_repair_threads = 2
myisam_recover_options = FORCE
###################
innodb_file_per_table=1
innodb_log_buffer_size = 8M
table_open_cache=256
max_heap_table_size=256M
### TRT-4685 ###
max_connections=500
################
innodb_log_file_size = 512M

[mysqld_safe]
log-error=/var/log/mariadb/mysqld.log
pid-file=/var/run/mysqld/mysqld.pid
[root@cslcodev11-oem ~]#
So, I want to know do we have any default location where these logs are getting generated, if the path cannot be read from config files.
INFO: Reference: https://mariadb.com/kb/en/mariadb/error-log/
On the MariaDB Knowledge base page for the error-log there is a paragraph that states.
systemd has its own logging system, and Linux distributions running systemd may log errors there instead. To view the systemd logs, use:
# journalctl -u mariadb.
This answers the question because –log-error would be an option that could be added to MY_SPECIAL.conf file and journalctl is where mariadb logs errors by default on a systemd system.
Here is how to quickly Determine which Mysql configuration file is being used
$ which mysqld
/usr/sbin/mysqld
$ /usr/sbin/mysqld --verbose --help | grep -A 1 "Default options"
Default options are read from the following files in the given order:
/etc/mysql/my.cnf ~/.my.cnf /usr/etc/my.cnf
Error when exporting a dump in plesk databases (See:https://docs.plesk.com/en-US/onyx/reseller-guide/website-management/website-databases/exporting-and-importing-database-dumps.69538/):
Warning: Using unique option prefix database instead of databases is deprecated and will be removed in a future release. Please use the full name instead.
Cause
key_buffer and myisam-recover are deprecated in Mysql 5.5. myisam-recover option is renamed as of MySQL 5.5.3 to myisam-recover-options .
Resolution
1. Log in to Plesk server via SSH
2. Correct /etc/my.cnf or /etc/mysql/my.cnf as below:
Change pass to password
See – https://serverfault.com/questions/670648/mysqldump-complains-about-chosen-databases-regardless-of-command-line