Install clamav

$ sudo apt-get install clamav clamav-daemon

Install this script to run a scan daily. Change the varables as needed.

#!/bin/bash
LOGFILE="/var/log/clamav/clamav-$(date +'%Y-%m-%d').log";
EMAIL_MSG="Please see the log file attached.";
EMAIL_FROM="clamav-daily@example.com";
EMAIL_TO="username@example.com";
DIRTOSCAN="/var/www /etc /root /home";

for S in ${DIRTOSCAN}; do
 DIRSIZE=$(du -sh "$S" 2>/dev/null | cut -f1);

 echo "Starting a daily scan of "$S" directory.
 Amount of data to be scanned is "$DIRSIZE".";

 clamscan -ri "$S" >> "$LOGFILE";

 # get the value of "Infected lines"
 MALWARE=$(tail "$LOGFILE"|grep Infected|cut -d" " -f3);

 # if the value is not equal to zero, send an email with the log file attached
 if [ "$MALWARE" -ne "0" ];then
 # using heirloom-mailx below
 echo "$EMAIL_MSG"|mail -a "$LOGFILE" -s "Malware Found" -r "$EMAIL_FROM" "$EMAIL_TO";
 fi 
done

exit 0

Set up the repository
Update the apt package index and install packages to allow apt to use a repository over HTTPS:

$ sudo apt-get update
$ sudo apt-get install ca-certificates curl gnupg lsb-release

Add Docker’s official GPG key:

$ curl -fsSL https://download.docker.com/linux/debian/gpg | sudo gpg --dearmor -o /usr/share/keyrings/docker-archive-keyring.gpg

Use the following command to set up the stable repository.

echo \
 "deb [arch=$(dpkg --print-architecture) signed-by=/usr/share/keyrings/docker-archive-keyring.gpg] https://download.docker.com/linux/debian \
  $(lsb_release -cs) stable" | sudo tee /etc/apt/sources.list.d/docker.list > /dev/null

Install Docker Engine

Update the apt package index, and install the latest version of Docker Engine and containerd, or go to the next step to install a specific version:

$ sudo apt-get update
$ sudo apt-get install docker-ce docker-ce-cli containerd.io

Verify that Docker Engine is installed correctly by running the hello-world image.

$ sudo docker run hello-world

Configure Docker to start on boot

$ sudo systemctl enable docker.service
$ sudo systemctl enable containerd.service

Manage Docker as a non-root user
Create the docker group.

sudo groupadd docker

Add your user to the docker group.

sudo usermod -aG docker $USER

Log out and log back in so that your group membership is re-evaluated. If testing on a virtual machine, it may be necessary to restart the virtual machine for changes to take effect. On a desktop Linux environment such as X Windows, log out of your session completely and then log back in.

On Linux, you can also run the following command to activate the changes to groups:

newgrp docker 

Verify that you can run docker commands without sudo.

$ docker run hello-world

This command downloads a test image and runs it in a container. When the container runs, it prints a message and exits.

Configuring remote access with systemd unit file

Use the command sudo systemctl edit docker.service to open an override file for docker.service in a text editor. Add or modify the following lines, substituting your own values.

[Service]
ExecStart=
ExecStart=/usr/bin/dockerd -H fd:// -H tcp://127.0.0.1:2375

Save the file. Reload the systemctl configuration.

 sudo systemctl daemon-reload

Restart Docker.

 sudo systemctl restart docker.service

Check to see whether the change was honored by reviewing the output of netstat to confirm dockerd is listening on the configured port.

$ sudo netstat -lntp | grep dockerd

Configuring remote access with daemon.json

Set the hosts array in the /etc/docker/daemon.json to connect to the UNIX socket and an IP address, as follows:

    {
      "hosts": ["unix:///var/run/docker.sock", "tcp://127.0.0.1:2375"]
    }

Restart Docker. Check to see whether the change was honored by reviewing the output of netstat to confirm dockerd is listening on the configured port.

 sudo netstat -lntp | grep dockerd

Ref:
https://docs.docker.com/engine/install/debian/
https://docs.docker.com/engine/install/linux-postinstall/

How to use wget to download iso’s directly to proxmox 6.2-14. Here is the location for the iso file. There is 1 ISO – a Debian ISO that I uploaded to the GUI. Login the proxmox host via ssh. Now find the location as follows:

cd /var/lib/vz/template/iso
# ls -la
total 357384
drwxr-xr-x 2 root root      4096 Nov  1 08:41 .
drwxr-xr-x 5 root root      4096 Oct 31 16:35 ..
-rw-r--r-- 1 root root 365953024 Nov  1 08:41 debian-10.6.0-amd64-netinst.iso

Download ubuntu 16.04. You can also specify a directory for the file to download to, as well as choose a name for the download. Use the -O (output) option and enter the directory and file name after the URL.

# wget https://releases.ubuntu.com/16.04/ubuntu-16.04.7-server-amd64.iso -O /var/lib/vz/template/iso/ubuntu-16.04.7-se         rver-amd64.iso
--2020-11-01 11:35:34--  https://releases.ubuntu.com/16.04/ubuntu-16.04.7-server-amd64.iso
Resolving releases.ubuntu.com (releases.ubuntu.com)... 2001:67c:1360:8001::33, 2001:67c:1360:8001::34, 2001:67c:1562::25, ...
Connecting to releases.ubuntu.com (releases.ubuntu.com)|2001:67c:1360:8001::33|:443... connected.
HTTP request sent, awaiting response... 200 OK
Length: 922746880 (880M) [application/x-iso9660-image]
Saving to: ‘/var/lib/vz/template/iso/ubuntu-16.04.7-server-amd64.iso’
/var/lib/vz/template/iso/ubuntu-16.04.7 100%[==============================================================================>] 880.00M  19.2MB/s    in 91s

2020-11-01 11:37:06 (9.64 MB/s) - ‘/var/lib/vz/template/iso/ubuntu-16.04.7-server-amd64.iso’ saved [922746880/922746880]

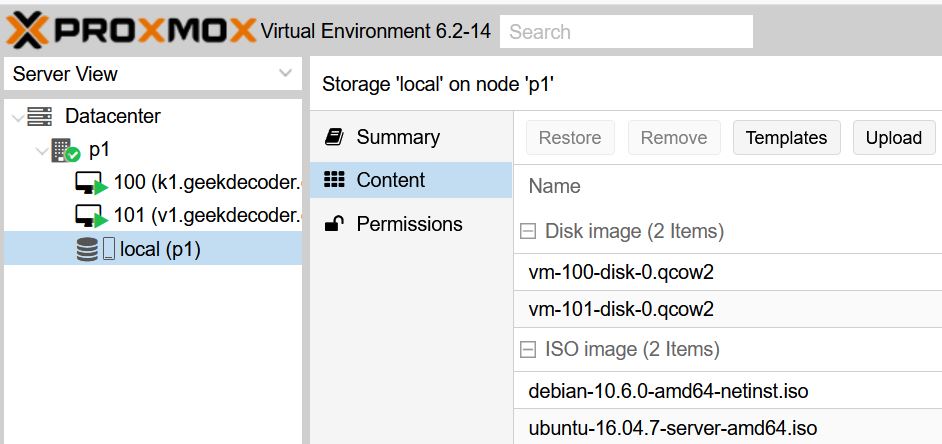
After the upload, you can see the new ISO in the GUI at p1 > local (storage) > Content.

This install in on Ubuntu 18.04. There is an excellent article for CentOS at – https://www.tecmint.com/install-asterisk-on-centos-7/
Please review aslo:
– https://wiki.asterisk.org/wiki/display/AST/Installing+Asterisk+From+Source
– https://community.asterisk.org/
– https://www.sangoma.com/articles/how-to-install-asterisk-11-on-ubuntu-12-4-lts/
– http://asteriskdocs.org/en/3rd_Edition/asterisk-book-html-chunk/asterisk-Install.html

Install Requirements:

Firewalld. See the Article here to set up asterisk on firewalld – https://www.geekdecoder.com/firewalld-on-centos-8/-

The command installs a bunch of new packages including gcc, g++ and make

# apt install build-essential

Libraries:

Help Finding the Right Libraries

Asterisk comes with a shell script called install_prereq.sh in the contrib/scripts sub-directory. If you run install_prereq test, it will give you the exact commands to install the necessary system libraries on your operating system. If you run install_prereq install, it will attempt to download and install the prerequisites automatically.

cd /usr/local/src/asterisk-17.3.0/contrib/scripts/
./install_prereq test
./install_prereq install

The script calls for calling code (https://en.wikipedia.org/wiki/List_of_country_calling_codes)

Download Files:

Go to the following to see the current asterisk release:
https://downloads.asterisk.org/pub/telephony/asterisk/

Here is what I am using:

Asterisk – https://downloads.asterisk.org/pub/telephony/asterisk/asterisk-17-current.tar.gz
dahdi-complete – https://downloads.asterisk.org/pub/telephony/dahdi-linux-complete/dahdi-linux-complete-current.tar.gz
dahdi-linux – https://downloads.asterisk.org/pub/telephony/dahdi-linux/dahdi-linux-current.tar.gz
dahdi-tools – https://downloads.asterisk.org/pub/telephony/dahdi-tools/dahdi-tools-current.tar.gz
libpri – https://downloads.asterisk.org/pub/telephony/libpri/libpri-current.tar.gz

Change directory:

# cd /usr/local/src

Get the files:

wget https://downloads.asterisk.org/pub/telephony/asterisk/asterisk-17-current.tar.gz
# wget https://downloads.asterisk.org/pub/telephony/dahdi-linux-complete/dahdi-linux-complete-current.tar.gz
# wget https://downloads.asterisk.org/pub/telephony/dahdi-linux/dahdi-linux-current.tar.gz
# wget https://downloads.asterisk.org/pub/telephony/dahdi-tools/dahdi-tools-current.tar.gz
# wget https://downloads.asterisk.org/pub/telephony/libpri/libpri-current.tar.gz

Lets extract

tar -zxvf asterisk-17-current.tar.gz
# tar -zxvf dahdi-linux-complete-current.tar.gz
# tar -zxvf dahdi-linux-current.tar.gz
# tar -zxvf dahdi-tools-current.tar.gz
# tar -zxvf libpri-current.tar.gz

You should now notice that a new sub-directory was created for each of the tarballs, each containing the extracted files from the corresponding tarball. We can now compile and install each of the components.

Building and Installing DAHDI
Let’s install DAHDI!
On Linux, we will use the DAHDI-linux-complete tarball, which contains the DAHDI Linux drivers, DAHDI tools, and board firmware files.

# cd dahdi-linux-complete-3.1.0+3.1.0/
# make
# make install
# make config

Next, building and Installing LibPRI
Have you installed DAHDI? – Before you can build libpri, you’ll need to Build and Install DAHDI.

# cd libpri-1.6.0/
# make
# make install

Using Menuselect to Select Asterisk Options

The next step in the build process is to tell Asterisk which modules to compile and install, as well as set various compiler options. These settings are all controlled via a menu-driven system called Menuselect. To access the Menuselect system, type:

# make menuselect

When you’re first learning your way around Asterisk on a test system, you’ll probably want to stick with the default settings in Menuselect. If you’re building a production system, however, you may not wish to build all of the various modules, and instead only build the modules that your system is using. When you are finished selecting the modules and options you’d like in Menuselect, press F12 to save and exit, or highlight the Save and Exit button and press enter.

See More here: https://wiki.asterisk.org/wiki/display/AST/Using+Menuselect+to+Select+Asterisk+Options

Install asterisk with pre-bundled PJSIP-pjproject

# cd /usr/local/src/asterisk-17.3.0
# ./configure
# make && make install

You should see:

 +---- Asterisk Installation Complete -------+
 +                                           +
 +    YOU MUST READ THE SECURITY DOCUMENT    +
 +                                           +
 + Asterisk has successfully been installed. +
 + If you would like to install the sample   +
 + configuration files (overwriting any      +
 + existing config files), run:              +
 +                                           +
 + For generic reference documentation:      +
 +    make samples                           +
 +                                           +
 + For a sample basic PBX:                   +
 +    make basic-pbx                         +
 +                                           +
 +                                           +
 +-----------------  or ---------------------+
 +                                           +
 + You can go ahead and install the asterisk +
 + program documentation now or later run:   +
 +                                           +
 +               make progdocs               +
 +                                           +
 + **Note** This requires that you have      +
 + doxygen installed on your local system    +
 +-------------------------------------------+

Installing Sample Files

Asterisk Sample Configs: not a sample PBX configuration

For many of the sample configuration files that make samples installs, the configuration contains more than just an example configuration. The sample configuration files historically were used predominately for documentation of available options. As such, they contain many examples of configuring Asterisk that may not be ideal for standard deployments.

While installing the sample configuration files may be a good starting point for some people, they should not be viewed as recommended configuration for an Asterisk system.

To install a set of sample configuration files for Asterisk, type:

# make samples

Any existing sample files which have been modified will be given a .old file extension. For example, if you had an existing file named extensions.conf, it would be renamed to extensions.conf.old and the sample dialplan would be installed as extensions.conf.

Installing Initialization Scripts

Now that you have Asterisk compiled and installed, the last step is to install the initialization script, or initscript. This script starts Asterisk when your server starts, will monitor the Asterisk process in case anything bad happens to it, and can be used to stop or restart Asterisk as well. To install the initscript, use the make config command.

# make config

As your Asterisk system runs, it will generate logfiles. It is recommended to install the logrotation script in order to compress and rotate those files, to save disk space and to make searching them or cataloguing them easier. To do this, use the make install-logrotate command.

# make install-logrotate

Validating Your Installation

Before continuing on, let’s check a few things to make sure your system is in good working order. First, let’s make sure the DAHDI drivers are loaded. You can use the lsmod under Linux to list all of the loaded kernel modules, and the grep command to filter the input and only show the modules that have dahdi in their name.

# lsmod | grep dahdi

If the command returns nothing, then DAHDI has not been started. Start DAHDI by running:

# /etc/init.d/dadhi start

Asterisk can now be started as a service:

# service asterisk start
 * Starting Asterisk PBX: asterisk                                                                               [ OK ] 

And stopped:

# service asterisk stop
 * Stopping Asterisk PBX: asterisk                                                                               [ OK ] 

And restarted:

# service asterisk restart
 * Stopping Asterisk PBX: asterisk                                                                               [ OK ] 
 * Starting Asterisk PBX: asterisk                                                                               [ OK ]

Asterisk Console

# asterisk -rvvvvv

Let set up a SIP client and Make a test call. Configure extensions.conf. Backup the sample extensions.conf and create a new one

# mv extensions.conf extensions.sample
# vim extensions.conf

We are going to use a very simple dialplan. A dialplan is simply instructions telling Asterisk what to do with a call. Edit your blank extensions.conf to reflect the following:

[from-internal]
exten = 100,1,Answer()
same = n,Wait(1)
same = n,Playback(hello-world)
same = n,Hangup()
[/bash]
When a phone dials extension 100, we are telling Asterisk to Answer the call, Wait one second, then Play (Playback) a sound file (hello-world) to the channel and Hangup.

Configure a SIP channel driver. Depending on the version of Asterisk in use, you may have the option of more than one SIP channel driver. You'll have to pick one to use for the example.
Asterisk 11 and previous: chan_sip is the primary option. Asterisk 12 and beyond: You'll probably want to use chan_pjsip (the newest driver), but you still have the option of using chan_sip as well
Follow the instructions below for the channel driver you chose. Configure chan_sip Backup and edit a new blank sip.conf. Then add the following to your sip.conf file:
[general]
context=default

[6001]
type=friend
context=from-internal
host=dynamic
secret=unsecurepassword
disallow=all
allow=ulaw

Configure chan_pjsip

Backup and edit a new blank pjsip.conf. Then add the following to your pjsip.conf file:

[transport-udp]
type=transport
protocol=udp
bind=0.0.0.0

[6001]
type=endpoint
context=from-internal
disallow=all
allow=ulaw
auth=6001
aors=6001

[6001]
type=auth
auth_type=userpass
password=unsecurepassword
username=6001

[6001]
type=aor
max_contacts=1

Configure your SIP phone

Use Jitsi.

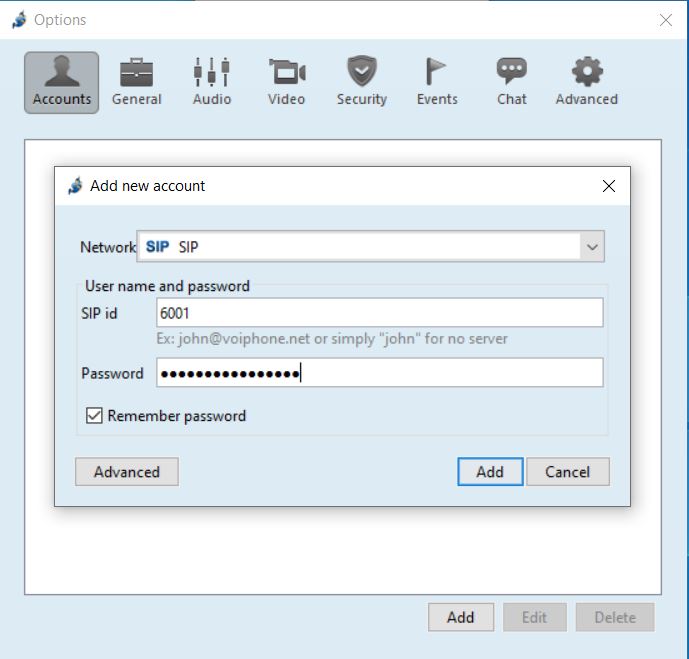
Once Jitsi is opened, click Tools > Options > Add.
Select the "SIP" Network".
For "SIP id", Enter 6001.
Enter your SIP peer's password(see above - unsecurepassword) in the Password field.
Click Advanced. Add your Display Name. Click the Connection Tab.
Put in the IP for the asterisk server in the "Registrar" Field.
Review and Click Sign in.


You should see the registration in asterisk:

Start Asterisk. Back at the Linux shell go ahead and start Asterisk. We'll start Asterisk with a control console (-c) and level 5 verbosity (vvvvv).

# asterisk -cvvvvv

Or if Asterisk is already running, restart Asterisk from the shell and connect to it.

# asterisk -rx "core restart now"
# asterisk -rvvvvv

Make the call. Once registered, enter extension 100 and click the Dial button. The call should be made and you should hear the sound file hello-world!

On the Asterisk CLI, you should see something like:

The Plesk Control Panel has the ability to create multiple MySQL and PostgreSQL databases as well as multiple users within each database. Also, directly accessible via Plesk, are the links to phpMyAdmin and PhpPGAdmin, the PHP interface applications that abstract mysql or postgresql into a web-based administration tool, allowing you to sort, edit, and create tables within a given database.

Before creating your databases within the Plesk Control Panel, please ensure that you have already added a hosted domain name to your dedicated server.

Here is how you can create MySQL (or PostgreSQL) databases using Plesk:
Login to your Plesk Control Panel. The login URL is in the following format (https://ipaddress:8443).
Click on Websites and Domains from the navigation bar on the left.

Select the domain name that you’d like to associate your database with.
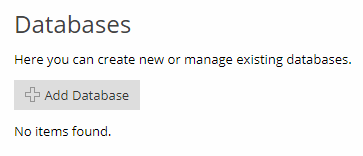
Click the Databases icon on the top right menu.

Click the Add Database icon.

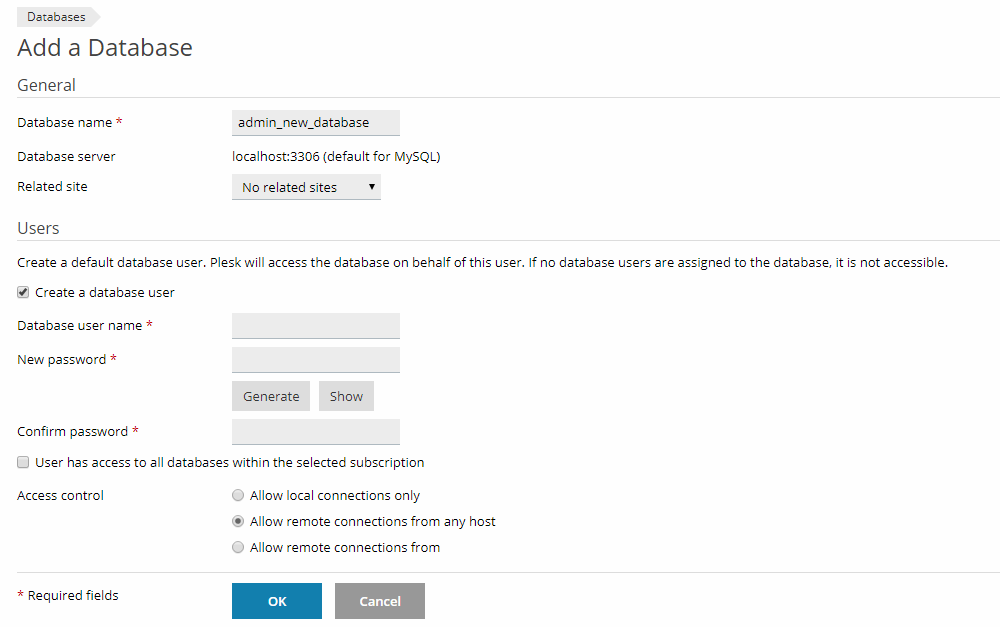
Add the Database Name
Select the related site for the data base.
Click the “Create a Database User” box in order to setup database administrator’s credentials.
Enter a username and a password which will be used for accessing the contents of the database.
Select if the User has access to all databases.
Select Access Control for the database.
Click OK.
Now, you can use the phpMyAdmin and other tools where you can manage your database.

Recently, there was an issue with a curl command that ran a script with php. The curl command would finish after a lengthy time as before it was completing within seconds.

The issue turned out to be that the command was using the IPV6 connection where in the data center the IPV6 was not active.

This was discovered with the -v option in curl.

curl -v "https://domain.com/path-to-php-script.php"
/* About to connect() to domain.com port 443 (#0)
/* Trying 2a09:2980:f0ee:a:fabe:b50c:0:2...
/* Connection timed out
/* Trying 23.17.44.888...

As you can see – the IPV6 address times out. The solution is to disable IPV6 in the network setting for the Ethernet card.

Here is how to check the CPU type in CentOS:

# dmidecode --type processor

Output:

# dmidecode 2.12
SMBIOS 2.7 present.

Handle 0x0004, DMI type 4, 42 bytes
Processor Information
	Socket Designation: CPU 1
	Type: Central Processor
	Family: Xeon
	Manufacturer: Intel
	ID: D7 06 02 00 FF FB EB BF
	Signature: Type 0, Family 6, Model 45, Stepping 7
	Flags:
		FPU (Floating-point unit on-chip)
		VME (Virtual mode extension)
		DE (Debugging extension)
		PSE (Page size extension)
		TSC (Time stamp counter)
		MSR (Model specific registers)
		PAE (Physical address extension)
		MCE (Machine check exception)
		CX8 (CMPXCHG8 instruction supported)
		APIC (On-chip APIC hardware supported)
		SEP (Fast system call)
		MTRR (Memory type range registers)
		PGE (Page global enable)
		MCA (Machine check architecture)
		CMOV (Conditional move instruction supported)
		PAT (Page attribute table)
		PSE-36 (36-bit page size extension)
		CLFSH (CLFLUSH instruction supported)
		DS (Debug store)
		ACPI (ACPI supported)
		MMX (MMX technology supported)
		FXSR (FXSAVE and FXSTOR instructions supported)
		SSE (Streaming SIMD extensions)
		SSE2 (Streaming SIMD extensions 2)
		SS (Self-snoop)
		HTT (Multi-threading)
		TM (Thermal monitor supported)
		PBE (Pending break enabled)
	Version: Intel(R) Xeon(R) CPU E5-2620 0 @ 2.00GHz
	Voltage: 0.0 V
	External Clock: 100 MHz
	Max Speed: 4000 MHz
	Current Speed: 2000 MHz
	Status: Populated, Enabled
	Upgrade: Socket LGA2011
	L1 Cache Handle: 0x0005
	L2 Cache Handle: 0x0006
	L3 Cache Handle: 0x0007
	Serial Number: Not Specified
	Asset Tag: Not Specified
	Part Number: Not Specified
	Core Count: 6
	Core Enabled: 1
	Thread Count: 12
	Characteristics:
		64-bit capable
		Multi-Core
		Hardware Thread
		Execute Protection
		Enhanced Virtualization
		Power/Performance Control

Handle 0x0008, DMI type 4, 42 bytes
Processor Information
	Socket Designation: CPU 2
	Type: Central Processor
	Family: Xeon
	Manufacturer: Intel
	ID: D7 06 02 00 FF FB EB BF
	Signature: Type 0, Family 6, Model 45, Stepping 7
	Flags:
		FPU (Floating-point unit on-chip)
		VME (Virtual mode extension)
		DE (Debugging extension)
		PSE (Page size extension)
		TSC (Time stamp counter)
		MSR (Model specific registers)
		PAE (Physical address extension)
		MCE (Machine check exception)
		CX8 (CMPXCHG8 instruction supported)
		APIC (On-chip APIC hardware supported)
		SEP (Fast system call)
		MTRR (Memory type range registers)
		PGE (Page global enable)
		MCA (Machine check architecture)
		CMOV (Conditional move instruction supported)
		PAT (Page attribute table)
		PSE-36 (36-bit page size extension)
		CLFSH (CLFLUSH instruction supported)
		DS (Debug store)
		ACPI (ACPI supported)
		MMX (MMX technology supported)
		FXSR (FXSAVE and FXSTOR instructions supported)
		SSE (Streaming SIMD extensions)
		SSE2 (Streaming SIMD extensions 2)
		SS (Self-snoop)
		HTT (Multi-threading)
		TM (Thermal monitor supported)
		PBE (Pending break enabled)
	Version: Intel(R) Xeon(R) CPU E5-2620 0 @ 2.00GHz
	Voltage: 0.0 V
	External Clock: 100 MHz
	Max Speed: 4000 MHz
	Current Speed: 2000 MHz
	Status: Populated, Enabled
	Upgrade: Socket LGA2011
	L1 Cache Handle: 0x0009
	L2 Cache Handle: 0x000A
	L3 Cache Handle: 0x000B
	Serial Number: Not Specified
	Asset Tag: Not Specified
	Part Number: Not Specified
	Core Count: 6
	Core Enabled: 1
	Thread Count: 12
	Characteristics:
		64-bit capable
		Multi-Core
		Hardware Thread
		Execute Protection
		Enhanced Virtualization
		Power/Performance Control


Turning on the Firewall

# sudo systemctl start firewalld.service

We can verify that the service is running and reachable by typing:

# firewall-cmd --state
output
running

We can see which zone is currently selected as the default by typing:

# firewall-cmd --get-default-zone
output
public
firewall-cmd --get-active-zones
output
public
interfaces: eth0 eth1

We can print out the default zone’s configuration by typing:

# firewall-cmd --list-all
output
public (default, active)
  interfaces: eth0 eth1
  sources: 
  services: dhcpv6-client ssh
  ports: 
  masquerade: no
  forward-ports: 
  icmp-blocks: 
  rich rules:

Exploring Alternative Zones. To get a list of the available zones, type:

# firewall-cmd --get-zones
output
block dmz drop external home internal public trusted work

We can see the specific configuration associated with a zone by including the –zone= parameter in our –list-all command:

# firewall-cmd --zone=home --list-all
output
home
  interfaces: 
  sources: 
  services: dhcpv6-client ipp-client mdns samba-client ssh
  ports: 
  masquerade: no
  forward-ports: 
  icmp-blocks: 
  rich rules:

You can output all of the zone definitions by using the –list-all-zones option. You will probably want to pipe the output into a pager for easier viewing:

# firewall-cmd --list-all-zones | less

Selecting Zones for your Interfaces
Unless you have configured your network interfaces otherwise, each interface will be put in the default zone when the firewall is booted.

Changing the Zone of an Interface for the Current Session

You can transition an interface between zones during a session by using the –zone= parameter in combination with the –change-interface= parameter. As with all commands that modify the firewall, you will need to use sudo.

For instance, we can transition our eth0 interface to the “home” zone by typing this:

# sudo firewall-cmd --zone=home --change-interface=eth0
output
success
# firewall-cmd --get-active-zones
output
home
  interfaces: eth0
public
  interfaces: eth1

If the firewall is completely restarted, the interface will revert to the default zone:

sudo systemctl restart firewalld.service
firewall-cmd --get-active-zones
output
public
  interfaces: eth0 eth1

Changing the Zone of your Interface Permanently

# sudo nano /etc/sysconfig/network-scripts/ifcfg-eth0

At the bottom of the file, set the ZONE= variable to the zone you wish to associate with the interface. In our case, this would be the “home” interface:

/etc/sysconfig/network-scripts/ifcfg-eth0
. . .

DNS1=2001:4860:4860::8844
DNS2=2001:4860:4860::8888
DNS3=8.8.8.8
ZONE=home

Save and close the file.

To implement your changes, you’ll have to restart the network service, followed by the firewall service:

sudo systemctl restart network.service
sudo systemctl restart firewalld.service

After your firewall restarts, you can see that your eth0 interface is automatically placed in the “home” zone:

# firewall-cmd --get-active-zones
output
home
  interfaces: eth0
public
  interfaces: eth1

Adjusting the Default Zone

# sudo firewall-cmd --set-default-zone=home
output
home
  interfaces: eth0 eth1

Setting Rules for your Applications

Adding a Service to your Zones

The easiest method is to add the services or ports you need to the zones you are using. Again, you can get a list of the available services with the –get-services option:

firewall-cmd --get-services
output
RH-Satellite-6 amanda-client bacula bacula-client dhcp dhcpv6 dhcpv6-client dns ftp high-availability http https imaps ipp ipp-client ipsec kerberos kpasswd ldap ldaps libvirt libvirt-tls mdns mountd ms-wbt mysql nfs ntp openvpn pmcd pmproxy pmwebapi pmwebapis pop3s postgresql proxy-dhcp radius rpc-bind samba samba-client smtp ssh telnet tftp tftp-client transmission-client vnc-server wbem-https

You can get more details about each of these services by looking at their associated .xml file within the /usr/lib/firewalld/services directory. For instance, the SSH service is defined like this:

/usr/lib/firewalld/services/ssh.xml
<?xml version="1.0" encoding="utf-8"?>
<service>
  <short>SSH</short>
  <description>Secure Shell (SSH) is a protocol for logging into and executing commands on remote machines. It provides secure encrypted communications. If you plan on accessing your machine remotely via SSH over a firewalled interface, enable this option. You need the openssh-server package installed for this option to be useful.</description>
  <port protocol="tcp" port="22"/>
</service>

You can enable a service for a zone using the –add-service= parameter.

For instance, if we are running a web server serving conventional HTTP traffic, we can allow this traffic for interfaces in our “public” zone for this session by typing:

sudo firewall-cmd --zone=public --add-service=http

You can leave out the –zone= if you wish to modify the default zone. We can verify the operation was successful by using the –list-all or –list-services operations:

firewall-cmd --zone=public --list-services
output
dhcpv6-client http ssh

We can make our “public” zone change permanent by typing:

# sudo firewall-cmd --zone=public --permanent --add-service=http

You can verify that this was successful by adding the –permanent flag to the –list-services operation. You need to use sudo for any –permanent operations:

sudo firewall-cmd --zone=public --permanent --list-services
output
dhcpv6-client http ssh

Your “public” zone will now allow HTTP web traffic on port 80. Add https:

sudo firewall-cmd --zone=public --add-service=https
sudo firewall-cmd --zone=public --permanent --add-service=https

Adding Other ports
We can verify that this was successful using the –list-ports operation:

firewall-cmd --list-ports
output
5000/tcp

It is also possible to specify a sequential range of ports by separating the beginning and ending port in the range with a dash. For instance, if our application uses UDP ports 4990 to 4999, we could open these up on “public” by typing:

# sudo firewall-cmd --zone=public --add-port=4990-4999/udp
After testing, we would likely want to add these to the permanent firewall. You can do that by typing:
sudo firewall-cmd --zone=public --permanent --add-port=5000/tcp
sudo firewall-cmd --zone=public --permanent --add-port=4990-4999/udp
sudo firewall-cmd --zone=public --permanent --list-ports
output
success
success
4990-4999/udp 5000/tcp

Creating Your Own Zones
While the predefined zones will probably be more than enough for most users, it can be helpful to define your own zones that are more descriptive of their function.

For instance, we could create the two zones we discussed above by typing:

sudo firewall-cmd --permanent --new-zone=publicweb
sudo firewall-cmd --permanent --new-zone=privateDNS
You can verify that these are present in your permanent configuration by typing:
# sudo firewall-cmd --permanent --get-zones
output

block dmz drop external home internal privateDNS public publicweb trusted work
As stated before, these won’t be available in the current instance of the firewall yet:

firewall-cmd --get-zones
output
block dmz drop external home internal public trusted work

Reload the firewall to bring these new zones into the active configuration:

sudo firewall-cmd --reload
firewall-cmd --get-zones
output
block dmz drop external home internal privateDNS public publicweb trusted work

Now, you can begin assigning the appropriate services and ports to your zones. It’s usually a good idea to adjust the active instance and then transfer those changes to the permanent configuration after testing. For instance, for the “publicweb” zone, you might want to add the SSH, HTTP, and HTTPS services:

sudo firewall-cmd --zone=publicweb --add-service=ssh
sudo firewall-cmd --zone=publicweb --add-service=http
sudo firewall-cmd --zone=publicweb --add-service=https
firewall-cmd --zone=publicweb --list-all
output
publicweb
  interfaces: 
  sources: 
  services: http https ssh
  ports: 
  masquerade: no
  forward-ports: 
  icmp-blocks: 
  rich rules:

Likewise, we can add the DNS service to our “privateDNS” zone:

sudo firewall-cmd --zone=privateDNS --add-service=dns
firewall-cmd --zone=privateDNS --list-all
output
privateDNS
  interfaces: 
  sources: 
  services: dns
  ports: 
  masquerade: no
  forward-ports: 
  icmp-blocks: 
  rich rules:

We could then change our interfaces over to these new zones to test them out:

sudo firewall-cmd --zone=publicweb --change-interface=eth0
sudo firewall-cmd --zone=privateDNS --change-interface=eth1

At this point, you have the opportunity to test your configuration. If these values work for you, you will want to add the same rules to the permanent configuration. You can do that by re-applying the rules with the –permanent flag:

sudo firewall-cmd --zone=publicweb --permanent --add-service=ssh
sudo firewall-cmd --zone=publicweb --permanent --add-service=http
sudo firewall-cmd --zone=publicweb --permanent --add-service=https
sudo firewall-cmd --zone=privateDNS --permanent --add-service=dns

You can then modify your network interfaces to automatically select the correct zones.

We can associate the eth0 interface with the “publicweb” zone:

sudo nano /etc/sysconfig/network-scripts/ifcfg-eth0
[label /etc/sysconfig/network-scripts/ifcfg-eth0
. . .
IPV6_AUTOCONF=no
DNS1=2001:4860:4860::8844
DNS2=2001:4860:4860::8888
DNS3=8.8.8.8
ZONE=publicweb

And we can associate the eth1 interface with “privateDNS”:

sudo nano /etc/sysconfig/network-scripts/ifcfg-eth1
/etc/sysconfig/network-scripts/ifcfg-eth1
. . .

NETMASK=255.255.0.0
DEFROUTE='no'
NM_CONTROLLED='yes'
ZONE=privateDNS
Afterwards, you can restart your network and firewall services:
sudo systemctl restart network
sudo systemctl restart firewalld

Validate that the correct zones were assigned:

firewall-cmd --get-active-zones
output
privateDNS
  interfaces: eth1
publicweb
  interfaces: eth0

And validate that the appropriate services are available for both of the zones:

firewall-cmd --zone=publicweb --list-services
output
http htpps ssh
firewall-cmd --zone=privateDNS --list-services
output
dns

You have successfully set up your own zones. If you want to make one of these zones the default for other interfaces, remember to configure that behavior with the –set-default-zone= parameter:

sudo firewall-cmd --set-default-zone=publicweb

To configure your firewall to start at boot, type:

sudo systemctl enable firewalld