If you get a notice that there is a new version of PowerShell, you can update it easily. Sometimes you see an update notice when you open PowerShell.
Category: Windows 2008 Server
This article guides you how to assign Home Folder to Active Directory users.
Install the File Server Resource Manager
- Open Server Manager
- Go to “Add roles and features”
- In “Server Roles” expand “File and Storage Services“, again expand “File and iSCI Services“, then tick “File Server Resource Manager” and click “next” to install.

Configure a Shared Folder
- Create a shared folder ex:- D:\HOME
- Open “HOME” folder properties by right clicking on it and go to properties > sharing.
- Click on “Share” button and activate folder sharing. Add users. Find shared folder path ex:- “\\YOUR-SERVER\home\”
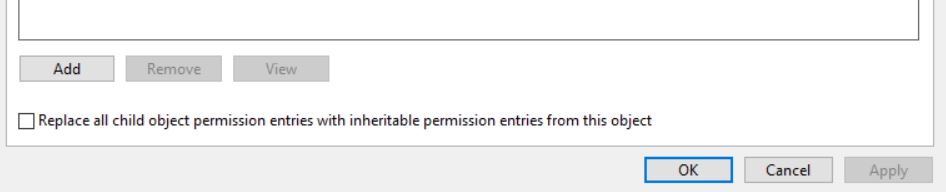
- select “security” tab and then open “Advance Security”. Please make sure inheritance is disabled like below.
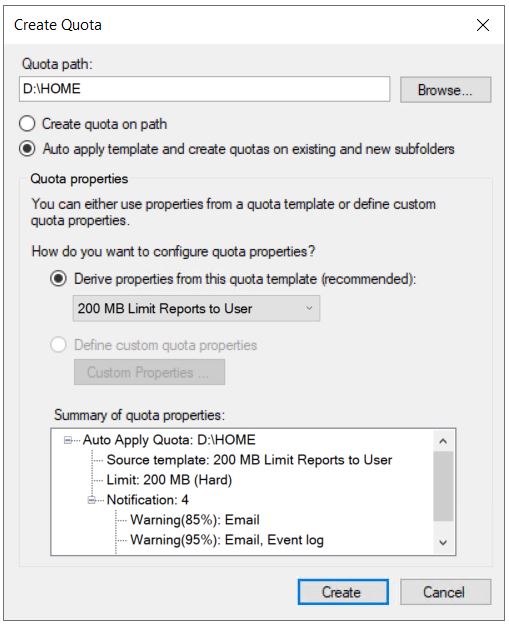
Configure Disk Quota
- Open “File Server Resource Manager”
- Expand “Quota Management” , you can configure “Quota Templates” if you wish or you can use existing template like here I did.
- Click on “Quotas” –> “Create Quotas” from right hand side.
- On then “Create Quota” window, browse and set Quota Path, select “Auto apply template and create quotas on existing and new sub folders” radio button, and make sure to select previously configured template from the drop down menu (200 MB Limit Reports to User – existing template).
Attach Network folder to Active directory user
Open “Active Directory Users and Computers”
Right click on user and open “properties” , then browse “profile” and set following Network path there.
“\\YOUR-SERVER\home\%username%”
If you get the following error message the first time that you access Windows after installation,
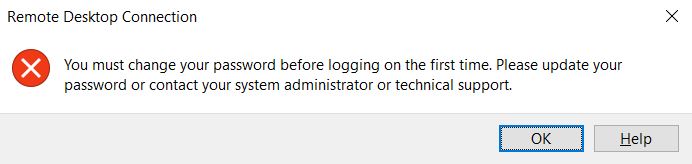
then your client has been negotiating with the server for network level authentication.
However, network level authentication is executed before a remote desktop session has even been created.
That means that you cannot perform the forced password change during the first login.
Temporarily disabling network level authentication
To make the password change take place despite this, you must first temporarily disable network level authentication.
To do this, first, create a RDP file:
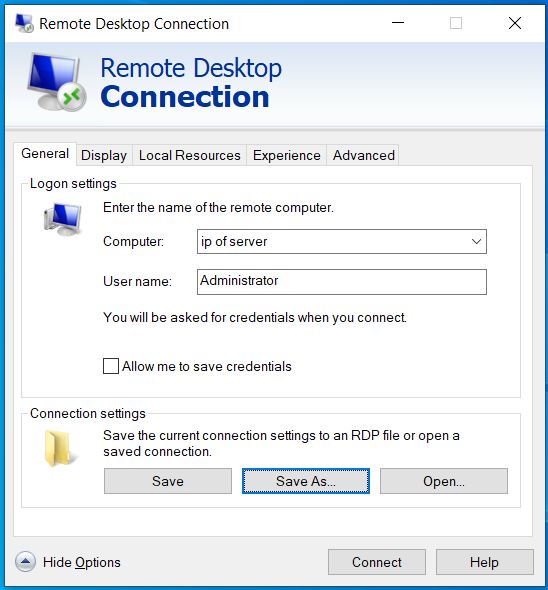
The save the file as Newconnection.rdp
Now, open the file with notepad and add the following line at the bottom:
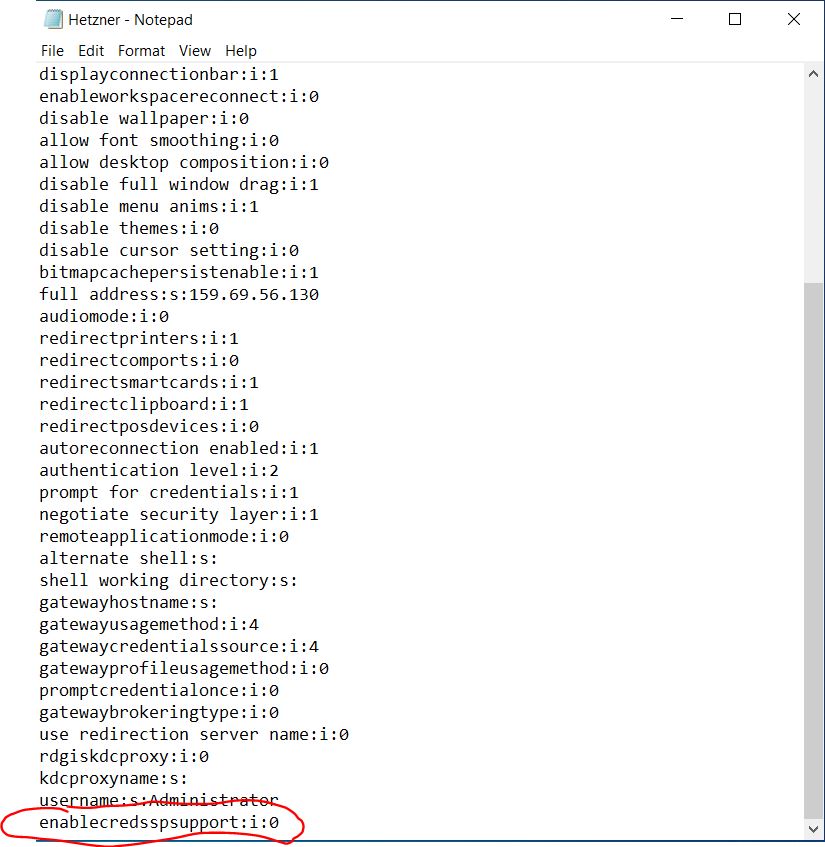
Save it. Now click on it to open and login.
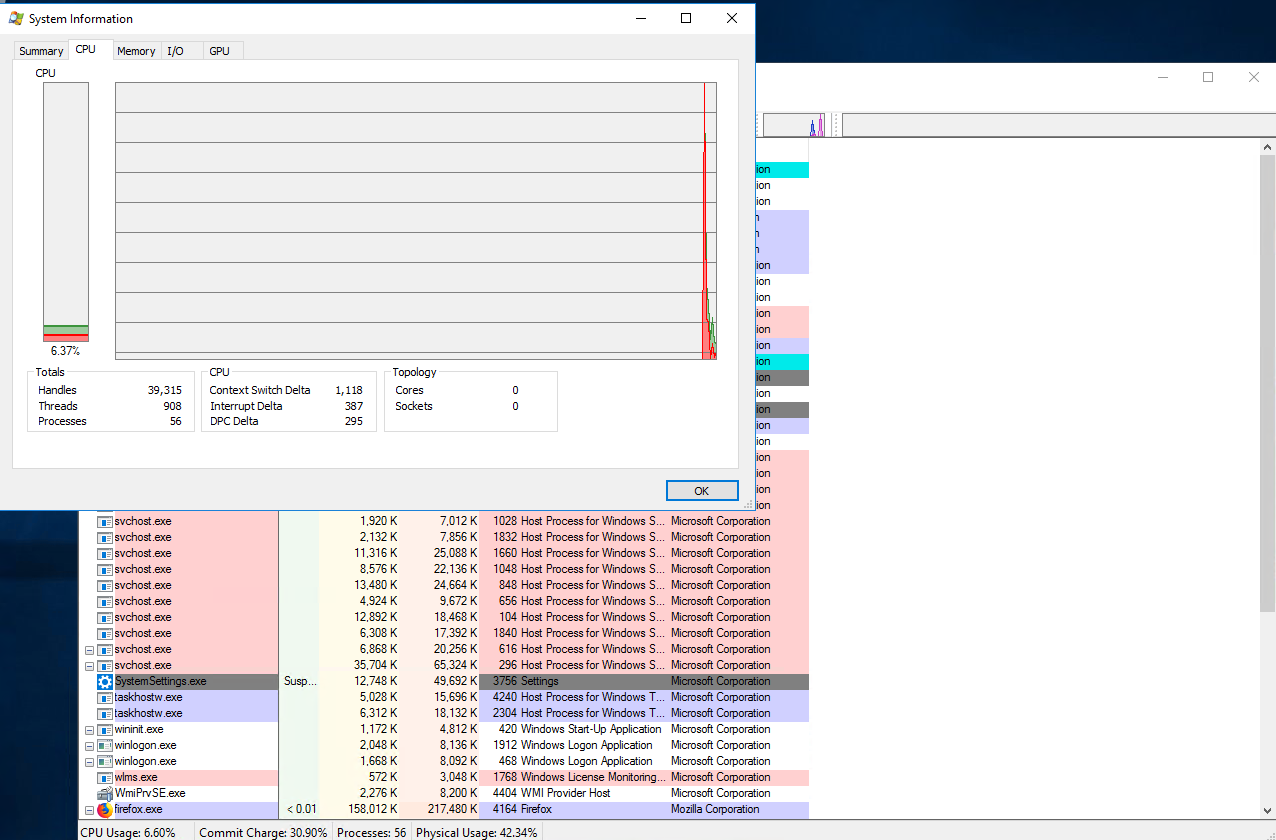
Ever wondered which program has a particular file or directory open? Now you can find out. Process Explorer shows you information about which handles and DLLs processes have opened or loaded.
Ever wondered which program has a particular file or directory open? Now you can find out. Process Explorer shows you information about which handles and DLLs processes have opened or loaded.
The Process Explorer display consists of two sub-windows. The top window always shows a list of the currently active processes, including the names of their owning accounts, whereas the information displayed in the bottom window depends on the mode that Process Explorer is in: if it is in handle mode you’ll see the handles that the process selected in the top window has opened; if Process Explorer is in DLL mode you’ll see the DLLs and memory-mapped files that the process has loaded. Process Explorer also has a powerful search capability that will quickly show you which processes have particular handles opened or DLLs loaded.
The unique capabilities of Process Explorer make it useful for tracking down DLL-version problems or handle leaks, and provide insight into the way Windows and applications work.
https://docs.microsoft.com/en-us/sysinternals/downloads/process-explorer
This information shows you how to Configure the Windows firewall to allow pings ICMP Ping.
- Open Windows Firewall
- Click Advanced Settings on the left.
- From the left pane of the resulting window, click Inbound Rules.
- In the right pane, find the rules titled File and Printer Sharing (Echo Request – ICMPv4-In).
- Right-click each rule and choose Enable Rule.
Error when using Remote Desktop to connect to a Windows Server:
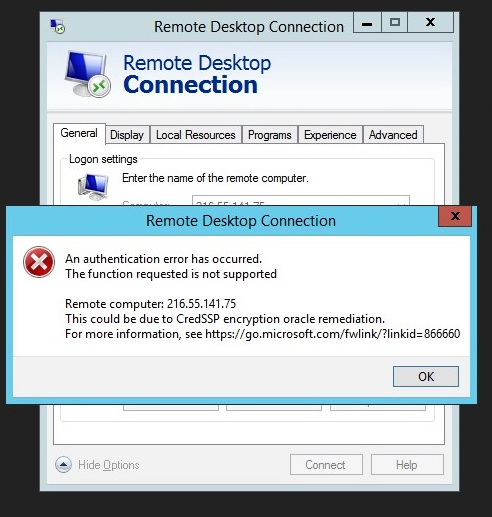
Microsoft Article: https://support.microsoft.com/en-us/help/4093492/credssp-updates-for-cve-2018-0886-march-13-2018
Fix: Run updates for Windows
Taking Ownership of Files and Folders in Windows Server. Here are some notes on how to do this:
If you are an administrator, an authorized user, or a backup operator, you can take ownership of a file or folder by completing the following steps:
1. In Windows Explorer, open the file or folder’s Properties dialog box by right-clicking the file or folder and then clicking Properties.
2. On the Security tab, click Advanced to display the Advanced Security Settings dialog box.
3. On the Owner tab, click Edit.This opens the Advanced Security Settings dialog box for editing.
4. In the Change Owner To list, select the new owner.If you’re taking ownership of a folder, you can take ownership of all subfolders and files within the folder by selecting the Replace Owner On Subcontainers And Objects option.
5. Click OK twice when you have finished.
Assigning Ownership
If you are an administrator or the current owner of a file, you can assign ownership of a file or a folder to another user or group by completing these steps:
1. In Windows Explorer, open the file or folder’s Properties dialog box by right-clicking the file or folder and then clicking Properties.
2. On the Security tab, click Advanced to display the Advanced Security Settings dialog box.
3. On the Owner tab, click Edit. This opens the Advanced Security Settings dialog box for editing.
4. Click Other Users Or Groups to display the Select User, Computer, Service Account, Or Group dialog box.
5. Type the name of a user or a group, and then click Check Names. If multiple names match the value you entered, you’ll see a list of names and can choose the one you want to use. Otherwise, the name will be filled in for you, and you can click OK to close the Select User, Computer, Service Account, Or Group dialog box.
6. In the Change Owner To list, select the new owner. If you’re assigning ownership of a folder, you can assign ownership of all subfolders and files within the folder by selecting the Replace Owner On Subcontainers And Objects option.
7. Click OK twice when you have finished.
Codero
Window 2008 does support TLS 1.2. There is a free program that will help with the installation.
https://www.nartac.com/Products/IISCrypto
Running the program and saving should ensure the proper TLS setting is running on your server. A reboot will be required after applying these settings to your server.
Also on older window 7 machines, there are reported errors when connecting to outlook.
I’ve found a Windows 7 and Outlook 2016 fix for TLS 1.2 that has worked on a bunch of machines. TLS12-Enable.reg, which can be found here. This is TechNet for Exchange Servers, but the reg fix works.
SSL Protocols for Dovecot can be set to: TLSv1.2 !TLSv1.1 !TLSv1 !SSLv3 !SSLv2
Anyone with issues can run the regedit and it usually fixes the issue with Outlook 2016. Due to other issues, I don’t like 2012,13.
For EXIM, the default works in v72.0.5
For Apache, the default SSL/TLS Protocols work fine. (TLSv1.2)
It could be that a session was left connected. If thats the case I’ll try using the admin console command and see if I can get connected with it.
On you local computer, go to Start -> Run then paste this and hit enter
mstsc.exe /admin
It’ll prompt for IP and then user/pass. It looks like it opens Remote Desktop Connection, but really its the “admin console”
I found one way to access the shared folder without giving the username and password.
We need to change the share folder protect settings in the machine where the folder has been shared.
Go to Control Panel > Network and sharing center > Change advanced sharing settings > Enable Turn Off password protect sharing option.
By doing the above settings we can access the shared folder without any username/password.
Go to Control Panel > Network and sharing center > Change advanced sharing settings > Enable Turn Off password protect sharing option.
By doing the above settings we can access the shared folder without any username/password.
You need to go to user accounts and enable Guest Account, its default disabled. Once you do this, you share any folder and add the guest account to the list of users who can accesss that specific folder, this also includes to Turn off password Protected Sharing in ‘Advanced Sharing Settings’.
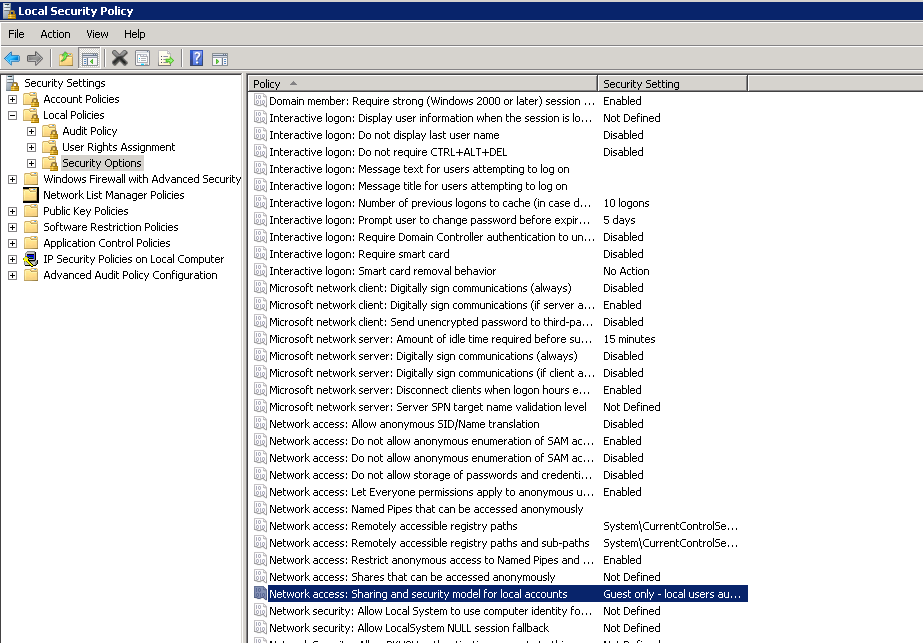
After some more research, there are 2 final steps in sharing over network segments like this case. By default, Everyone does not include anonymous logins for permissions. Anonymous logins would be any user trying to access a share without a local username and password. The second step is the sharing and security policy which is defaulted to classic mode. Changed these in the gpedit console to:
1)enabled for everyone includes anonymous
2) guest mode for sharing and security model
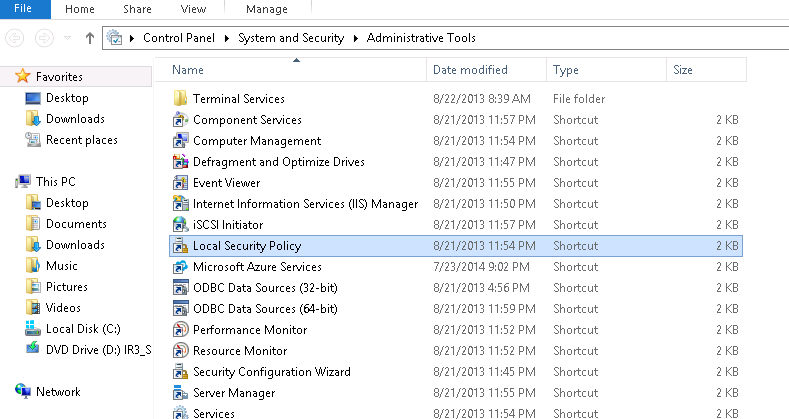
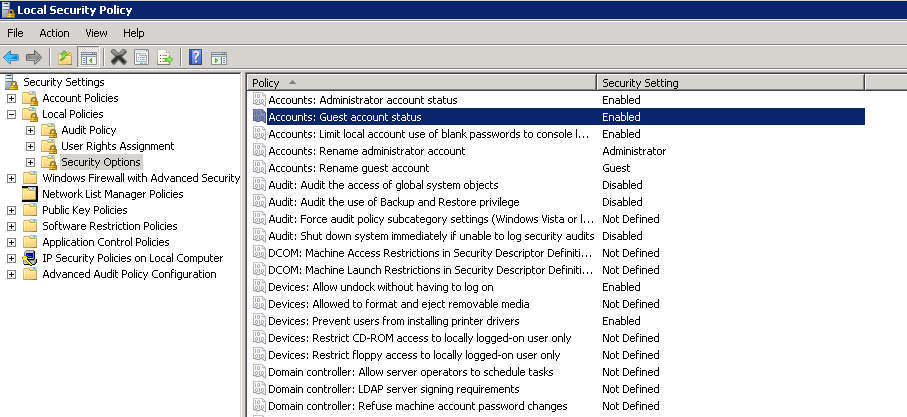
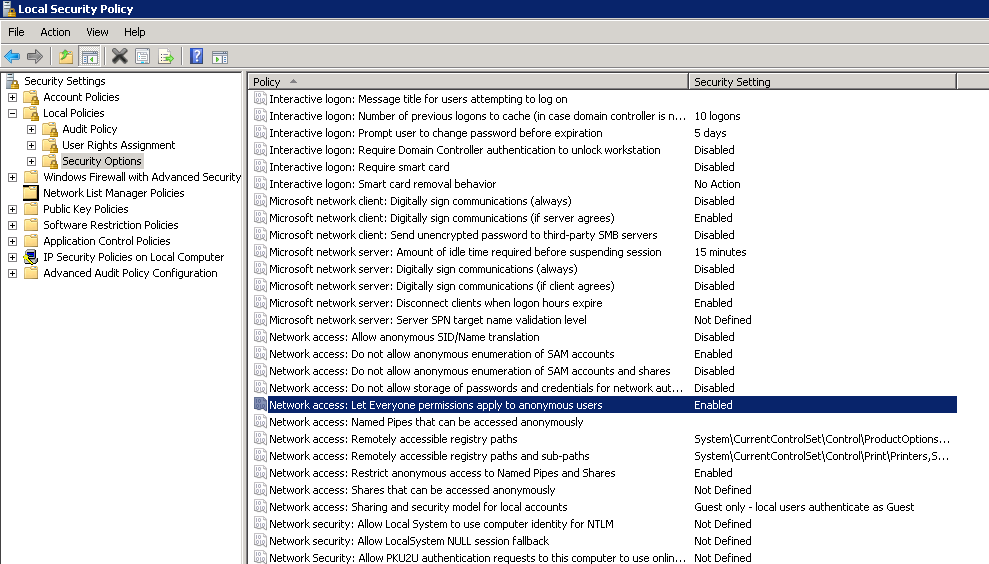
Start > Administrative tools > Local Security Policy > Local Policy, Security Options.
Accounts: Guest account status Enabled
Network access: Let Everyone permissions apply to anonymous users Enabled
Network access: Sharing and Security model for local accounts – set to Guestonly – local users authenticate as guest
Step 2
Step 3
Step 3
This should be able to access the share now without any prompt for user or password.