Passive FTP set for 50000-51000
Or, port 60000-61000 on your hardware firewall for FTP passive ports.
Linux, Windows, Software Tips, Articles and Hacks
Passive FTP set for 50000-51000
Or, port 60000-61000 on your hardware firewall for FTP passive ports.
Windows 2008 R2
1) SQL Server should be up and running.
All Programs >> Microsoft SQL Server 2008 >> Configuration Tools >> SQL Server Configuration Manager >> SQL Server Services, and check if SQL Server service status is “Running”.
Run “sqlcmd -L” in your command prompt to ascertain if your server is included in your network list.
2) Enable TCP/IP in SQL Server Configuration
When two or more SQL Servers are connected across network they do all communication using TCP/IP. The default port of SQL Server installation is 1433. This port can be changed through SQL Server Configuration Manager. TCP/IP should be enabled for SQL Server to be connected.
Go to All Programs >> Microsoft SQL Server 2008 >> Configuration Tools >> SQL Server Configuration Manager >> Select TCP/IP >> right click and enable
3) Open Port in Windows Firewall
Go to Control Panel >> Windows Firewall >> Change Settings >> Exceptions >> Add Port
Make the following entries in popup “Add a Port” and click OK.
Name : SQL
Port Number: 1433
Protocol: Select TCP
1) SQL Server should be up and running.
Go to All Programs >> Microsoft SQL Server 2008 >> Configuration Tools >> SQL Server Configuration Manager >> SQL Server Services, and check if SQL Server service status is “Running”.
2) Enable TCP/IP in SQL Server Configuration
Go to All Programs >> Microsoft SQL Server 2008 >> Configuration Tools >> SQL Server Configuration Manager >> Select TCP/IP >>Right Click on TCP/IP >> Click on Enable
restart SQL Server Services
3) Open Port in Windows Firewall
Go to Control Panel >> Windows Firewall >> Change Settings >> Exceptions >> Add Port
Make the following entries in popup “Add a Port” and click OK.
Name : SQL
Port Number: 1433
Protocol: Select TCP
4) Enable Remote Connection
All Programs >> Microsoft SQL Server 2008 >> Configuration Tools >> SQL Server Configuration Manager
Right click on the server node and select Properties.
Go to Left Tab of Connections and check “Allow remote connections to this server”
5) Enable SQL Server Browser Service
Go to All Programs >> Microsoft SQL Server 2008 >> Configuration Tools >> SQL Server Configuration Manager >> SQL Server Browser
FTP produces the following error:
530 User cannot log in, home directory inaccessible
Other resources:
http://kb.odin.com/en/549
http://kb.odin.com/en/124140
http://kb.odin.com/en/116628
http://kb.odin.com/en/124094
Internet Explorer 10 is available by default with Windows Server 2012 /R2 , which includes Adobe Flash Player as a platform feature. However, the plugin is enabled only if you enable the Desktop Experience feature.
To enable Desktop Experience on Windows Server 2012
1. Open Server Manager and click Add Roles and Features.
2. When the Add Roles and Features Wizard appears, specify the appropriate values on the Installation Type, Server Selection, and Server Roles pages.
3. On the Features page, expand User Interfaces and Infrastructure and select Desktop Experience.
4. On the Confirmation page, select Restart the destination server automatically if required and click Install.
On Windows 2008 R2 please visit www.adobe.com to download and install the latest version of Flash Player. It is not necessary to enable Flash Player on Windows 2008 R2.
Configuring the rDNS for a linux server is easy. A windows server with plesk is a different story.
Plesk
I changed the hostname in the plesk Tools and Settings.

Rebooted the system. Then sent a test email. Here is the header:
Received: from WIN-QO7M1M92HBS.home
Humm…where is the new hostname? So I did some investigation. I checked the computername in windows:
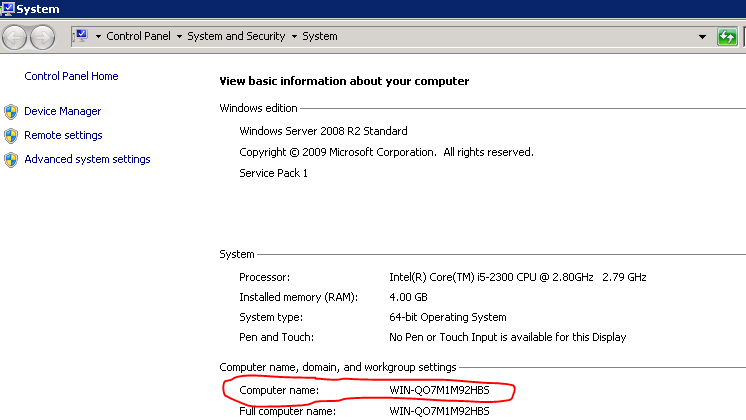
Then I checked the Mailenable settings > Services and Connectors > SMTP > properties.
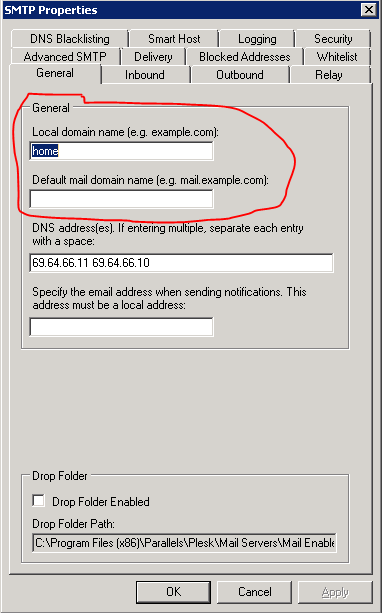
So, the email received from name is a combination of the Windows computer name and the Mailenable Local domain name.
Now that I had this information, how do I give the mail server a valid hostname?
Definition of profiles in Microsoft words:
Domain. Windows automatically identifies networks on which it can authenticate access to the domain controller for the domain to which the computer is joined in this category. No other networks can be placed in this category.
Public. Other than domain networks, all networks are initially categorized as public. Networks that represent direct connections to the Internet or are in public places, such as airports and coffee shops should be left public.
Private. A network will only be categorized as private if a user or application identifies the network as private. Only networks located behind a NAT device (preferably a hardware firewall) should be identified as private networks. Users will likely want to identify home or small business networks as private.
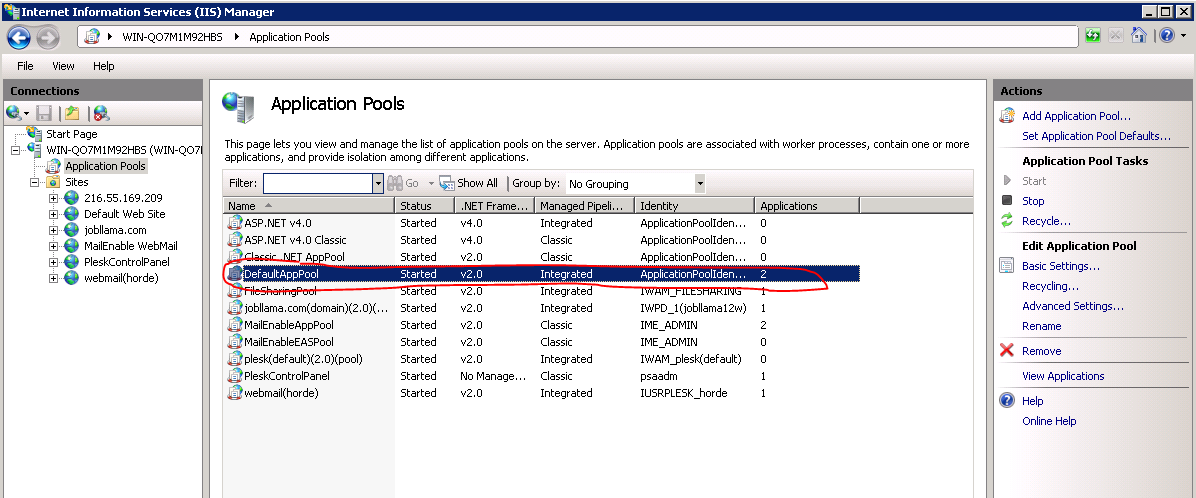
The solution for me was to change the .NET framework version in the Application Pools from v4.0 to v2.0 for the Default App Pool:
21
down vote
If, like me, you need to target v4 but can only build with .net 3.5, follow the instruction here. Just replace in your web.config the whole content of the
<configSections>
<sectionGroup name="system.web.extensions" type="System.Web.Configuration.SystemWebExtensionsSectionGroup, System.Web.Extensions, Version=4.0.0.0, Culture=neutral, PublicKeyToken=31bf3856ad364e35">
  <sectionGroup name="scripting" type="System.Web.Configuration.ScriptingSectionGroup, System.Web.Extensions, Version=4.0.0.0, Culture=neutral, PublicKeyToken=31bf3856ad364e35">
    <section name="scriptResourceHandler" type="System.Web.Configuration.ScriptingScriptResourceHandlerSection, System.Web.Extensions, Version=4.0.0.0, Culture=neutral, PublicKeyToken=31bf3856ad364e35" requirePermission="false" allowDefinition="MachineToApplication"/>
    <sectionGroup name="webServices" type="System.Web.Configuration.ScriptingWebServicesSectionGroup, System.Web.Extensions,  Version=4.0.0.0, Culture=neutral, PublicKeyToken=31bf3856ad364e35">
      <section name="jsonSerialization" type="System.Web.Configuration.ScriptingJsonSerializationSection, System.Web.Extensions, Version=4.0.0.0, Culture=neutral, PublicKeyToken=31bf3856ad364e35" requirePermission="false" allowDefinition="Everywhere"/>
      <section name="profileService" type="System.Web.Configuration.ScriptingProfileServiceSection, System.Web.Extensions, Version=4.0.0.0, Culture=neutral, PublicKeyToken=31bf3856ad364e35" requirePermission="false" allowDefinition="MachineToApplication"/>
      <section name="authenticationService" type="System.Web.Configuration.ScriptingAuthenticationServiceSection, System.Web.Extensions, Version=4.0.0.0, Culture=neutral, PublicKeyToken=31bf3856ad364e35" requirePermission="false" allowDefinition="MachineToApplication"/>
      <section name="roleService" type="System.Web.Configuration.ScriptingRoleServiceSection, System.Web.Extensions, Version=4.0.0.0, Culture=neutral, PublicKeyToken=31bf3856ad364e35" requirePermission="false" allowDefinition="MachineToApplication"/>
    </sectionGroup>
  </sectionGroup>
</sectionGroup>
Connect to your server via Remote Desktop
Click simultaneously on the Windows logo + R to open the “Run” dialog and execute the “cmd” command
Open the registry editor by typing the “regedit” command
Search for this registry subkey:
HKEY_LOCAL_MACHINE\System\CurrentControlSet\Control\TerminalServer\WinStations\RDP-Tcp\PortNumber
Double-click or right-click on the “PortNumber” registry subkey, select the decimal base and type the port number of your choice (the default port is 3389, in this example, we selected port 3390). Click on “Ok” to save your selection.
IMPORTANT: Make sure that remote access to your server through the new port is authorized in your Windows firewall before executing the next step. Add a new Firewall Port Incoming rule allowing the port number.
Exit the registry editor
Restart your server
After the reboot, specify the Remote Desktop port number.
Resources:
http://www.techrepublic.com/blog/the-enterprise-cloud/changing-the-rdp-listening-port-on-windows-server/
Open IIS Manager and navigate to the level you want to manage. For information about opening IIS Manager, see Open IIS Manager (IIS 7). For information about navigating to locations in the UI, see Navigation in IIS Manager (IIS 7).
In the Connections pane, click Sites.
In Features View, select the site for which you want to enable trace logging.
In the Actions pane, under Configure, click Failed Request Tracing.
In the Edit Web Site Failed Request Tracing Settings dialog box, select Enable to enable logging for this site.
In the Directory text box, type the path where you want to store the log files or click the browse button (…) to find a location on the computer. The default is %SystemDrive%\inetpub\logs\FailedReqLogFiles.
noteNote
As a best practice, log files, such as log files for failed request tracing, should be stored in a directory other than systemroot.
In the Maximum number of trace files text box, type the maximum number of trace log files that you want to keep, and then click OK.