Sometimes wordpress may have errors that you want to find out more about. Here are a few steps we can take to see more information on what’s happening.
Category: Wordpress
What are the top cache plugins for wordpress?
There are several popular cache plugins for WordPress, including:
Redis Object Cache – A persistent object cache backend powered by Redis. Supports Predis, PhpRedis, Relay, replication, sentinels, clustering and WP-CLI.
Panomity WP Cache – Provides an extremely simple full page cache of the homepage.
WP Fastest Cache – This is a lightweight and easy-to-use plugin that offers a range of caching options, including minification and Gzip compression.
W3 Total Cache – This is a comprehensive caching plugin that offers a range of caching options, including page caching, database caching, and object caching.
WP Super Cache – This is a popular caching plugin that offers a range of caching options, including page caching, gzip compression, and CDN support.
Comet Cache – This is a simple and easy-to-use caching plugin that offers features such as page caching, browser caching, and Gzip compression.
LiteSpeed Cache – All-in-one unbeatable acceleration & PageSpeed improvement: caching, image/CSS/JS optimization.
It’s worth noting that the effectiveness of a caching plugin can depend on your website’s specific setup and requirements, so it’s a good idea to experiment with different options to find the best fit for your site.
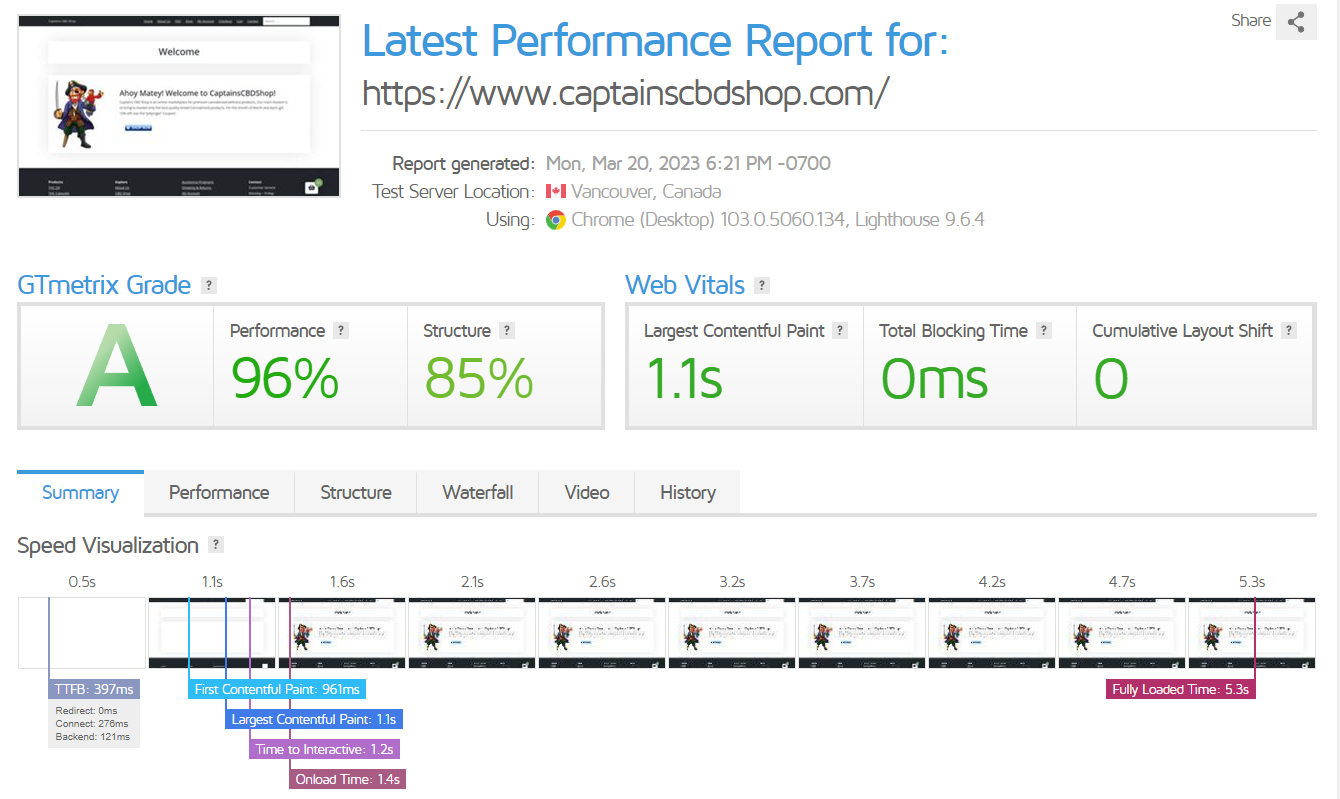
Let’s test a WordPress WooCommerce Site – CaptainsCBDShop.com.
Without Cache Plugins – https://gtmetrix.com/reports/www.captainscbdshop.com/bwO9zBlZ/
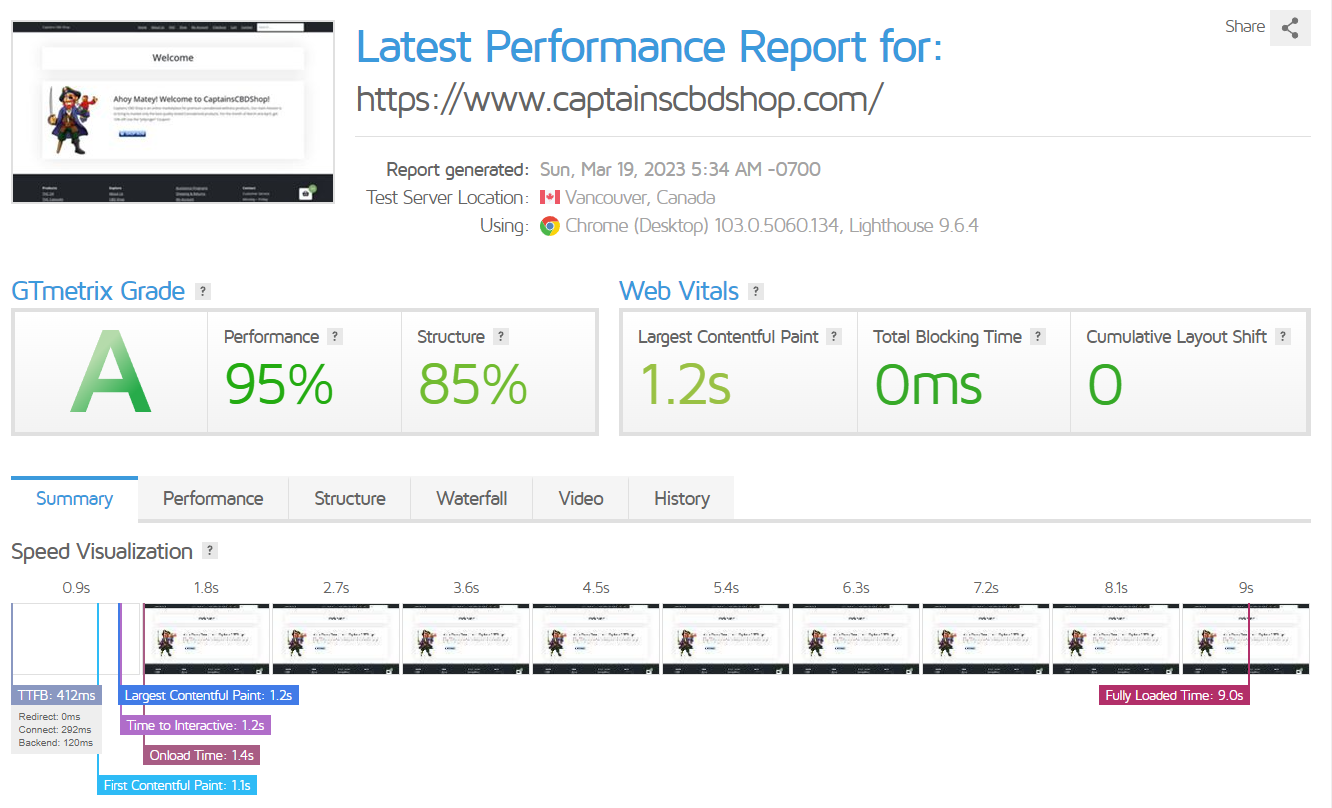
In this test, we will test without any plugins.
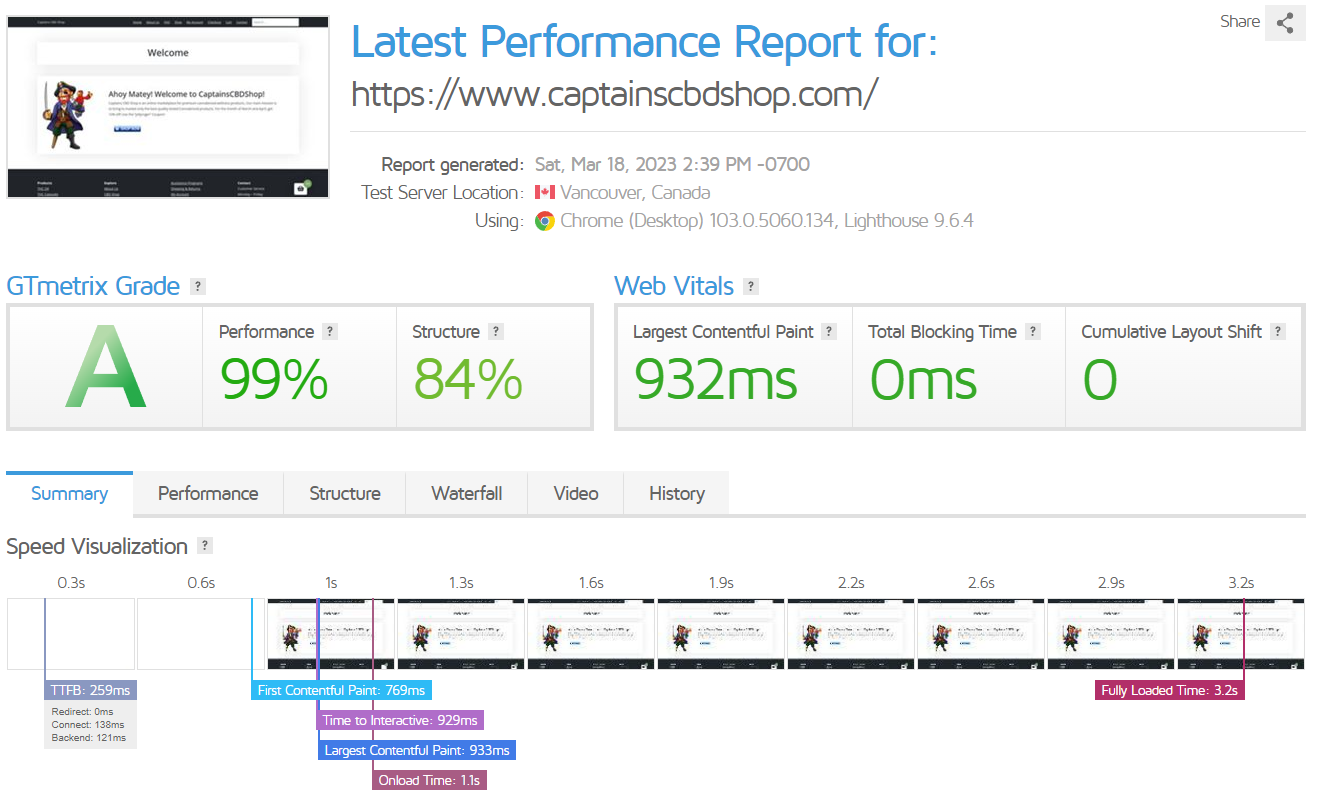
With Redis Object Cache
In this test, we set up redis and then installed the plugin in WordPress.

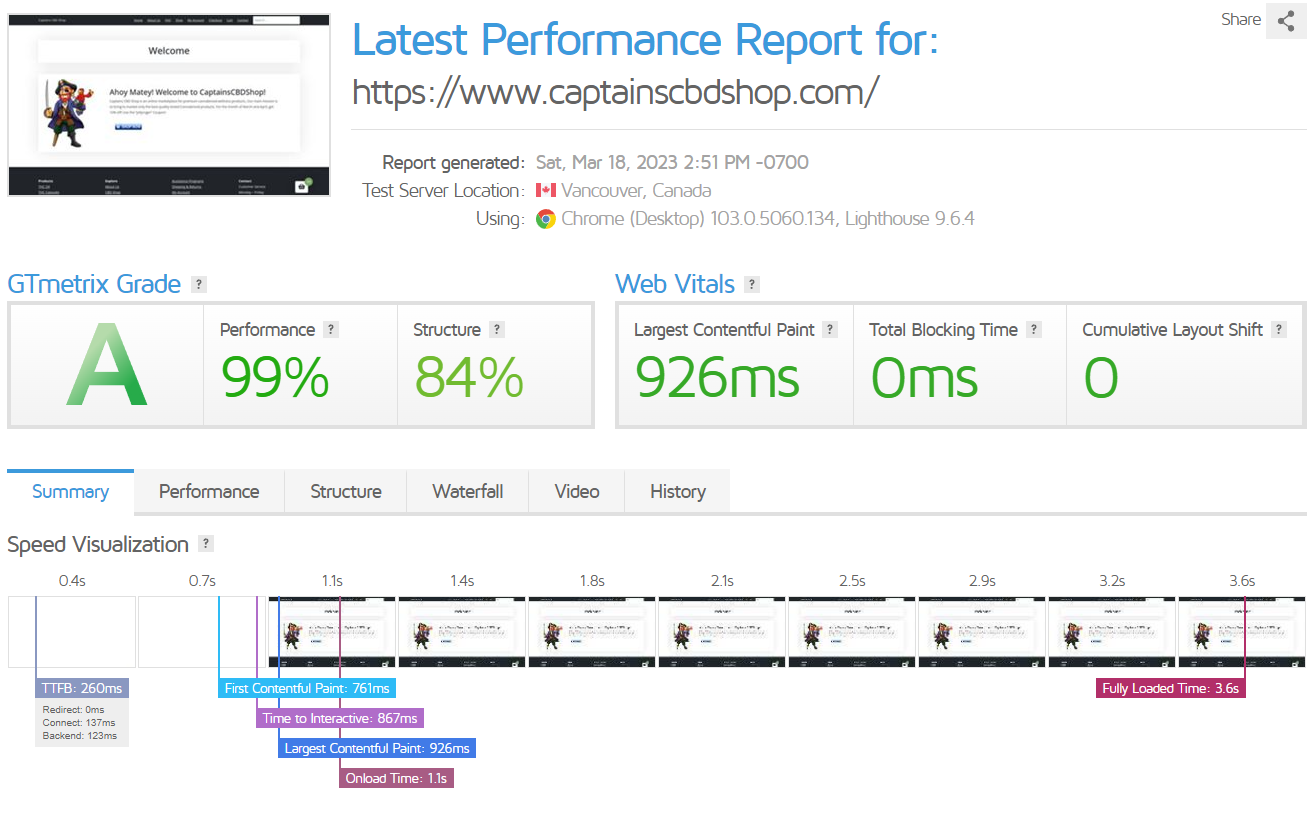
With Panomity WP Cache
In this test, we set up the Panomity WP Cache plugin.
WP Fastest Cache
Here we test with WP Fastest Cache.
W3 Total Cache
Below we set up W3 Total Cache
W3 Total Cache has a cool setup where you can configure it.
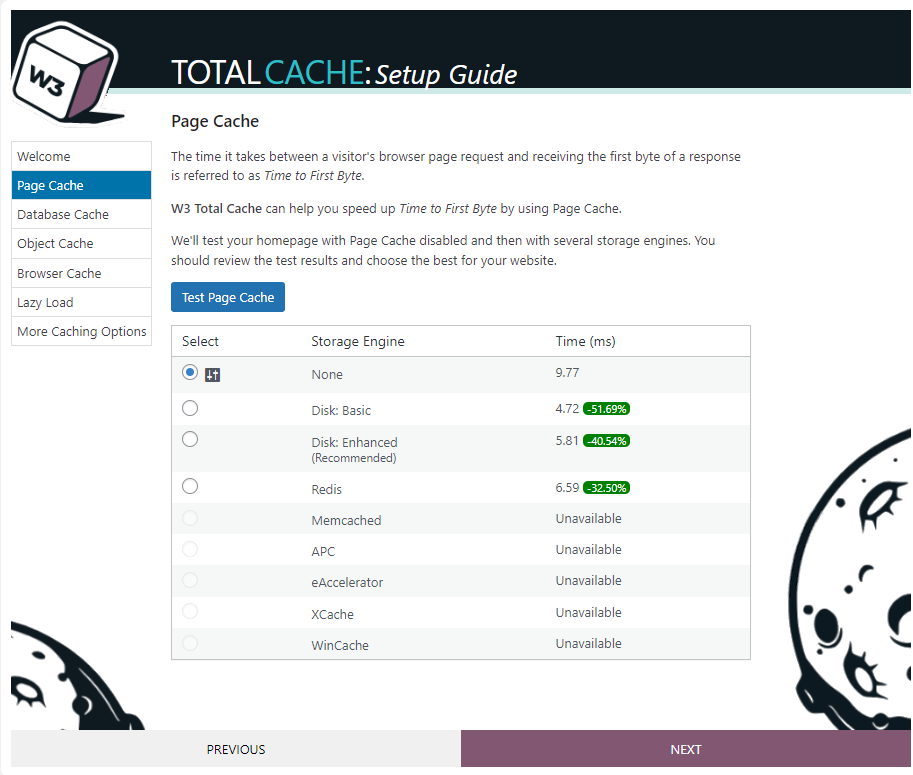
Here are the test results after installation.
So, the following we run the commands to set up apache for wordpress.
Download and unzip the WordPress package from:
# wget https://wordpress.org/latest.tar.gz
Then extract the package to the apache root directory:
# tar -xzvf latest.tar.gz --directory /var/www/kdoozle
Activate Mod Rewrite.
# sudo a2enmod rewrite
Create vhosts.
<VirtualHost *:80>
    ServerName ipgw.io
    ServerAlias www.ipgw.io
    ServerAdmin webmaster@ipgw.io
    DocumentRoot /var/www/ipgw

    <Directory /var/www/ipgw>
        Options -Indexes +FollowSymLinks
        AllowOverride All
    </Directory>

    ErrorLog ${APACHE_LOG_DIR}/ipgw.io-error.log
    CustomLog ${APACHE_LOG_DIR}/ipgw.io-access.log combined
</VirtualHost>

<VirtualHost *:443>
    ServerAdmin rogerp@local
    ServerName www.ipgw.io
    ServerAlias ipgw.io
    DocumentRoot /var/www/ipgw
    SSLEngine on
    SSLCertificateFile /etc/pki/tls/certs/ipgw.io.crt
    SSLCertificateKeyFile /etc/pki/tls/certs/ipgw.io.key
</VirtualHost>

<VirtualHost *:443>
    ServerAdmin rogerp@local
    ServerName www.ipgw,io
    ServerAlias ipgw.io

    DocumentRoot /var/www/ipgw

    SSLEngine on
    SSLCertificateFile /etc/pki/tls/certs/ipgw.io.crt
    SSLCertificateKeyFile /etc/pki/tls/certs/ipgw.io.key
</VirtualHost>
After installing it, you will need to restart Apache services with the command:
service apache2 restart
If needed, you will need to edit the config file and find the directive:
AllowOverride None
Change it to:
AllowOverride All
Order allow,deny
Allow from all
Create the Database
MariaDB [(none)]> CREATE database kdoozle;
Query OK, 1 row affected (0.001 sec)
Add user and set up permissions.
MariaDB [(none)]> CREATE USER 'kdoozle'@'localhost' IDENTIFIED BY 'sdsrg54yhs';
Query OK, 0 rows affected (0.032 sec)
MariaDB [(none)]> GRANT ALL PRIVILEGES ON kdoozle.* to 'kdoozle'@'localhost' IDENTIFIED BY 'sdsrg54yhs';
Query OK, 0 rows affected (0.017 sec)
Next, run the installer by loading the website in the browser.
Error in WordPress Toolkit when updating.
Selected items were updated with errors:
The following errors have occurred while updating WordPress instance #1 ('https://www.captainscbdshop.com'):
- Unable to update plugin 'akismet`4.1.12`1`', details: Fatal error: Allowed memory size of 41943040 bytes exhausted (tried to allocate 20480 bytes) in /home/captainscbdshop/public_html/wp-content/plugins/woocommerce/packages/action-scheduler/classes/data-stores/ActionScheduler_DBStore.php on line 199
Fatal error: Allowed memory size of 41943040 bytes exhausted (tried to allocate 20480 bytes) in /home/captainscbdshop/public_html/wp-includes/plugin.php on line 439

- Unable to update plugin 'creative-mail-by-constant-contact`1.4.6`1`', details: Fatal error: Allowed memory size of 41943040 bytes exhausted (tried to allocate 32768 bytes) in /home/captainscbdshop/public_html/wp-content/plugins/woocommerce/packages/action-scheduler/classes/data-stores/ActionScheduler_DBStore.php on line 693
Fatal error: Allowed memory size of 41943040 bytes exhausted (tried to allocate 32768 bytes) in /usr/local/cpanel/3rdparty/wp-toolkit/plib/vendor/wp-cli/vendor/wp-cli/php-cli-tools/lib/cli/Colors.php on line 1

- Unable to update plugin 'jetpack`10.1`1`', details: Fatal error: Allowed memory size of 41943040 bytes exhausted (tried to allocate 20480 bytes) in /home/captainscbdshop/public_html/wp-content/plugins/woocommerce/packages/action-scheduler/classes/data-stores/ActionScheduler_DBStore.php on line 199
Fatal error: Allowed memory size of 41943040 bytes exhausted (tried to allocate 20480 bytes) in /home/captainscbdshop/public_html/wp-includes/plugin.php on line 439

- Unable to update plugin 'woocommerce`5.7.1`1`', details: Fatal error: Allowed memory size of 41943040 bytes exhausted (tried to allocate 20480 bytes) in /home/captainscbdshop/public_html/wp-content/plugins/woocommerce/packages/action-scheduler/classes/data-stores/ActionScheduler_DBStore.php on line 199
Fatal error: Allowed memory size of 41943040 bytes exhausted (tried to allocate 20480 bytes) in /home/captainscbdshop/public_html/wp-includes/plugin.php on line 439

- Unable to update plugin 'woocommerce-services`1.25.18`1`', details: Fatal error: Allowed memory size of 41943040 bytes exhausted (tried to allocate 65536 bytes) in /home/captainscbdshop/public_html/wp-includes/widgets/class-wp-widget-rss.php on line 136
Fatal error: Allowed memory size of 41943040 bytes exhausted (tried to allocate 65536 bytes) in /home/captainscbdshop/public_html/wp-includes/class-wp-fatal-error-handler.php on line 45

Checking for updates was performed with errors:
Failed to reset cache for the instance #1: Fatal error: Allowed memory size of 41943040 bytes exhausted (tried to allocate 20480 bytes) in /home/captainscbdshop/public_html/wp-content/plugins/woocommerce/packages/action-scheduler/classes/data-stores/ActionScheduler_DBStore.php on line 509
Fatal error: Allowed memory size of 41943040 bytes exhausted (tried to allocate 4096 bytes) in /usr/local/cpanel/3rdparty/wp-toolkit/plib/vendor/wp-cli/vendor/composer/ClassLoader.php on line 427
Solution
In File Manager, Edit the file and change the lower memory limit:
public_html/wp-includes/default-constants.php
Change From:
// Define memory limits.
	if ( ! defined( 'WP_MEMORY_LIMIT' ) ) {
		if ( false === wp_is_ini_value_changeable( 'memory_limit' ) ) {
			define( 'WP_MEMORY_LIMIT', $current_limit );
		} elseif ( is_multisite() ) {
			define( 'WP_MEMORY_LIMIT', '64M' );
		} else {
			define( 'WP_MEMORY_LIMIT', '40M' );
		}
	}
Cange to:
// Define memory limits.
	if ( ! defined( 'WP_MEMORY_LIMIT' ) ) {
		if ( false === wp_is_ini_value_changeable( 'memory_limit' ) ) {
			define( 'WP_MEMORY_LIMIT', $current_limit );
		} elseif ( is_multisite() ) {
			define( 'WP_MEMORY_LIMIT', '64M' );
		} else {
			define( 'WP_MEMORY_LIMIT', '128M' );
		}
	}
In WordPress Toolkit, re-run check for updates. Now you can update.
Here are some great resources for hardening you CMS:
WordPress: OWASP WordPress Security Implementation Guide [OWASP]
WordPress: Hardening WordPress [Official WordPress Codex]
General: How to Secure your CMS [MalwareBytes]
General: A Security Overview of Content Management Systems [Detectify]
I recently received this error on a wordpress site update:
cURL error 28: Connection timed out after 10001 milliseconds with wordpress update.
The Fix:
- The first thing to do is to update your WordPress to the latest version if not already done.
- Then, check the following points :
- Make sure your server is running a recent version of PHP and the cURL library.
- Try to increase your Server Memory Limits settings.
- The cURL error can be a dns related issue. Your hosting company might need to switch dns configuration to Google, Cloudflare or OpenDNS : https://www.howtogeek.com/164981/how-to-switch-to-opendns-or-google-dns-to-speed-up-web-browsing/
- Ask your host if there is some limitation with wp-cron, or if loopback is disabled.
- Ask your host if there a firewall or security modules (e.g. mod_security ) that could block the outgoing cURL requests.
More information here: https://www.samuelaguilera.com/post/curl-error-28-wordpress
I recently moved a wordpress site to a different host and after all the files and database were updated kept getting the following error:
2018/01/31 12:10:11 [error] 1857#0: *165 FastCGI sent in stderr: "PHP message: PHP Warning:  Unknown: failed to open stream: No such file or directory in Unknown on line 0
PHP message: PHP Fatal error:  Unknown: Failed opening required '/home/olddomain/public_html/wordfence-waf.php' (include_path='.:/usr/share/pear:/usr/share/php') in Unknown on line 0" while reading response header from upstream, client: 65.47.199.226, server: domain.com, request: "GET / HTTP/2.0", upstream: "fastcgi://unix:/var/run/php-fpm/php-fpm.sock:", host: "domain.com"
After reviewing the KB files here:
https://docs.wordfence.com/en/After_moving_a_site_or_deleting_some_files,_I_see:_PHP_Fatal_error:_Unknown:_Failed_opening_required_/var/www/html/wordfence-waf.php
https://docs.wordfence.com/en/Web_Application_Firewall_FAQ#How_can_I_remove_the_firewall_setup_manually.3F
I was able to modify the .user.ini file and the wordfence-waf.php file to set the correct path and all is well.
UPDATE wp_options SET option_value = replace(option_value, ‘http://www.oldurl’, ‘http://www.newurl’) WHERE option_name = ‘home’ OR option_name = ‘siteurl’;
UPDATE wp_posts SET guid = replace(guid, ‘http://www.oldurl’,’http://www.newurl’);
UPDATE wp_posts SET post_content = replace(post_content, ‘http://www.oldurl’, ‘http://www.newurl’);
UPDATE wp_postmeta SET meta_value = replace(meta_value,’http://www.oldurl’,’http://www.newurl’);
mysql> UPDATE wp_options SET option_value = replace(option_value, ‘http://www.oldurl’, ‘http://www.newurl’) WHERE option_name = ‘home’ OR option_name = ‘siteurl’;
Query OK, 0 rows affected (0.00 sec)
Rows matched: 2 Changed: 0 Warnings: 0
mysql> UPDATE wp_posts SET guid = replace(guid, ‘http://www.oldurl’,’http://www.newurl’);
Query OK, 0 rows affected (0.02 sec)
Rows matched: 964 Changed: 0 Warnings: 0
mysql> UPDATE wp_posts SET post_content = replace(post_content, ‘http://www.oldurl’, ‘http://www.newurl’);
Query OK, 0 rows affected (0.05 sec)
Rows matched: 964 Changed: 0 Warnings: 0
mysql> UPDATE wp_postmeta SET meta_value = replace(meta_value,’http://www.oldurl’,’http://www.newurl’);g
Query OK, 0 rows affected (0.01 sec)
Rows matched: 686 Changed: 0 Warnings: 0
Implement WordPress automatic Updates using wp-config file
Before editing, creating a complete backup.
After backup, Navigate to the home directory and makes changes in wp-config.php file.
cd /var/www/domain.com
nano wp-config.php
Add the following…
/** Enable Auto Updates */
define('WP_AUTO_UPDATE_CORE', true);
add_filter( 'auto_update_plugin', '__return_true' );
add_filter( 'auto_update_theme', '__return_true' );
http://codex.wordpress.org/FAQ_Troubleshooting#How_to_deactivate_all_plugins_when_not_able_to_access_the_administrative_menus.3F