Do you wonder which databases are actually taking up how much space but only have one huge ibdata1 in your /var/lib/mysql and the directories inside your mysql data directory don’t represent the actual database sizes?

Run from a mysql root console:

mysql> SELECT table_schema AS “Database name”, SUM(data_length + index_length) / 1024 / 1024 AS “Size (MB)” FROM information_schema.TABLES GROUP BY table_schema;
+——————–+————-+
| Database name | Size (MB) |
+——————–+————-+
| information_schema | 0.00878906 |
| mysql | 0.62860394 |
| performance_schema | 0.00000000 |
| roundcube | 0.46875000 |
+——————–+————-+
8 rows in set (1.21 sec)

Sometimes your OS needs to be reinstalled by your datacenter. This means that you need to mount the slaved drive in order to copy the data to the new OS drive. Here is a typical example:

Login to the server and run the following to see whats mounted:

[root@68-168-105-44 ~]# df -h
Filesystem      Size  Used Avail Use% Mounted on
/dev/sdb3       913G  2.8G  864G   1% /
tmpfs           7.8G     0  7.8G   0% /dev/shm
/dev/sdb1       485M   80M  380M  18% /boot

As we can see above, there is the primary new OS drive mounted on /dev/sdb. To see all the drives, run the following:

[root@68-168-105-44 ~]# fdisk -l

Disk /dev/sda: 1000.2 GB, 1000204886016 bytes
255 heads, 63 sectors/track, 121601 cylinders
Units = cylinders of 16065 * 512 = 8225280 bytes
Sector size (logical/physical): 512 bytes / 512 bytes
I/O size (minimum/optimal): 512 bytes / 512 bytes
Disk identifier: 0x00000000

   Device Boot      Start         End      Blocks   Id  System
/dev/sda1   *           1          62      497983+  83  Linux
/dev/sda2              64         584     4184932+  82  Linux swap / Solaris
/dev/sda3             585      121598   972044955   82  Linux swap / Solaris

Disk /dev/sdb: 1000.2 GB, 1000204886016 bytes
255 heads, 63 sectors/track, 121601 cylinders
Units = cylinders of 16065 * 512 = 8225280 bytes
Sector size (logical/physical): 512 bytes / 512 bytes
I/O size (minimum/optimal): 512 bytes / 512 bytes
Disk identifier: 0x0009b45b

   Device Boot      Start         End      Blocks   Id  System
/dev/sdb1   *           1          64      512000   83  Linux
Partition 1 does not end on cylinder boundary.
/dev/sdb2              64         587     4194304   82  Linux swap / Solaris
Partition 2 does not end on cylinder boundary.
/dev/sdb3             587      121602   972054528   83  Linux

Since out drive from the first command showed the /dev/sdb disk as the primary OS disk, we can tell that the /dev/sda disk is the slaved disk. No we can mount it.

First, you’ll need to create a mount point. We’ll use /mnt/slave. This is where we’ll mount /mnt/slave. Enter the following commands:


# mkdir /mnt/slave
# mount /dev/sda3 /mnt/slave
# df -h
Filesystem      Size  Used Avail Use% Mounted on
/dev/sdb3       913G  2.7G  864G   1% /
tmpfs           7.8G     0  7.8G   0% /dev/shm
/dev/sdb1       485M   80M  380M  18% /boot
/dev/sda3       913G  113G  754G  13% /mnt/slave

Edit /etc/fstab so the new drive will automatically mount to /disk1 on reboot

# /dev/sda3       /mnt/slave  ext3  defaults     0       0

Note: article describes the issue caused by MySQL update from Atomic repository, make sure you have Atomic repository enabled before applying fix:


# yum repolist
Loaded plugins: fastestmirror
Loading mirror speeds from cached hostfile
* atomic: www4.atomicorp.com

After update MySQL cannot be started. In Plesk the following error message is shown:


    Error in Plesk:
    ERROR: PleskFatalException
    Unable to connect to database: mysql_connect() [<a href='function.mysql-connect'>function.mysql-connect</a>]: No such file or directory

    0: common_func.php3:153
    psaerror(string 'Unable to connect to database: mysql_connect() [<a href='function.mysql-connect'>function.mysql-connect</a>]: No such file or directory')
    1: auth.php3:116

or


    ERROR: Zend_Db_Adapter_Exception: SQLSTATE[HY000] [2002] No such file or directory
    Additionally, an exception has occurred while trying to report this error: Zend_Exception
    No entry is registered for key &#039;translate&#039; (Abstract.php:144)
    Search for related Knowledge Base articles
    ERROR: Uncaught exception 'PDOException' with message 'SQLSTATE[HY000] [2002] No such file or directory' in /usr/local/psa/admin/externals/Zend/Db/Adapter/Pdo/Abstract.php:129 Stack trace: #0 /usr/local/psa/admin/externals/Zend/Db/Adapter/Pdo/Abstract.php(129): PDO->__construct('mysql:dbname=ps...', 'admin', '$AES-128-CBC$Zm...', Array) #1 /usr/local/psa/admin/externals/Zend/Db/Adapter/Pdo/Mysql.php(111): Zend_Db_Adapter_Pdo_Abstract->_connect() #2 /usr/local/psa/admin/externals/Zend/Db/Adapter/Abstract.php(460): Zend_Db_Adapter_Pdo_Mysql->_connect() #3 /usr/local/psa/admin/externals/Zend/Db/Adapter/Pdo/Abstract.php(238): Zend_Db_Adapter_Abstract->query('select param, v...', Array) #4 /usr/local/psa/admin/plib/Db/Adapter/Pdo/Mysql.php(30): Zend_Db_Adapter_Pdo_Abstract->query('select param, v...', Array) #5 /usr/local/psa/admin/plib/db.php(36): Db_Adapter_Pdo_Mysql->query('select param, v...') #6 /usr/local/psa/admin/plib/db.php(212): db_query('select param, v...', false) #7 /usr/local/psa/admin/plib/Plesk/Mode.php(4 (Abstract.php:144)

There are no records in /var/log/mysqld.log

Cause

Atomic issued broken mysql package to their repositories. During updates installation mysql package gets updated, but required directory /var/lib/mysql-files is not created.

This issue has been fixed by Atomic in 5.5.54-1199 version of mysql-server package. Update the package to the latest version:


# yum update mysql-server

If no packages are marked for update, clean yum cache:


# yum clean all


# yum update mysql-server

Some instances, the iscsi connection fails. This may be due to swap space. Adding a swap file can help. How to create a swap file.

Pre-9.3 NAS loses iSCSI or NFS/CIFS connectivity arbitrarily

From NAS /var/log/messages:
Aug 15 22:24:01 nas kernel: pid 29173 (smbd), uid 65534, was killed: out of swap space
Aug 15 22:27:11 nas kernel: arp: 10.132.29.129 moved from 00:25:90:a1:47:6e to 3e:c6:19:01:9d:8d on em0
Aug 15 22:27:16 nas kernel: arp: 10.132.29.129 moved from 3e:c6:19:01:9d:8d to 00:25:90:a1:47:6e on em0
Aug 15 22:35:01 nas kernel: pid 29365 (smbd), uid 65534, was killed: out of swap space
Aug 15 22:44:57 nas kernel: pid 29453 (smbd), uid 65534, was killed: out of swap space

Cause:
No swap file.

Resolution:
Created a swap file.


dd if=/dev/zero of=/mnt/vol1/swap0 bs=1m count=8192;
chmod 0600 /mnt/vol1/swap0;


[root@nas] /mnt/vol1# mdconfig -a -t vnode -f /mnt/vol1/swap0
md3


[root@nas] swapon /dev/md3

The Open-iSCSI project is a high performance, transport independent, multi-platform implementation of RFC3720 (The iSCSI specification). It consists of a minimal set of kernel modules combined with powerful userspace utilities. Once installed on a system, a daemon process iscsid can be controlled using the iscsiadm management utility. Open-iSCSI requires a Linux kernel of 2.6.16 or greater.

CentOS 5/6: Open-iSCSI can be installed using yum:

# sudo yum install iscsi-initiator-utils

Debian/Ubuntu: Open-iSCSI can be installed using apt:

# sudo apt-get install open-iscsi

Configure iSCSI Drivers and Utilities

Linux

Open /etc/iscsi/iscsid.conf with the text editor of your choice:

# sudo vi /etc/iscsi/iscsid.conf

Make the following edits to the configuration file. Set the values of username and password to the CHAP username/password provided to you when you purchased the block storage.

node.startup = automatic
node.session.auth.authmethod = CHAP
node.session.auth.username = 
node.session.auth.password = 
discovery.sendtargets.auth.authmethod = CHAP
discovery.sendtargets.auth.username = 
discovery.sendtargets.auth.password = 

Next, you must run the discovery command against the discovery IP for your block storage device. After the discovery command is run, you must restart the iscsi service.

CentOS 5/6:

# sudo iscsiadm -m discovery -t sendtargets -p <Discovery IP Address>
# sudo service iscsi restart


# sudo iscsiadm -m discovery -t sendtargets -p 192.168.1.106
192.168.1.106:3260,257 iqn.2005-10.org.freenas.ctl:vol1

Debian/Ubuntu:

# sudo service open-iscsi start
# sudo iscsiadm -m discovery -t sendtargets -p <Discovery IP Address>
# sudo service open-iscsi restart


Setup Storage Volumes

Linux

After successfully discovering your block storage disk, the volume should show as available to the fdisk command:

# fdisk -l

....output truncated....

        Disk /dev/sdb: 300.0 GB, 300000002048 bytes
        255 heads, 63 sectors/track, 36472 cylinders
        Units = cylinders of 16065 * 512 = 8225280 bytes
        Sector size (logical/physical): 512 bytes / 4096 bytes
        I/O size (minimum/optimal): 4096 bytes / 4096 bytes
        Disk identifier: 0x00000000

        Disk /dev/sda doesn't contain a valid partition table

Or

# iscsiadm -m session
tcp: [1] 192.168.1.106:3260,257 iqn.2005-10.org.freenas.ctl:vol1 (non-flash)

At this point, you can create filesystems on the disk or configure it as a raw block device as desired:

    # parted /dev/sdb
    GNU Parted 2.2
    Using /dev/sda
    Welcome to GNU Parted&gt; ! Type 'help' to view a list of commands.
    (parted) mklabel gpt
    (parted) mkpart extended 0% 100%
    (parted) print
    Model: SolidFir SSD SAN (scsi)
    Disk /dev/sda: 300GB
    Sector size (logical/physical): 512B/4096B
    Partition Table: gpt

    Number  Start   End    Size   File system  Name      Flags
     1      1049kB  300GB  300GB               extended

     (parted) quit

Create the format the file system:

    # mkfs -t ext3 -L myBlockStorage /dev/sdb1
    mke2fs 1.41.11 (14-Mar-2010)
    Filesystem label=myBlockStorage
    .... output truncated ....

Create a mount point and mount the device

# mkdir /mnt/my_block_storage_volume
# mount /dev/sdb1 /mnt/my_block_storage_volume/

Get mount information:

# blkid
/dev/mapper/centos-root: UUID="198c20b5-d690-404b-8244-6e4ef8e66618" TYPE="xfs"
/dev/sda2: UUID="5d57ye-2YQD-vpoo-YV4w-VTUm-gtGA-kGTNzr" TYPE="LVM2_member"
/dev/sda1: UUID="bdf1787d-e27b-4cd0-bd47-0de6865c6858" TYPE="xfs"
/dev/mapper/centos-swap: UUID="33d91d50-a9f8-4d1e-94f4-63ab19dc34d1" TYPE="swap"
/dev/sdb1: LABEL="storage" UUID="362c5edb-6c68-4ec9-8745-576cba65133e" SEC_TYPE="ext2" TYPE="ext3" PARTLABEL="extended" PARTUUID="8689df9d-b059-4812-a5d4-e97fcb3b80c4"

Edit fstab to mount on boot:

# nano /etc/fstab 
#/dev/sdb1       /mnt/storage  ext3  defaults     0       0

Reboot system to ensure that the device is mounted on boot. If you receive the following error:
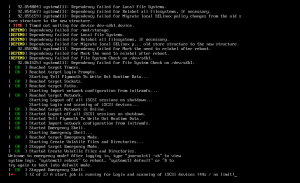
Edit fstab to include the following:

# /dev/sdb1 /mnt/storage ext3 _netdev 0 0

This works as well…


# /dev/sdb1       /mnt/storage  ext3  acl,user,nofail     0       0

Notes:

  1. Use the nofail option in /etc/fstab
  2. Make sure the dump field is set to 0 (zero) else the system will stop booting and prompt for the maintenance mode as the device is not available at this time in the boot process.
    The dump option is the fifth entry option in /etc/fstab, see man 5 fstab for more information.
  3. Make sure iscsi is enabled at boot – (CentOS 7 – systemctl enable iscsi.service).

Source: https://www.novell.com/support/kb/doc.php?id=7004427

NOTE: SAN disks can be slow to format due to the large number of small IOPs required by the formatting utility. To speed the formatting of your disk, you may wish to pass the ‘-E lazy_itable_init’ option to mkfs.

In order to automatically connect to your block storage disk on system startup, make the following changes to the /etc/iscsi/iscsi.conf file:


# nano /etc/iscsi/iscsid.conf
# To manually startup the session set to "manual". The default is automatic.
node.startup = automatic

You will need to add the Remote Desktop role first.

https://support.microsoft.com/en-us/help/2833839/guidelines-for-installing-the-remote-desktop-session-host-role-service-on-a-computer-running-windows-server-2012-without-the-remote-desktop-connection-broker-role-service

After doing so you can continue installing the CAL license following these steps.

1. Click on Start->Administrative Tools->Remote Desktop Services->Remote Desktop Licensing Manager
2. Click on “All Servers” and right click on the server you want to add the RDS CALs to and click on “Properties.”
3. For connection method, select “Automatic Connection” and select your country.
4. Insert the required information and click “OK.”
5. Right click on the server again and go to “Activate Server.”
6. Click through the menu until it asks for the license type. Select “Open License” and click okay.
7. Input Authorization and License number and the amount of CALs you purchased.
8. This will activate your RDS CALs and you are done!

The first step to install the Server Backup Manager is to create a new YUM .repo file with the R1Soft repository information.  Save the file in the yum.repos.d directory (typically located in /etc/).


#nano /etc/yum.repos.d/r1soft.repo

Add the following:


[r1soft]
name=R1soft Repository Server
baseurl=http://repo.r1soft.com/yum/stable/$basearch/
enabled=1
gpgcheck=0

Verify what was written to the file by running ‘cat /etc/yum.repos.d/r1soft.repo’

# cat /etc/yum.repos.d/r1soft.repo

Now that the repo is added, run ‘yum install serverbackup-enterprise’ to install Server Backup Manager. Enter ‘y’ to install the package and its dependencies.

# yum install serverbackup-enterprise

Next you need to configure and start the Backup Manager Web-based user interface. Define a username and password for the WebUI by running ‘serverbackup-setup –user –pass ‘:

# serverbackup-setup --user r1user --pass 12w34r

It is necessary to configure a different set of ports for the Backup Manager WebUI. This will mitigate the use of random port assignments. To configure different ports for the Backup Manager WebUI, run ‘serverbackup-setup –http-port 26080 –https-port 26443’

# serverbackup-setup --http-port 26080 --https-port 26443

Finally, start the Backup Manager WebUI by running ‘/etc/init.d/cdp-server restart’

# /etc/init.d/cdp-server restart

Next, open the WebUI by pointing a browser to http://: and logging in with the username and password you configured.

Next – install the agent software on your linux server or VM that you need backed up ( See Installing the R1Soft Linux Agent on CentOS)

The first step required for installing the agent is to configure the YUM repository. Modify the repository as follows:

echo -e "[r1soft]\nname=R1Soft Repository Server\nbaseurl=http://repo.r1soft.com/yum/stable/\$basearch/\nenabled=1\ngpgcheck=0" &gt; /etc/yum.repos.d/r1soft.repo
yum install serverbackup-agent

Or…

# nano /etc/yum.repos.d/r1soft.repo

Add…

[r1soft]
name=R1soft Repository Server
baseurl=http://repo.r1soft.com/yum/stable/$basearch/
enabled=1
gpgcheck=0

Save the files and then run ‘yum install serverbackup-agent’:

# yum install serverbackup-agent

Next, restart the agent:

# /etc/init.d/cdp-agent restart
/etc/init.d/cdp-agent restart: cdp not running, trying to start
/etc/init.d/cdp-agent restart: cdp started

Next, we need to get the Server Backup Manager Server key from the Manager server:
NOTE: If the server manager is running on a different port than port 80, you will need to include the port in the URL. This server manager is on http port 26080. You can replace the port with port 80 if needed:

# serverbackup-setup --get-key http://192.168.1.103:26080
Key '192.168.1.103' successfully installed

If you get a connection errr - check your firewall:
# systemctl status firewalld
● firewalld.service - firewalld - dynamic firewall daemon
   Loaded: loaded (/usr/lib/systemd/system/firewalld.service; enabled; vendor preset: enabled)
   Active: active (running) since Tue 2017-02-28 17:56:33 CST; 3 days ago
     Docs: man:firewalld(1)
 Main PID: 665 (firewalld)
   CGroup: /system.slice/firewalld.service
           └─665 /usr/bin/python -Es /usr/sbin/firewalld --nofork --nopid

Warning: Journal has been rotated since unit was started. Log output is incomplete or unavailable.

Add the port on the linux agent server to allow connection from the R1Soft server manager:

# firewall-cmd --permanent --zone=public --add-port=1167/tcp --permanent
success

Reload the firewall:

# firewall-cmd --reload
success

You can now safely add this target server to the Manager Server (See Installing R1Soft Linux Manager Server on CentOS)

**** If the agent is installed on CentOS 7, or if you have installed kernel-devel / kernel-headers and ‘r1soft-setup –get-module’ is still failing, check http://repo.r1soft.com/modules/ for the associated kernel and driver.

You can download the appropriate module to /lib/modules/r1soft/ run insmod $module to insert the module and /etc/init.d/cdp-agent restart to load hcpdriver.
Once CDP-agent is restarted, you can verify that the module is loaded via lsmod | grep hcp.

# cd  /lib/modules/r1soft/
# wget http://repo.r1soft.com/modules/Centos_7_x64/hcpdriver-cki-3.10.0-693.11.6.el7.x86_64.ko
# insmod  hcpdriver-cki-3.10.0-693.11.6.el7.x86_64.ko
# /etc/init.d/cdp-agent restart
# lsmod | grep hcp
# hcpdriver              81014  4

When adding the key – Error message

# r1soft-setup --get-key http://192.168.1.103
Get http://192.168.1.103//public_info: dial tcp 192.168.1.103:80: connection refused

Note: When configuring the R1Soft Manager – http and https ports were set using the command:

# serverbackup-setup --http-port 26080 --https-port 26443

Thus, the following command should work when setting up the key on the agent server to the Manager server:

r1soft-setup --get-key http://192.168.1.103:26080

You can manually configure the key by doing the below steps:

1) Login on to CDP server front end panel
2) Click on “Advanced Options” on the left-bottom menu
3) Copy the Public Key from the page.
4) On the CDP agent(the server you are trying to configure to r1soft), edit the config files at:

# cd /usr/sbin/r1soft/conf/server.allow
#ls -la
 --w----r-- 1 root root  271 Mar  3 11:13 192.168.1.103ifconfig
# nano 192.168.1.103ifconfig

5) Paste the Public Key of CDP server into this file without any white spaces.
6) Also white list the CDP server IP in the agent firewall.

# nano /etc/sysconfig/iptables

Add…

-A INPUT -p tcp -s 192.168.1.103 -j ACCEPT

Restart iptables on Agent server

# service iptables restart

7) Go to Protected Machines, Click arrow on the right for Test Agent Connection. You should see a success message:

More on Keys:
http://wiki.r1soft.com/display/CDP3/Viewing+Server+Keys+Installed+on+Linux+Agent