1. Getting the required software

For an SSL encrypted web server you will need a few things. Depending on your install you may or may not have OpenSSL and mod_ssl, Apache’s interface to OpenSSL. Use yum to get them if you need them.


# yum install mod_ssl openssl

Yum will either tell you they are installed or will install them for you.

2. Generate a self-signed certificate

Using OpenSSL we will generate a self-signed certificate. If you are using this on a production server you are probably likely to want a key from a Trusted Certificate Authority, but if you are just using this on a personal site or for testing purposes a self-signed certificate is fine. To create the key you will need to be root so you can either su to root or use sudo in front of the commands

# Generate private key


#openssl genrsa -out ca.key 2048 

# Generate CSR

 
# openssl req -new -key ca.key -out ca.csr

# Generate Self Signed Key


# openssl x509 -req -days 365 -in ca.csr -signkey ca.key -out ca.crt

# Copy the files to the correct locations


cp ca.crt /etc/pki/tls/certs
cp ca.key /etc/pki/tls/private/ca.key
cp ca.csr /etc/pki/tls/private/ca.csr

WARNING: Make sure that you copy the files and do not move them if you use SELinux. Apache will complain about missing certificate files otherwise, as it cannot read them because the certificate files do not have the right SELinux context.
If you have moved the files and not copied them, you can use the following command to correct the SELinux contexts on those files, as the correct context definitions for /etc/pki/* come with the bundled SELinux policy.


restorecon -RvF /etc/pki

Then we need to update the Apache SSL configuration file


Nano /etc/httpd/conf.d/ssl.conf

Change the paths to match where the Key file is stored. If you’ve used the method above it will be


SSLCertificateFile /etc/pki/tls/certs/ca.crt

Then set the correct path for the Certificate Key File a few lines below. If you’ve followed the instructions above it is:


SSLCertificateKeyFile /etc/pki/tls/private/ca.key

Quit and save the file and then restart Apache


/etc/init.d/httpd restart

All being well you should now be able to connect over https to your server and see a default Centos page. As the certificate is self signed browsers will generally ask you whether you want to accept the certificate.

3. Setting up the virtual hosts

Just as you set VirtualHosts for http on port 80 so you do for https on port 443. A typical VirtualHost for a site on port 80 looks like this


<VirtualHost *:80>
        <Directory /var/www/vhosts/yoursite.com/httpdocs>
        AllowOverride All
        </Directory>
        DocumentRoot /var/www/vhosts/yoursite.com/httpdocs
        ServerName yoursite.com
</VirtualHost>

To add a sister site on port 443 you need to add the following at the top of your file

NameVirtualHost *:443
and then a VirtualHost record something like this:


NameVirtualHost *:443
<VirtualHost *:443>
        SSLEngine on
        SSLCertificateFile /etc/pki/tls/certs/ca.crt
        SSLCertificateKeyFile /etc/pki/tls/private/ca.key
        <Directory /var/www/vhosts/yoursite.com/httpsdocs>
        AllowOverride All
        </Directory>
        DocumentRoot /var/www/vhosts/yoursite.com/httpsdocs
        ServerName yoursite.com
</VirtualHost>

Restart Apache again using


# /etc/init.d/httpd restart

4. Configuring the firewall

You should now have a site working over https using a self-signed certificate. If you can’t connect you may need to open the port on your firewall. To do this amend your iptables rules:


iptables -A INPUT -p tcp --dport 443 -j ACCEPT
/sbin/service iptables save
iptables -L -v

Other resources: http://www.rackspace.com/knowledge_center/article/centos-apache-virtual-hosts#NameVirtualHosts
To Disable Recursive DNS in the Parallels Plesk Panel

  1. Log in to the Parallels Plesk Panel as administrator.
  2. Click Tools & Settings.
  3. From the General Settings area, click DNS Template Settings.
  4. Click DNS Recursion.Select Localnets, and then click Ok.

For Windows Servers:

  1. Log in to your  Server  through a Remote Desktop Connection.
  2. From the Start menu, click Control Panel, Administrative Tools, then DNS.
  3. In the console tree, right-click the appropriate DNS server, and then click Properties.
  4. Click the Advanced tab.
  5. Under Server options, check Disable recursion, and then click OK.
  6. In the console tree, right-click the appropriate DNS server, and then click Clear Cache.

CentOS


# cd /etc
# nano named.conf

Change this line

# recursion yes;

to

# recursion no;

Restart

# service named restart

Ubuntu


# nano /etc/bind/named.conf.options

Set up like this

// global options apply to external clients
options {
    recursion no;
    additional-from-auth no;
    additional-from-cache no;
};

view "local" in {
    // view options enable recursion only for local clients
    match-clients { 172.16.45.80/23; 192.168.12.0/24; 127.0.0.1/8; ::1; };
    recursion yes;
    additional-from-auth yes;
    additional-from-cache yes;

    zone "." in {
            type hint;
            file "/etc/bind/db.root";
    };

    // put definitions for zones like "localhost" and "127.in-addr.arpa" here
}

// put definitions for real authoritative zones here.

A very serious security problem has been found and patched in the GNU C Library called Glibc. It was announced on 27th January 2015.

Here are the affected Linux distros:

  • RHEL (Red Hat Enterprise Linux) version 5.x, 6.x and 7.x
  • CentOS Linux version 5.x, 6.x & 7.x
  • Ubuntu Linux version 10.04, 12.04 LTS
  • Debian Linux version 7.x
  • Linux Mint version 13.0
  • Fedora Linux version 19 or older
  • SUSE Linux Enterprise 11 and older (also OpenSuse Linux 11 or older versions).
  • SUSE Linux Enterprise Software Development Kit 11 SP3
  • SUSE Linux Enterprise Server 11 SP3 for VMware
  • SUSE Linux Enterprise Server 11 SP3
  • SUSE Linux Enterprise Server 11 SP2 LTSS
  • SUSE Linux Enterprise Server 11 SP1 LTSS
  • SUSE Linux Enterprise Server 10 SP4 LTSS
  • SUSE Linux Enterprise Desktop 11 SP3
  • Arch Linux glibc version <= 2.18-1

Read More to Fix the GHOST vulnerability on a CentOS/RHEL/Fedora/Ubuntu Linux

Read More

1. Introduction

With the size of the Apache configuration file what it is, it can be easier to find and change a virtual host container (configurations) if the settings are in separate files.

This isn’t strictly recommended by the upstream documentation, but is a common manual extension to make the system more manageable.

All manual extensions to your system should be documented for future reference.

There are several places that virtual host source files can be put. This is a complex topic with several major points of view and is not fully addressed in this document.

2. Usual Practice: conf.d/

The most common location for discrete virtual host configuration files is /etc/httpd/conf.d/. The config files can be named to reflect the website(s) to which they refer, provided they don’t conflict with configuration files of existing or future modules. The matching content can be placed under /var/www/ or /var/www/html/ in sub-directories, such as /var/www/example.com/ or /var/www/html/example.com/.

This has the advantage that the parent directories are already created and SELinux is familiar through rule inheritance, as to how to handle access rights. The packaging system leverages this, of course, by dropping the php.conf file into that configurartion directory such that after a package based install of php, and a restart of the webserver, PHP parsed pages ‘just work’

Though placing a vhost configuration file in a directory full of non-vhost related matter, such as: php.conf and mailman.conf, initially appears an out of order jumble, upon closer reading of the documentation, from Apache HTTP Server Version 2.2 – Configuration Sections, we see that: “Most containers are evaluated for each request.”

So, Apache applies the virtual host directives after all non-vhost related stanzas, regardless of the seeming alphabetical sort order position in the configuration file, or in a merged directory full of such config files, in the matter processed.

This is largely a settled area of Systems Administration, such that the most recent documentation from upstream does not appear to include a ‘System Administration Guide’ in the CentOS 5 series. The System Administration Guide from CentOS 4, Chapter 24. Apache HTTP Server Configuration covers the matter in greater depth.

3. Virtual Host Files

Virtual Host container files can be placed in the configuration directory directly or by link. The name must end with .conf to be included. If using links, make sure to update the SELinux properties of the actual file.

3.1. Example

The file should contain the configuration items specific to this host. An example.conf could be…


# file: /etc/http/conf.d/example.conf
# vhost: example.org *.example.org
<VirtualHost *:80>
  ServerName example.org
  ServerAlias *.example.org
  ServerAdmin webmaster@example.org
  ErrorLog /var/log/httpd/example.err
  CustomLog /var/log/httpd/example.log combined
  DocumentRoot /var/www/example.org
  <Directory "/var/www/example.org">
    Order allow,deny
    Allow from all
  </Directory>
</VirtualHost>

Of course, a virtual host configuration file may refer to more than one URL or DNS result as a single file tree.


[userid@webhost conf.d]$ cat example.conf 
### two domain vhost sites handled here:  
###       example.com and example.org
###
### the .COM
<VirtualHost x.x.x.x >
        ServerAdmin     webmaster@example.com
        DocumentRoot    /var/www/html/example.com/public_html/
        ServerName      example.com
        ServerAlias     www.example.com
        ErrorLog        logs/example.com-error_log
        TransferLog     logs/example.com-access_log
        AccessFileName .htaccess
</VirtualHost>

### the .ORG
<VirtualHost x.x.x.x >
        ServerAdmin     webmaster@example.org
        DocumentRoot    /var/www/html/example.org/public_html/
        ServerName      example.org
        ServerAlias     www.example.org
        ErrorLog        logs/example.org-error_log
        TransferLog     logs/example.org-access_log
        AccessFileName .htaccess
</VirtualHost>

This file sets up the two domains, one the .com and the other the .org. As to each, it would provide the same content at the bare domain name, and also at the www when used either way in a URL for a web browser, which is usually the desired result, but of course possibly differing content between the two TLD variations as the content down the file tree specified.

4. Virtual Host Inclusion

There might be times when it is desirable to disable a virtual host. Since the include in /etc/httpd/conf/httpd.conf specifies *.conf, it is possible to hide a virtual host by changing the configuration file name.

4.1. Disable Virtual Host

Virtual hosts can be disabled by renaming the file so it doesn’t match the *.conf file specification. Adding a disabled extension is one way.


# mv --verbose /etc/httpd/conf.d/example.conf /etc/httpd/conf.d/example.conf.disabled

If less typing is desired, it can be shortened:


# mv -v /etc/httpd/conf.d/example.conf{,_}

4.2. Enable Virtual Host

Virtual hosts can be re-enabled by removing the extra.

To remove the disabled flag:


# mv --verbose /etc/httpd/conf.d/example.conf.disabled /etc/httpd/conf.d/example.conf

For the shorter version:


# mv -v /etc/httpd/conf.d/example.conf{_,}

Enabling or disabling a virtual host using this method will not take effect until the web server is restarted.

5. Restart Apache

To make your changes take effect, restart Apache. Using the graceful option ensures that existing processes are allowed to finish serving the current page, reducing the chance of disrupting a user’s browsing experience.


# service httpd graceful

Memcached (Memcache Daemon) is a caching daemon designed especially for dynamic web applications to decrease database load by storing objects in memory. It is commonly used to speed up dynamic database-driven websites by caching data and objects in server memory to reduce the number of times the data source must be read. Memcached is free and open-source software, licensed under the Revised BSD license. Also, there are PHP extensions which allow you to work with memcached. There are two PHP memcache extensions available from the PHP Extension Community Library, PHP memcached and PHP memcache.

PHP Memcache vs PHP Memcached

These two PHP extensions are not identical. PHP Memcache is older, very stable but has a few limitations. The PHP memcache module utilizes the daemon directly while the PHP memcached module uses the libMemcached client library and also contains some added features.

Installing Memcache Daemon + PHP memcache or PHP memcached

Before selecting a PHP extension be sure to install the memcache daemon.

How-To: Install Memcache on CentOS (WHM/cPanel)

    1. Login into your WHM panel and using easyapache to enable Memcache

Go to Software – Module Installers – PHP Pecl. Search for memcache and then install both memcache and memcached
Restart apache:

# service httpd restart

Check your memcached server is running successfully: ps -eaf | grep memcached

Installing Memcache Daemon + PHP memcache or PHP memcached on CentOS or Ubuntu

Before selecting a PHP extension be sure to install the memcache daemon:

Centos / Red Hat:


# yum install memcached

Ubuntu/ Debian:


# apt-get update
# apt-get install memcached

After installing Memcached, open the configuration file for Memcached and make any changes:

Centos / Red Hat:


# nano /etc/sysconfig/memcached

Ubuntu / Debian:


# nano /etc/memcached.conf

Exit and save the configuration file, and then restart Memcached


# service memcached restart

Remember to set the memcache daemon to start on server boot.
Centos / Red Hat:


# chkconfig memcached on

Ubuntu / Debian:


# update-rc.d memcached enable

Install a PHP memcache extension

PHP memcache

You can browse the version here – https://pecl.php.net/package/memcache The current version as of this writing is 3.0.8


wget https://pecl.php.net/get/memcache-3.0.8.tgz
tar xvf memcache-3.0.8.tgz
cd memcache-3.0.8
phpize
./configure
make 
make install
make test
Then add memcache.so to your php.ini file:

# nano /etc/php.ini
extension="memcache.so"

PHP memcached:

Remember to install libmemcached dependancy (Ubuntu/Debian):


yum install cyrus-sasl-devel zlib-devel gcc-c++
wget https://launchpad.net/libmemcached/1.0/1.0.16/+download/libmemcached-1.0.16.tar.gz
tar -xvf libmemcached-1.0.16.tar.gz
cd libmemcached-1.0.16
./configure --disable-memcached-sasl
make
make install

Then install PHP Memcached:

wget https://pecl.php.net/get/memcached-3.0.8.tgz
tar xf memcached-3.0.8.tgz
cd memcached-3.0.8
phpize
./configure
make 
make install
make test

Then add memcached.so to your php.ini file:


extension="memcached.so"

You will need to connect your PHP application to memcached. For example, using W3 Total Cache with WordPress, memcached module with Drupal, Magento config, etc.

Finally restart memcached, httpd (or apache, apache2 for Ubuntu/Debian)

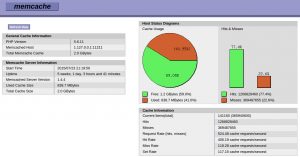
If you would like to view stats of hit rate etc you can download memcachephp stats at GitHub – HERE. Which will look something like this:

For CentOS-6 the EPEL repository is carrying later NTFS packages. EPEL is also usable for CentOS-5. To install, after enabling the repo per the Repositories page:


# yum install ntfs-3g 

or if you prefer to leave EPEL disabled by default


# yum --enablerepo epel install ntfs-3g 

You may also want to


yum install ntfsprogs ntfsprogs-gnomevfs 

Suppose your ntfs filesystem is /dev/sda1 and you are going to mount it on /mymnt/win, do the following.

First, create a mount point.

# mkdir /mymnt/win 

Next, edit /etc/fstab as follows. To mount read-only:

# /dev/sda1       /mymnt/win   ntfs-3g  ro,umask=0222,defaults 0 0 

To mount read-write:

# /dev/sda1       /mymnt/win   ntfs-3g  rw,umask=0000,defaults 0 0 

You can now mount it by running:

# mount /mymnt/win 

Because fail2ban is not available from CentOS, we should start by downloading the EPEL repository:

rpm -Uvh http://dl.fedoraproject.org/pub/epel/6/x86_64/epel-release-6-8.noarch.rpm

Follow up by installing fail2ban:

yum install fail2ban

The default fail2ban configuration file is location at /etc/fail2ban/jail.conf. The configuration work should not be done in that file, however, and we should instead make a local copy of it.


cp /etc/fail2ban/jail.conf /etc/fail2ban/jail.local

After the file is copied, you can make all of your changes within the new jail.local file. Many of possible services that may need protection are in the file already. Each is located in its own section, configured and turned off.

Set up a few rules on a plesk server with CentOS

SSH

[ssh-iptables]

enabled  = true
filter   = sshd
action   = iptables[name=SSH, port=10222, protocol=tcp]
           sendmail-whois[name=SSH, dest=root, sender=admin@domain.com, sendername="Fail2Ban"]
logpath  = /var/log/secure
maxretry = 5

* Notice ssh is set up on port 10222

ProFTP

[proftpd-iptables]

enabled  = true
filter   = proftpd
action   = iptables[name=ProFTPD, port=ftp, protocol=tcp]
           sendmail-whois[name=ProFTPD, dest=admin@domain.com]
logpath  = /var/log/secure
maxretry = 5

* Notice the log location. This is for a Plesk server as proftpd logs to /var/log/secure
Restart fail2ban

# service fail2ban restart

Postfix

# This jail forces the backend to "polling".
[sasl-iptables]

enabled  = true
filter   = postfix-sasl
backend  = polling
action   = iptables[name=sasl, port=smtp, protocol=tcp]
           sendmail-whois[name=sasl, dest=admin@domain.com]
logpath  = /usr/local/psa/var/log/maillog

Postfix

[postfix-tcpwrapper]

enabled  = true
filter   = postfix
action   = hostsdeny[file=/etc/fail2ban/hosts.deny]
           sendmail[name=Postfix, dest=admin@domain.com]
logpath  = /usr/local/psa/var/log/maillog
bantime  = 300

Apache Auth

[apache-tcpwrapper]

enabled  = true
filter   = apache-auth
action   = iptables[name=apache, port=apache, protocol=tcp]
           sendmail-whois[name=apache, dest=admin@domain.com]
logpath  = /var/log/httpd/error_log
#           /home/www/myhomepage/error.log
maxretry = 6

Edit the netowrk file

# nano /etc/sysconfig/network

You should see this:

HOSTNAME=host.domain.com
# =============================================================
# Network Script generated by BareMetal
# =============================================================
NETWORKING=yes
NETWORKING_IPV6=no
GATEWAY=216.xx.xx.1

Change the Gateway and save then restart networking

# service  network restart