Try this

]# php -m
[PHP Modules]
bcmath
bz2
calendar
Core
ctype
curl
date
dom
ereg
exif
fileinfo
filter
ftp
gd
gettext
gmp
hash
iconv
intl
json
ldap
libxml
mbstring
mcrypt
mhash
mysql
mysqli
openssl
pcntl
pcre
PDO
pdo_mysql
pdo_sqlite
Phar
posix
pspell
readline
Reflection
session
shmop
SimpleXML
sockets
SPL
sqlite3
standard
sysvmsg
sysvsem
sysvshm
tidy
tokenizer
wddx
xml
xmlreader
xmlwriter
xsl
zip
zlib

If you do not see the module – then you need to install it.

Useful commands to check if a server is getting ddos’d

Show IPs with more than 10 connections open:


# netstat -nat | grep ":80" | awk -F: '{print $8}' | sort | uniq -c | sort -n | awk '{ if ( $1 > 10) print $2 ; }'

Show # of connections open per IP


# netstat -nat | egrep ":80|:443" | awk -F: '{print $8}' | sort | uniq -c | sort -n 

Number of connections per IP


# netstat -anp |grep 'tcp\|udp' | awk '{print $5}' | cut -d: -f1 | sort | uniq -c | sort -n

Haynie’s version(better sorting):


# netstat -anp|awk '{print $5}'|awk -F: '{print $4}'|sort -n -t. -k1,1 -k2,2 -k3,3 -k4,4|uniq -c|sort -n

Drop ips with 100 or more connections:


# netstat -nat | egrep ":80|:443" | awk -F: '{print $8}' | sort | uniq -c | sort -n | awk '{ if ( $1 > 100) print $2 ; }' | xargs -n1 echo iptables -I INPUT -j DROP -s

Graphic netstat connections(# of connections open per host)

# netstat -an | grep ESTABLISHED | awk ‘{print $5}’ | awk -F: ‘{print $1}’ | sort | uniq -c | awk ‘{ printf(“%s\t%s\t”,$2,$1) ; for (i = 0; i < $1; i++) {printf("*")}; print "" }' [/bash]

Normally on CentOS the file system check is in the fstab file.

If all you want to do is avoid an fsck, adding the -f option to shutdown should help with that.

[bash]

# shutdown -f

[/bash]

The other option is you can manually make it skip fsck checks at boot by updating the 6th field in your /etc/fstab:


# /dev/sda2  /  ext3  defaults,errors=remount-ro 0       1

This is the similar to what most fstabs will have 1 means that it should be checked and is a root file system, 2 means it should be checked but will be done in parallel with other file systems and 0 means skip checking

Other ways to configure and check the settings:

On CentOS, edit /etc/sysconfig/autofsck (or create it if it doesn’t exist) with the following content.


# sudo vi /etc/sysconfig/autofsck
AUTOFSCK_DEF_CHECK=yes

If the filesystem is large, you can force filesystem checks on a regular basis, instead of every boot time. In order to do so, first find out the filesystem configuration with tune2fs command. The following command line shows the current values of filesystem related parameters. Note that /dev/sda1 is the partition where the filesystem superblock is located.


# sudo tune2fs -l /dev/sda1 

Disk identifier: 0x00000000

[root@cloud1 log]# tune2fs -l /dev/sda1
tune2fs 1.41.12 (17-May-2010)
Filesystem volume name:   <none>
Last mounted on:          /boot
Filesystem UUID:          3f3d720d-781c-402f-8599-94a97f7a824f
Filesystem magic number:  0xEF53
Filesystem revision #:    1 (dynamic)
Filesystem features:      has_journal ext_attr resize_inode dir_index filetype needs_recovery extent flex_bg sparse_super huge_file uninit_bg dir_nlink extra_isize
Filesystem flags:         signed_directory_hash
Default mount options:    user_xattr acl
Filesystem state:         clean
Errors behavior:          Continue
Filesystem OS type:       Linux
Inode count:              128016
Block count:              512000
Reserved block count:     25600
Free blocks:              394486
Free inodes:              127963
First block:              1
Block size:               1024
Fragment size:            1024
Reserved GDT blocks:      256
Blocks per group:         8192
Fragments per group:      8192
Inodes per group:         2032
Inode blocks per group:   254
Flex block group size:    16
Filesystem created:       Fri Jan 23 19:06:50 2015
Last mount time:          Sun Mar 29 12:10:18 2015
Last write time:          Sun Mar 29 12:10:18 2015
Mount count:              8
Maximum mount count:      -1
Last checked:             Fri Jan 23 19:06:50 2015
Check interval:           0 (<none>)
Lifetime writes:          108 MB
Reserved blocks uid:      0 (user root)
Reserved blocks gid:      0 (group root)
First inode:              11
Inode size:               128
Journal inode:            8
Default directory hash:   half_md4
Directory Hash Seed:      ea055f98-4239-40e2-a8a7-0dae21287819
Journal backup:           inode blocks

From tune2fs output, you can see not only the filesystem state (clean or not), but also parameters that are related to filesystem checks. “Maximum mount count” parameter is the number of mounts after which the filesystem check gets triggered. “Check interval” parameter shows the maximum time between two filesystem checks. On most Linux distros, these parameters are not set by default, meaning no regular filesystem checks are occurring.

To force filesystem check for every 30 mounts, run the following command.


# sudo tune2fs -c 30 /dev/sda1

To force filesystem check for every 3 months, use the command below.


# sudo tune2fs -i 3m /dev/sda1

Now verify that newly added filesystem check conditions are set properly.


#sudo tune2fs -l /dev/sda1


. . .
Last mount time:          n/a
Last write time:          Fri Mar 14 22:29:24 2014
Mount count:              20
Maximum mount count:      30
Last checked:             Mon Mar  3 20:55:08 2014
Check interval:           7776000 (3 months)
Next check after:         Sun Jun  1 21:55:08 2014

Force One-Time Filesystem Check on the Next Reboot

If you want to trigger one-time filesystem check on your next reboot, you can use this command.


# sudo touch /forcefsck

Once you create an empty file named forcefsck in the top directory (/) like above, it will force filesystem check the next time you boot up. After successful booting, /forcefsck will automatically be removed.

Viewing the orders in opencart admin – the following errors appear:


[Wed Apr 01 14:51:21 2015] [warn] [client 67.81.xxx.xx] mod_fcgid: read data timeout in 45 seconds, referer: https://www.domainname.com/admin/index.php?route=sale/order&token=96d6680034320729c7df84d678589324

Try to increase the timeout in the /etc/httpd/conf.d/fcgid.conf file to 90 seconds.

You experience the following error message:

A network-related or instance-specific error occurred while establishing a connection to SQL Server. The server was not found or was not accessible. Verify that the instance name is correct and that SQL Server is configured to allow remote connections. (provider: Named Pipes Provider, error: 40 – Could not open a connection to SQL Server)

error

Instrucions to enable MSSQL remote connecton.

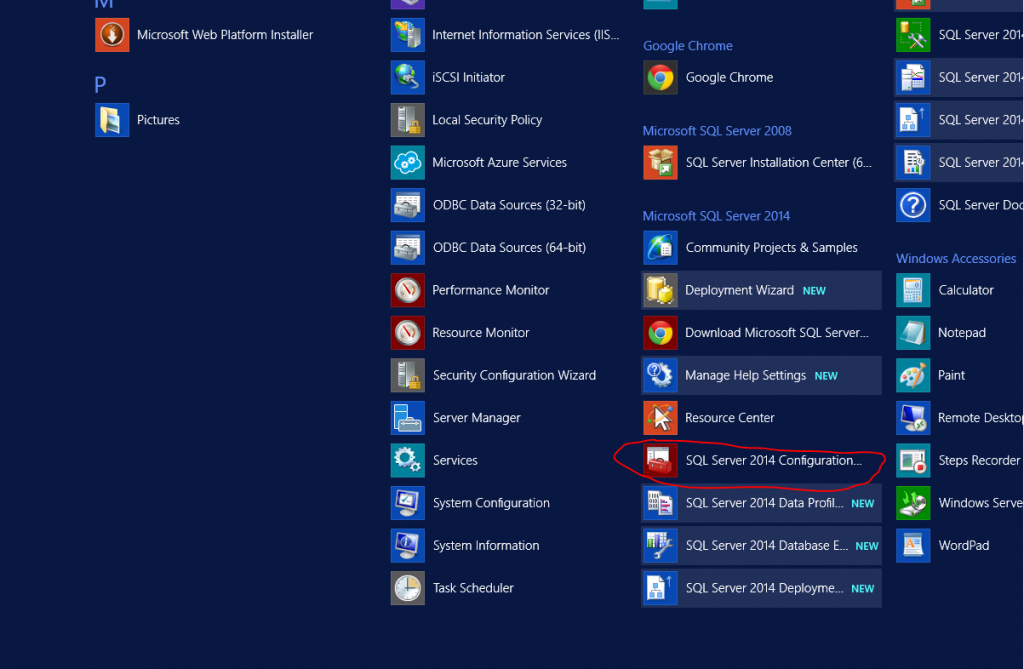
Run SQL Server Configuration Manager.
start

Protocols for MSSQLServer

The next good thing to check is the SQL Server Network Configuration. Open the SQL Server Configuration Manager, unfold the node SQL Server Network Configuration and select Protocols for MSSQLServer (or whatever the name of your SQL Server instance is).

Go to SQL Server Network Configuration > Protocols for SQLEXPRESS.

tcp

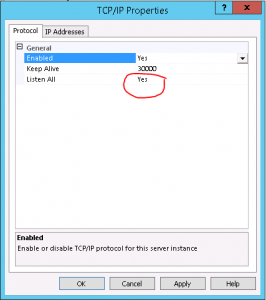
Make sure TCP/IP is enabled. Right-click on TCP/IP and select Properties.

enable

Now:

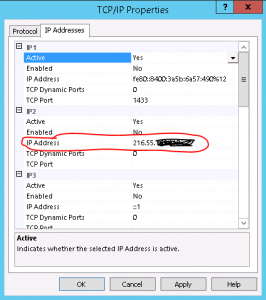
Select the IP Addresses Tab. Verify that, under IP2, the IP Address is set to the computer’s IP address on the local subnet.

ip
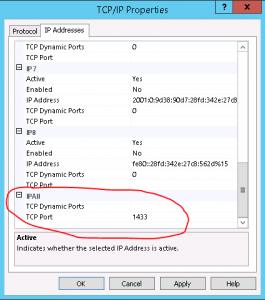
Scroll down to IPAll. Make sure that TCP Dynamic Ports is blank. Make sure that TCP Port is set to 1433.

ipall
Apply and Click OK.

Make Sure the SQL Server Browser is running. Go to Services and set the start to automatic. Then start the service.

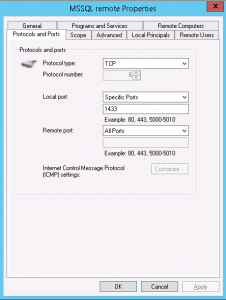
Add a firewall rule to allow port 1433

fw

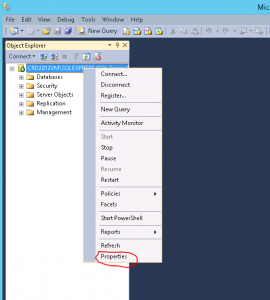
Make user Remote Connections are enabled on your SQL Server database.

Open SQL Server 2008 Management Studio, connect to the server in question, right click the server.

prop

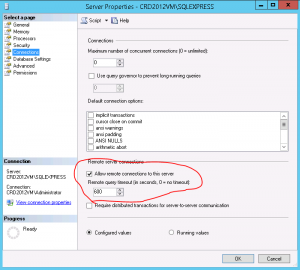
Navigate to Connections and ensure that Allow remote connections to this server is checked.

remote

Other resources:

http://blogs.msdn.com/b/walzenbach/archive/2010/04/14/how-to-enable-remote-connections-in-sql-server-2008.aspx
https://msdn.microsoft.com/en-us/library/ms191464.aspx

The mod_deflate module allows the Apache2 web service to compress files and deliver them to clients (browsers) that can handle them. With mod_deflate you can compress HTML, text or XML files by up to 70% of their original sizes. Thus, saving you server traffic and speeding up page loads.

Compressing files will increase load on your server, but it is a small tradeoff considering your client’s connection times will decrease significantly.

This will not exclude users with older browsers that cannot handle compressed content. The browser negotiates with the server before any file is transferred, and if the browser does not have the capability to handle compressed content, the server delivers the files uncompressed.

mod_deflate has replaced Apache 1.3’s mod_gzip in Apache2.

This article shows how to enable mod_deflate globally across all the domains on your DV server. Should you only wish to enable for a single domain you’d need to add the AddOutputFilterByType and BrowserMatch rules below to the VirtualHost section in your configuration.

For Plesk:

Set server wide configuration file in /etc/httpd/conf.d/

Make sure that mod_deflate is enabled on your server. Your DV server should have it enabled by default. If the following command returns a line with a “#” at the beginning you will have to remove(uncomment) the “#” character using vi or the perl command below:


# grep 'mod_deflate' /etc/httpd/conf/httpd.conf

If the result was LoadModule deflate_module modules/mod_deflate.so, you can continue.

If the result was #LoadModule deflate_module modules/mod_deflate.so, please run the following command:


# perl -pi -e 's/# LoadModule mod_deflate/LoadModule mod_deflate/g' /etc/httpd/conf/httpd.conf

Now that we have verified that mod_deflate is in fact being loaded by Apache, we must configure the module. First, backup your existing conf file in case you need to revert back:


# cp /etc/httpd/conf/httpd.conf /etc/httpd/conf/httpd.conf.bak 

Using nano, we will edit our Apache conf file and add the following lines at the very bottom of the file, making sure they are separated from any other configurations:


nano /etc/httpd/conf/httpd.conf

     #
     # Deflate output configuration
     #
     AddOutputFilterByType DEFLATE text/html text/plain text/xml text/css
     BrowserMatch ^Mozilla/4 gzip-only-text/html
     BrowserMatch ^Mozilla/4\.0[678] no-gzip
     BrowserMatch \bMSIE !no-gzip !gzip-only-text/html

Save your file. Now, we need to check that Apache likes our changes using the apachectl command:


# /usr/sbin/apachectl -t

You should see a Syntax OK message. If not, please check your file to make sure you modified the file correctly. Next, we need to restart apache using the same apachectl command:


# /usr/sbin/apachectl graceful

You have now enabled mod_deflate on your DV server! You can see whether the changes are in effect using the following tool at http://whatsmyip.org/mod_gzip_test/.

Trying to LOAD DATA with phpmyadmin

#1085 – The file ‘/tmp/phpqcXPYv’ must be in the database directory or be readable by all
#1148 – The used command is not allowed with this MySQL version


/etc/mysql/my.cnf
[mysqld]
local-infile=0

If this is set to local-infile=1 – and restart mysql – this should work
Also – if that does not work – try adding it under the [client] section

cPanel default backup system may fail to create and save backup of your server and send you following message:
The backup was not able to be completed because timed out waiting for /bin/backup to finish

Possible cause of the problem

Any old backup process is still running in background on the server.

Login to your server as root via SSH and execute following command


# /usr/local/cpanel/bin/backup --force

Most probably it will show you following type message:

Backup process currently running. Pid: 5378
Backup log file: /usr/local/cpanel/logs/cpbackup/1377934812.log

Solution

We need to kill the current running backup process. Note the Pid from above and run following command. Change xxxx to Pid number that you have got from above.


# kill -9 xxxx

cPanel backup should now run normally. You can force to start a new fresh backup process using below command:


# /usr/local/cpanel/bin/backup --force