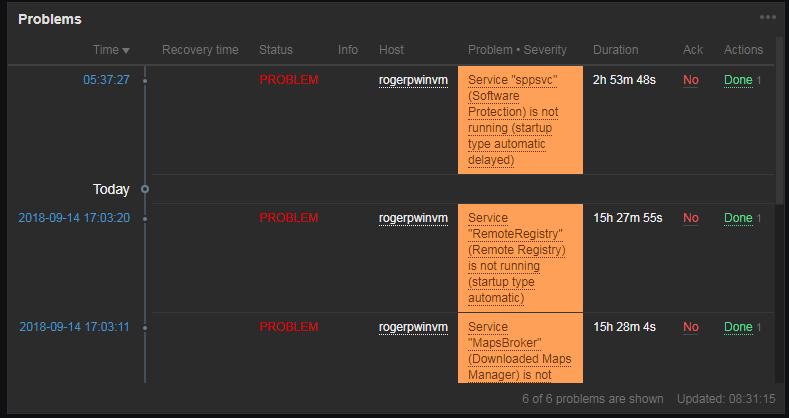
When installing windows servers, there are constant alerts for:

Service “sppsvc” (Software Protection) is not running (startup type automatic delayed)
Service “RemoteRegistry” (Remote Registry) is not running (startup type automatic)
Service “MapsBroker” (Downloaded Maps Manager) is not running (startup type automatic delayed)
Service “IaasVmProvider” (IaasVmProvider) is not running (startup type automatic)
Service “WbioSrvc” (Windows Biometric Service) is not running (startup type automatic)
Service “VSS” (Volume Shadow Copy) is not running (startup type automatic)

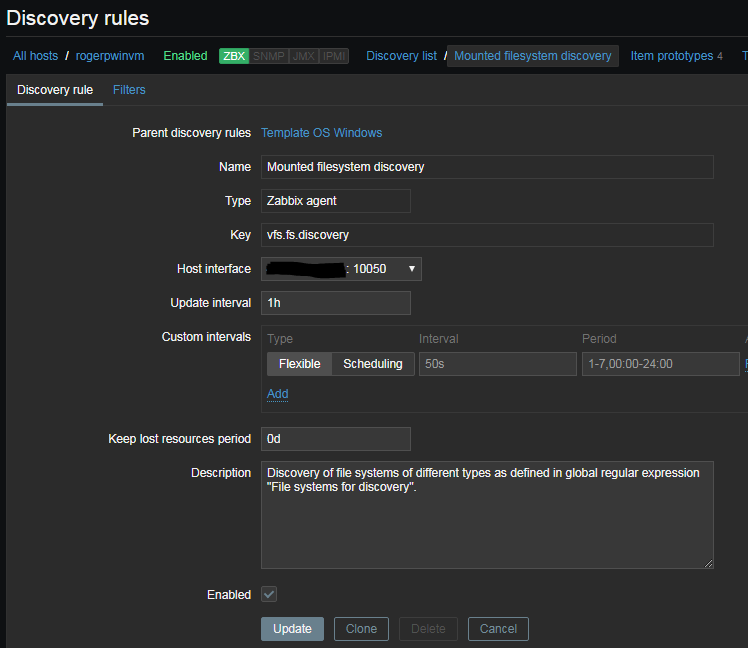
Check Configuraton > Hosts > Server Name > Click on Discovery inline with server namre > Mounted filesystem discovery. Find “Keep lost resources period:. Change from 31d to 0d.

Reference: https://www.zabbix.com/documentation/3.2/manual/discovery/low_level_discovery#discovery_of_file_systems

this has to do with the “Specifically to the Keep lost resources period” (in days) parameter.

Explanation:
If an entity is discovered by LLD, and then is either: removed; lost; or excluded by a filter, it is still kept in Zabbix for the duration of time defined by the Keep Lost Resources parameter (default is 30 days).

So, the changes were recognized in the next LLD cycle (1 hour), but the filtered entity was then considered “lost”, so would be kept for an additional 30 days. If I had waited that long, it would have finally disappeared.

Fortunately you can set that parameter to “0” and it will disappear after the next LLD cycle. Best not to leave that setting at “0” though, so reset back to “30” after LLD.
letsEncrypt is an alternative AutoSSL provider for users who opt to not use the default AutoSSL Powered by cPanel provider. Installing the LetsEncrypt provider is a straightforward process that involves running one command.

Procedure
Installation of the officially supported AutoSSL – Let’s Encrypt provider can be completed by performing the following command via SSH as the root user:

/usr/local/cpanel/scripts/install_lets_encrypt_autossl_provider

When updating wordpress, this error appears:
Error message: cURL error 28: Connection timed out after 10001 milliseconds

Resolution: Curl the site with the private IP and not the public IP. From inside the private network each server or device is known only by it’s private IP address and is always referenced using that address.

Ref: https://www.the-art-of-web.com/system/iptables-nat/

Also, on cpanel that is behind a firewall, you can check the file for the mappings:/var/cpanel/cpnat

Install Zabbix Agent

First, log into Zabbix agent instance and add the Zabbix repository with the following command:
Change version number for your zabbix version.


# wget http://repo.zabbix.com/zabbix/3.4/debian/pool/main/z/zabbix-release/zabbix-release_3.0-2+stretch_all.deb
# sudo dpkg -i zabbix-release_3.0-2+stretch_all.deb
# sudo apt-get update -y

Install the Zabbix agent by just running the following command:


# sudo apt-get install zabbix-agent -y

Once the Zabbix agent is installed, you will need to configure Zabbix agent to communicate with Zabbix server. You can do this by editing the Zabbix agent configuration file:


# sudo nano /etc/zabbix/zabbix_agentd.conf

Change the file as shown below:


    #Zabbix Server IP Address / Hostname

    Server=192.168.0.103

    #Zabbix Agent Hostname

    Hostname=zabbix-agent

Save and close the file when you are finished, then restart the Zabbix agent service and enable it to start on boot time with the following command:


# sudo systemctl restart zabbix-agent
# sudo systemctl enable zabbix-agent

Source: https://www.howtoforge.com/tutorial/install-zabbix-monitoring-server-and-agent-on-debian-9/

Add a domain like this for the primary domain:

*.domain.com

The add the wildcard domain to that domain.

According to the following link, once you update the wildcard SSL for the domain/subscription “*.domain.com ” it will affect all subdomains.
https://support.plesk.com/hc/en-us/articles/213921605-Is-it-possible-to-create-and-use-wildcard-SSL-certificates-in-Plesk-

Log Files:

/var/log/auth.log – All events related to authentication for the system.

In addition to the above, every Virtual Machine hosted on ESXi will have corresponding VM log files called vmware.log recording events related to machine activity, system failures, hardware changes, migrations, status and so on. To view the log file, SSH to the ESXi host and navigate to the datastore on which the VM folder resides.

The path to the log file should be similar to /vmfs/volumes///vwmare.log.

There are some adjustments you can make to the log rotation and logging options for a VM. Disable or enable logging: Set the logging value in the VM’s VMX file to false or true respectively. You can do this by editing the VM’s settings (VM Options -> Advanced -> Edit Configuration) in vSphere Web client as shown.

I recently received this error on a wordpress site update:

cURL error 28: Connection timed out after 10001 milliseconds with wordpress update.

The Fix:

  1. The first thing to do is to update your WordPress to the latest version if not already done.
  2. Then, check the following points :
  • Make sure your server is running a recent version of PHP and the cURL library.
  • Try to increase your Server Memory Limits settings.
  • The cURL error can be a dns related issue. Your hosting company might need to switch dns configuration to Google, Cloudflare or OpenDNS : https://www.howtogeek.com/164981/how-to-switch-to-opendns-or-google-dns-to-speed-up-web-browsing/
  • Ask your host if there is some limitation with wp-cron, or if loopback is disabled.
  • Ask your host if there a firewall or security modules (e.g. mod_security ) that could block the outgoing cURL requests.

More information here: https://www.samuelaguilera.com/post/curl-error-28-wordpress

This is for CentOS/RHEL based servers.

Steps in WHM: Log into WHM and go to Basic cPanel & WHM Setup.

Change the Primary IP here with the option that says “The IP address (only one address) that will be used for setting up shared IP virtual hosts”

Log in to SSH, and do the following:

Edit /etc/sysconfig/network-scripts/ifcfg-eth0
Change the IPADDR and GATEWAY lines to match the new IP and Gateway for the new ip

Edit /etc/sysconfig/network
Change the GATEWAY line here if it does not exist in the ifcfg-* file.

Edit /etc/ips
Remove the new primary IP from this file if it is present
Add the old primary IP to this file with the format


 <IP address>:<Net Mask>:<Gateway>

Edit /var/cpanel/mainip
Replace the old primary IP with the new primary IP

Edit /etc/hosts
Replace the old primary IP with the new one if needed. The hostname’s dns will need to be updated too

Restart the network service to make the new IP the primary

# service network restart

Note: You’re probably going to be disconnected at this point, and have to log in to ssh using the new primary ip.

Restart the ipaliases script to bring up the additional IPs

# service ipaliases restart

Run ifconfig and make sure all IPs show up correctly

Update the cpanel license to the new primary IP

Verify you can still log in to WHM and there is no license warning