Plesk uses system users to handle logins. As such removing the user effectively removes their access to the entire server.
If you want to delete the user without deleting any of their files, type this command as root:

#userdel username

If you want to delete the user’s home directory along with the user account itself, type this command as root:

# userdel -r username

Check for user


# grep username /etc/passwd
#

Just to be sure check the logins for Plesk on the server and the list of users is below.

[/bash]

# plesk db “select login from domains inner join sys_users on domains.id = sys_users.id”
+————–+
| login |
+————–+
| artist |
| test |
| user1|
| testuser1|
| rod|
| james|
| lisa|
+————–+

This issue revolves around Azure and AWS outbound SMTP from their virtual machines / EC2 instances.

AZURE

Azure: https://blogs.msdn.microsoft.com/mast/2017/11/15/enhanced-azure-security-for-sending-emails-november-2017-update/

For Pay-As-You-Go or Microsoft Partner Network subscriptions created after November 15, 2017, there will be technical restrictions blocking e-mail sent directly from VMs in these subscriptions. Customers that need the ability to send e-mail from Azure VMs directly to external e-mail providers (not using an authenticated SMTP relay) can make a request to remove the restriction.

Requests will be reviewed and approved at Microsoft’s discretion and will be only granted after additional anti-fraud checks are performed. To make a request, open a support case with the issue type Technical –> Virtual Network –> Connectivity –> Cannot send e-mail (SMTP/Port 25).

Be sure to add details about why your deployment needs to send mail directly to mail providers instead of going through an authenticated relay.

AWS

AWS: https://aws.amazon.com/premiumsupport/knowledge-center/ec2-port-25-throttle/
Note: If you want AWS to create a reverse DNS record for you, you must first create a corresponding DNS A record before submitting this form.
1. Sign in and open the Request to Remove Email Sending Limitations form. https://aws-portal.amazon.com/gp/aws/html-forms-controller/contactus/ec2-email-limit-rdns-request
2. In the Use Case Description field, provide a description of your use case.
3. (Optional) Provide the AWS-owned Elastic IP addresses that you use to send outbound email, as well as any reverse DNS records AWS needs to associate with the Elastic IP addresses. AWS will use this information to help reduce the chance that email sent from the Elastic IP addresses is marked as spam.
4. Choose Submit.

You can replicate a sending error by attempting to connect to an external email server. E.g. smtp.gmail.com on 25/tcp.

For plesk, you can use port 587. See: https://support.plesk.com/hc/en-us/articles/213372829

cPanel presents and error on update:

***** FATAL: Failed to download updatenow.static from server: The system cannot update the /var/cpanel/sysinfo.config file. at /usr/local/cpanel/Cpanel/GenSysInfo.pm line 113.

This issue stems from an issue with the rpm database. Run the following:


rpm --rebuilddb
/scripts/upcp --force

How to Install Zabbix Agent on Windows 2016 and avoid the: Windows error service could not be started. Error 1053: The service did not respond to the start or control request in a timely fashion.

Download – https://www.zabbix.com/download_agents

If you have the agent service installed incorrectly now, you can remove it by running “zabbix_agentd.exe –uninstall”.

cd c:\zabbix
zabbix_agentd.exe --uninstall

New Install

  1. Create directory C:\zabbix and place zabbix_agentd.exe and zabbix_agentd.win.conf files there.
  2. Edit the zabbix_agentd.win.conf file and set the values:

LogFile=C:\zabbix\zabbix_agentd.log
Server = IP address of your Zabbix server
# ListenPort = 10050 Leave it commented as is if you don’t change the defaults
ServerActive = IP of your Zabbix server
Hostname = computer that will be monitored as listed in the zabbix server hosts setup

3. Open command prompt and execute:

C:\zabbix\zabbix_agentd.exe --config C:\zabbix\zabbix_agentd.win.conf --install
zabbix_agentd.exe [5584]: service [Zabbix Agent] installed successfully
zabbix_agentd.exe [5584]: event source [Zabbix Agent] installed successfully


4. Start Windows service.
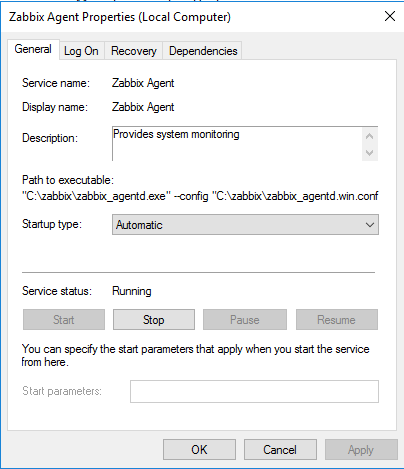
If you receive an error – Windows Agent – Error 1053 – that the service could not be started, run the uninstall above and restart the installation and make sure the files are in the correct directory and the config file changes match what you need.

Please find more info here: https://www.zabbix.com/documentation/4.0/manual/appendix/install/windows_agent

Adding a firewall rule in Windows.

Go to Windows Firewall. Add new rule. Choose port, TCP, Specific Local Ports. Add port 10050.

This script creates an Azure Virtual Machine with an Ubuntu operating system. After running the script, you can access the virtual machine over SSH.

If needed, install the Azure PowerShell module using the instructions found in the Azure PowerShell guide, and then run Login-AzureRmAccount to create a connection with Azure. Also, you need to have an SSH public key named id_rsa.pub in the .ssh directory of your user profile.

# Variables for common values
$resourceGroup = "myResourceGroup"
$location = "westeurope"
$vmName = "myVM"

# Definer user name and blank password
$securePassword = ConvertTo-SecureString ' ' -AsPlainText -Force
$cred = New-Object System.Management.Automation.PSCredential ("azureuser", $securePassword)

# Create a resource group
New-AzureRmResourceGroup -Name $resourceGroup -Location $location

# Create a subnet configuration
$subnetConfig = New-AzureRmVirtualNetworkSubnetConfig -Name mySubnet -AddressPrefix 192.168.1.0/24

# Create a virtual network
$vnet = New-AzureRmVirtualNetwork -ResourceGroupName $resourceGroup -Location $location `
  -Name MYvNET -AddressPrefix 192.168.0.0/16 -Subnet $subnetConfig

# Create a public IP address and specify a DNS name
$pip = New-AzureRmPublicIpAddress -ResourceGroupName $resourceGroup -Location $location `
  -Name "mypublicdns$(Get-Random)" -AllocationMethod Static -IdleTimeoutInMinutes 4

# Create an inbound network security group rule for port 22
$nsgRuleSSH = New-AzureRmNetworkSecurityRuleConfig -Name myNetworkSecurityGroupRuleSSH  -Protocol Tcp `
  -Direction Inbound -Priority 1000 -SourceAddressPrefix * -SourcePortRange * -DestinationAddressPrefix * `
  -DestinationPortRange 22 -Access Allow

# Create a network security group
$nsg = New-AzureRmNetworkSecurityGroup -ResourceGroupName $resourceGroup -Location $location `
  -Name myNetworkSecurityGroup -SecurityRules $nsgRuleSSH

# Create a virtual network card and associate with public IP address and NSG
$nic = New-AzureRmNetworkInterface -Name myNic -ResourceGroupName $resourceGroup -Location $location `
  -SubnetId $vnet.Subnets[0].Id -PublicIpAddressId $pip.Id -NetworkSecurityGroupId $nsg.Id

# Create a virtual machine configuration
$vmConfig = New-AzureRmVMConfig -VMName $vmName -VMSize Standard_D1 | `
Set-AzureRmVMOperatingSystem -Linux -ComputerName $vmName -Credential $cred -DisablePasswordAuthentication | `
Set-AzureRmVMSourceImage -PublisherName Canonical -Offer UbuntuServer -Skus 14.04.2-LTS -Version latest | `
Add-AzureRmVMNetworkInterface -Id $nic.Id

# Configure SSH Keys
$sshPublicKey = Get-Content "$env:USERPROFILE\.ssh\id_rsa.pub"
Add-AzureRmVMSshPublicKey -VM $vmconfig -KeyData $sshPublicKey -Path "/home/azureuser/.ssh/authorized_keys"

# Create a virtual machine
New-AzureRmVM -ResourceGroupName $resourceGroup -Location $location -VM $vmConfig

Courier cannot start:

Courier service can not be started: courierlogger dead but pid file exists
#service courier-pop3s status

In the Plesk Control Panel/Tools and Settings/ Services all of the ‘Courier’ entries show they are not running.

The usual fix of grep the courierlogger process and killing it does not work. Here is what does:

This is caused by hung processes, but not courierlogger was hung, but couriertcpd processes, one of them was running since April 3:


# ps aux | grep couriertcpd
root 3784 0.0 0.0 11976 1796 ? S 11:05 0:04 /usr/lib64/couriertcpd -address=0 -maxprocs=40 -maxperip=4 -nodnslookup -noidentlookup 110 /usr/sbin/pop3login /usr/lib64/plesk-9.0/pop3login Maildir
root 3907 0.0 0.0 11972 1884 ? S 11:05 0:00 /usr/lib64/couriertcpd -address=0 -maxprocs=40 -maxperip=4 -nodnslookup -noidentlookup 143 /usr/sbin/imaplogin /usr/bin/imapd Maildir
root 3973 0.0 0.0 11972 1776 ? S 11:05 0:00 /usr/lib64/couriertcpd -address=0 -maxprocs=40 -maxperip=4 -nodnslookup -noidentlookup 993 /usr/bin/couriertls -server -tcpd /usr/sbin/imaplogin /usr/bin/imapd Maildir
root 26808 0.0 0.0 103396 2080 pts/2 S+ 19:53 0:00 grep couriertcpd
root 26951 0.0 0.0 11976 1704 ? S Apr03 0:49 /usr/lib64/couriertcpd -address=0 -maxprocs=80 -maxperip=10 -nodnslookup -noidentlookup 995 /usr/bin/couriertls -server -tcpd /usr/sbin/pop3login /usr/lib64/plesk-9.0/pop3login Maildir
[root@216-55-187-88 ~]# ps aux | grep courierlogger
root 13394 0.0 0.0 4124 1432 ? S 18:08 0:00 /usr/sbin/courierlogger -name=courier-authdaemon -pid=/var/run/courier-authdaemon.pid -lockfile=/var/lock/subsys/courier-authdaemon -start /usr/lib64/courier-authlib/authdaemond


Kill all those processes and after that you are able to start the service successfully:


# service courier-imapd status
courierlogger (pid 29099) is running...

Here are some Plesk commands that are useful:

How to re-patch

 # plesk installer update --repatch

https://support.plesk.com/hc/en-us/articles/360002264953-How-to-reinstall-Plesk-micro-updates-MU-

This is related to an issue for Courier