Great article on how to enable remote desktop on Windows servers
https://www.howtogeek.com/175087/how-to-enable-and-secure-remote-desktop-on-windows/
Linux, Windows, Software Tips, Articles and Hacks
Great article on how to enable remote desktop on Windows servers
https://www.howtogeek.com/175087/how-to-enable-and-secure-remote-desktop-on-windows/
It could be that a session was left connected. If thats the case I’ll try using the admin console command and see if I can get connected with it.
On you local computer, go to Start -> Run then paste this and hit enter
mstsc.exe /admin
It’ll prompt for IP and then user/pass. It looks like it opens Remote Desktop Connection, but really its the “admin console”
Cisco IPSec VPN Client is not supported on Windows 8 or Windows 10 unless you do a registry key edit.
Cisco VPN client (5.0.07.0440 for x64, 5.0.07.0410 for x86) is working for some people. But for that
you need to apply a small Registry workaround as below.
1. Open Registry editor regedit in Run prompt
2. Browse to the Registry Key HKEY_LOCAL_MACHINE\SYSTEM\CurrentControlSet\Services\CVirtA
3. Select the Display Name to modify, and remove the leading characters from the value data value as shown below,
For x86 machine,
"@oem8.inf,%CVirtA_Desc%;Cisco Systems VPN Adapter”
Change to to “Cisco Systems VPN Adapter”
For x64 machine,
"@oem8.inf,%CVirtA_Desc%;Cisco Systems VPN Adapter for 64-bit Windows”
Change to to “Cisco Systems VPN Adapter for 64-bit Windows”
Then try the connection. If you get the following error:
Error: Secure VPN connection terminated by Peer. Reason 433 (Reason not specified by peer)
Perform the following:
That’s it! The SonicWall VPN client installs the DNE LightWeight Filter required for the Cisco client to work on Windows 10. You should now be able to connect without any peer errors and return to your everyday scheduled programming.
More info…
So people are getting this error:

Go here:
http://www.citrix.com/go/lp/dne.html
to download these:
1. ftp://files.citrix.com/winfix.exe
2. ftp://files.citrix.com/dneupdate64.msi
Steps to Install:
Linux:
# mysql -uadmin -p`cat /etc/psa/.psa.shadow` DATABASE_NAME
Windows:
This will retrieve admin password
cd %plesk_bin%
plesksrvclient -get
Login to mysql
cd %plesk_dir%\mysql\bin
mysql -uadmin -pPassword -P8306
Windows 2008 R2
1) SQL Server should be up and running.
All Programs >> Microsoft SQL Server 2008 >> Configuration Tools >> SQL Server Configuration Manager >> SQL Server Services, and check if SQL Server service status is “Running”.
Run “sqlcmd -L” in your command prompt to ascertain if your server is included in your network list.
2) Enable TCP/IP in SQL Server Configuration
When two or more SQL Servers are connected across network they do all communication using TCP/IP. The default port of SQL Server installation is 1433. This port can be changed through SQL Server Configuration Manager. TCP/IP should be enabled for SQL Server to be connected.
Go to All Programs >> Microsoft SQL Server 2008 >> Configuration Tools >> SQL Server Configuration Manager >> Select TCP/IP >> right click and enable
3) Open Port in Windows Firewall
Go to Control Panel >> Windows Firewall >> Change Settings >> Exceptions >> Add Port
Make the following entries in popup “Add a Port” and click OK.
Name : SQL
Port Number: 1433
Protocol: Select TCP
1) SQL Server should be up and running.
Go to All Programs >> Microsoft SQL Server 2008 >> Configuration Tools >> SQL Server Configuration Manager >> SQL Server Services, and check if SQL Server service status is “Running”.
2) Enable TCP/IP in SQL Server Configuration
Go to All Programs >> Microsoft SQL Server 2008 >> Configuration Tools >> SQL Server Configuration Manager >> Select TCP/IP >>Right Click on TCP/IP >> Click on Enable
restart SQL Server Services
3) Open Port in Windows Firewall
Go to Control Panel >> Windows Firewall >> Change Settings >> Exceptions >> Add Port
Make the following entries in popup “Add a Port” and click OK.
Name : SQL
Port Number: 1433
Protocol: Select TCP
4) Enable Remote Connection
All Programs >> Microsoft SQL Server 2008 >> Configuration Tools >> SQL Server Configuration Manager
Right click on the server node and select Properties.
Go to Left Tab of Connections and check “Allow remote connections to this server”
5) Enable SQL Server Browser Service
Go to All Programs >> Microsoft SQL Server 2008 >> Configuration Tools >> SQL Server Configuration Manager >> SQL Server Browser
FTP produces the following error:
530 User cannot log in, home directory inaccessible
Other resources:
http://kb.odin.com/en/549
http://kb.odin.com/en/124140
http://kb.odin.com/en/116628
http://kb.odin.com/en/124094
How to restore default permissions on a domain?
Resolution
In case default permissions on the domain folder are lost, the following actions can be performed to restore them:
In Parallels Plesk Panel (PP), go to the Domains page, mark the required domains, and click on the Check permissions button. Then uncheck the Check-only mode checkbox and click OK.
If it is necessary to repair permissions for all domains, you can launch Plesk Reconfigurator (Start > Programs > SWsoft > Plesk > Plesk Reconfigurator). When it is running, choose Repair Plesk installation, toggle on Plesk virtual hosts security, and click on the Check button.
Note: Please be aware that any custom permissions that might have been configured by customers will be replaced with the default ones after this action.
You can find instructions for Plesk for Linux here – http://kb.odin.com/en/6572
How to set it in plesk: https://support.managed.com/kb/a642/how-to-fix-permissions-on-your-site-through-plesk-control.aspx
Internet Explorer 10 is available by default with Windows Server 2012 /R2 , which includes Adobe Flash Player as a platform feature. However, the plugin is enabled only if you enable the Desktop Experience feature.
To enable Desktop Experience on Windows Server 2012
1. Open Server Manager and click Add Roles and Features.
2. When the Add Roles and Features Wizard appears, specify the appropriate values on the Installation Type, Server Selection, and Server Roles pages.
3. On the Features page, expand User Interfaces and Infrastructure and select Desktop Experience.
4. On the Confirmation page, select Restart the destination server automatically if required and click Install.
On Windows 2008 R2 please visit www.adobe.com to download and install the latest version of Flash Player. It is not necessary to enable Flash Player on Windows 2008 R2.
On Windows, similar results can be achieved using the IIS URL Rewrite functionality. To enable this functionality, place the desired rewrite rules in a web.config file in your website’s document root directory. Refer to the IIS documentation for more information.
More info: http://www.iis.net/learn/extensions/url-rewrite-module/using-the-url-rewrite-module
Windows 2008
http://www.microsoft.com/en-us/download/details.aspx?id=7435
For Windows Plesk servers, this KB says that IIS rewrite can be supported in a plesk panel and installed as a panel component – http://kb.odin.com/en/125167
Under Tools and Settings > Updates and upgrades
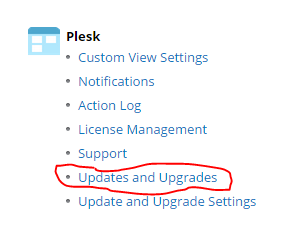
Click Add/Remove Components

Select IIS URL Rewrite Module and Then Click OK
![]()
https://www.digicert.com/ssl-certificate-installation-microsoft-iis-8.htm