Configuring the rDNS for a linux server is easy. A windows server with plesk is a different story.

Plesk

I changed the hostname in the plesk Tools and Settings.

pleskhostname

Rebooted the system. Then sent a test email. Here is the header:


Received: from WIN-QO7M1M92HBS.home

Humm…where is the new hostname? So I did some investigation. I checked the computername in windows:

Win-Computername

Then I checked the Mailenable settings > Services and Connectors > SMTP > properties.

SMTP Connector

So, the email received from name is a combination of the Windows computer name and the Mailenable Local domain name.

Now that I had this information, how do I give the mail server a valid hostname?

Definition of profiles in Microsoft words:

Domain. Windows automatically identifies networks on which it can authenticate access to the domain controller for the domain to which the computer is joined in this category. No other networks can be placed in this category.

Public. Other than domain networks, all networks are initially categorized as public. Networks that represent direct connections to the Internet or are in public places, such as airports and coffee shops should be left public.

Private. A network will only be categorized as private if a user or application identifies the network as private. Only networks located behind a NAT device (preferably a hardware firewall) should be identified as private networks. Users will likely want to identify home or small business networks as private.

The solution for me was to change the .NET framework version in the Application Pools from v4.0 to v2.0 for the Default App Pool:

apppool

21
down vote

If, like me, you need to target v4 but can only build with .net 3.5, follow the instruction here. Just replace in your web.config the whole content of the with:

<configSections>
<sectionGroup name="system.web.extensions" type="System.Web.Configuration.SystemWebExtensionsSectionGroup, System.Web.Extensions, Version=4.0.0.0, Culture=neutral, PublicKeyToken=31bf3856ad364e35">
  <sectionGroup name="scripting" type="System.Web.Configuration.ScriptingSectionGroup, System.Web.Extensions, Version=4.0.0.0, Culture=neutral, PublicKeyToken=31bf3856ad364e35">
    <section name="scriptResourceHandler" type="System.Web.Configuration.ScriptingScriptResourceHandlerSection, System.Web.Extensions, Version=4.0.0.0, Culture=neutral, PublicKeyToken=31bf3856ad364e35" requirePermission="false" allowDefinition="MachineToApplication"/>
    <sectionGroup name="webServices" type="System.Web.Configuration.ScriptingWebServicesSectionGroup, System.Web.Extensions,  Version=4.0.0.0, Culture=neutral, PublicKeyToken=31bf3856ad364e35">
      <section name="jsonSerialization" type="System.Web.Configuration.ScriptingJsonSerializationSection, System.Web.Extensions, Version=4.0.0.0, Culture=neutral, PublicKeyToken=31bf3856ad364e35" requirePermission="false" allowDefinition="Everywhere"/>
      <section name="profileService" type="System.Web.Configuration.ScriptingProfileServiceSection, System.Web.Extensions, Version=4.0.0.0, Culture=neutral, PublicKeyToken=31bf3856ad364e35" requirePermission="false" allowDefinition="MachineToApplication"/>
      <section name="authenticationService" type="System.Web.Configuration.ScriptingAuthenticationServiceSection, System.Web.Extensions, Version=4.0.0.0, Culture=neutral, PublicKeyToken=31bf3856ad364e35" requirePermission="false" allowDefinition="MachineToApplication"/>
      <section name="roleService" type="System.Web.Configuration.ScriptingRoleServiceSection, System.Web.Extensions, Version=4.0.0.0, Culture=neutral, PublicKeyToken=31bf3856ad364e35" requirePermission="false" allowDefinition="MachineToApplication"/>
    </sectionGroup>
  </sectionGroup>
</sectionGroup>

Connect to your server via Remote Desktop
Click simultaneously on the Windows logo + R to open the “Run” dialog and execute the “cmd” command
Open the registry editor by typing the “regedit” command
Search for this registry subkey:

HKEY_LOCAL_MACHINE\System\CurrentControlSet\Control\TerminalServer\WinStations\RDP-Tcp\PortNumber

Double-click or right-click on the “PortNumber” registry subkey, select the decimal base and type the port number of your choice (the default port is 3389, in this example, we selected port 3390). Click on “Ok” to save your selection.

IMPORTANT: Make sure that remote access to your server through the new port is authorized in your Windows firewall before executing the next step. Add a new Firewall Port Incoming rule allowing the port number.

Exit the registry editor
Restart your server

After the reboot, specify the Remote Desktop port number.

Resources:

http://www.techrepublic.com/blog/the-enterprise-cloud/changing-the-rdp-listening-port-on-windows-server/

Open IIS Manager and navigate to the level you want to manage. For information about opening IIS Manager, see Open IIS Manager (IIS 7). For information about navigating to locations in the UI, see Navigation in IIS Manager (IIS 7).

In the Connections pane, click Sites.

In Features View, select the site for which you want to enable trace logging.

In the Actions pane, under Configure, click Failed Request Tracing.

In the Edit Web Site Failed Request Tracing Settings dialog box, select Enable to enable logging for this site.

In the Directory text box, type the path where you want to store the log files or click the browse button (…) to find a location on the computer. The default is %SystemDrive%\inetpub\logs\FailedReqLogFiles.
noteNote
As a best practice, log files, such as log files for failed request tracing, should be stored in a directory other than systemroot.

In the Maximum number of trace files text box, type the maximum number of trace log files that you want to keep, and then click OK.

If you’ve forgotten the sa password for your SQL server, you are probably in a panic. Fear not, for you can change the password and once again have access to the powers of the SA account using Windows Authentication mode.

Login into SQL Server using Windows Authentication.

In Object Explorer, open Security folder, open Logins folder. Right click on SA account and go to Properties.

sql-server-management

Change SA password, and confirm it. Click OK.

change-sql-server-password

Change SQL Server Password Using SQL Script

Open the SQL Server Management Studio.
Open a New Query.

Copy, paste, and execute the following:


    GO
    ALTER LOGIN [sa] WITH DEFAULT_DATABASE=[master]
    GO
    USE [master]
    GO
    ALTER LOGIN [sa] WITH PASSWORD=N'NewPassword' MUST_CHANGE
    GO

where NewPassword is the password you wish to use for the sa account.

Option 3: Change SQL Server Password with Third Party Software

Download SQL Server Password Changer on your local PC, install and launch it.

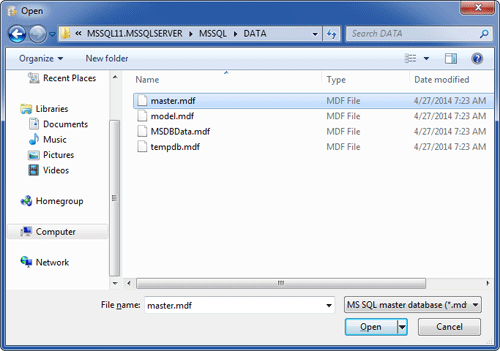
Click the Open File button. Select the SQL Server master database file (master.mdf). Typically it is located in the folder: C:\Program Files\Microsoft SQL Server\MSSQL.1\MSSQL\Data.

open_sqlserver

The program will automatically decrypt the master database file and display all user accounts in your SQL Server. Select the SA account, click the Change Password button. Type a new password and click OK.

sqlserver_pwd

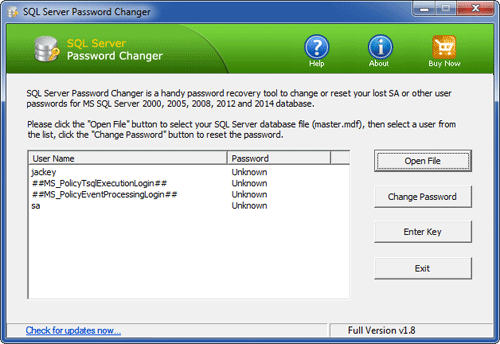
The program will replace the existing password with your new password, and also unlock your SA account if it’s already locked out or disabled.