CentOS 8 uses firewalld.You can see all zones by running the following ls command:

# ls -l /usr/lib/firewalld/zones/
total 36
-rw-r--r--. 1 root root 299 Nov  8 11:48 block.xml
-rw-r--r--. 1 root root 293 Nov  8 11:48 dmz.xml
-rw-r--r--. 1 root root 291 Nov  8 11:48 drop.xml
-rw-r--r--. 1 root root 304 Nov  8 11:48 external.xml
-rw-r--r--. 1 root root 397 Nov  8 11:48 home.xml
-rw-r--r--. 1 root root 412 Nov  8 11:48 internal.xml
-rw-r--r--. 1 root root 343 Nov  8 11:48 public.xml
-rw-r--r--. 1 root root 162 Nov  8 11:48 trusted.xml
-rw-r--r--. 1 root root 339 Nov  8 11:48 work.xml

Predefined Zones Explained

block – All incoming network connections rejected. Only network connections initiated from within the system are possible.
dmz – Classic demilitarized zone (DMZ) zone that provided limited access to your LAN and only allows selected incoming ports.
drop – All incoming network connections dropped, and only outgoing network connections allowed.
external – Useful for router type of connections. You need LAN and WAN interfaces too for masquerading (NAT) to work correctly.
home – Useful for home computers such as laptops and desktops within your LAN where you trust other computers. Allows only selected TCP/IP ports.
internal – For use on internal networks when you mostly trust the other servers or computers on the LAN.
public – You do not trust any other computers and servers on the network. You only allow the required ports and services. For cloud servers or server hosted at your place always use public zone.
trusted – All network connections are accepted. I do not recommend this zone for dedicated servers or VMs connected to WAN.
work – For use at your workplace where you trust your coworkers and other servers.

Run the following command to see all zones on CentOS 8:

# firewall-cmd --get-zones

To get your default zone run:

# firewall-cmd --get-default-zone

To see your network interface names run either ip command or nmcli command:

# ip link show
# nmcli device status

When new interface connection added (such as eth0 or ens3) to NetworkManager, they are attached to the default zone. Verify it by running the following command:

# firewall-cmd --get-active-zones
public
  interfaces: eth0

How to Start and enable firewalld

# systemctl start firewalld
# systemctl enable firewalld

Stop and disable firewalld

# systemctl stop firewalld
# systemctl disable firewalld

Check the firewalld status

# firewall-cmd --state

Command to reload a firewalld configuration when you make change to rules

# firewall-cmd --reload

Get the status of the firewalld service

# systemctl status firewalld

How to see firewall rules or services associated with the public zone
Run:

# firewall-cmd --list-all

OR

# firewall-cmd --list-all --zone=public

How to see which services are allowed in the current zone

# firewall-cmd --list-services

OR

# firewall-cmd --list-services --zone=public

Adding

Temporary Adds:

# firewall-cmd --zone=public --add-service=http

Permanent Adds

# firewall-cmd --zone=public --add-service=https --permanent
# firewall-cmd --reload
# firewall-cmd --list-services
# sudo firewall-cmd --list-services --permanent 

How to add a service to your zone

# firewall-cmd --zone=public --add-service=dns --permanent

Add ports 5060 5061 for Asterisk by creating a service. Create the following Firewalld service:

# nano /etc/firewalld/services/asterisk.xml

Add the code


  asterisk
  Asterisk is a software implementation of a telephone private branch exchange (PBX).


[/bash]
Save the file and - WAIT 5 seconds - apply the new firewall rules by typing:
# firewall-cmd --add-service=asterisk --permanent
# firewall-cmd --reload

If you get an error - just wait and then retry. I received this error the first time:

# firewall-cmd --add-service=asterisk --permanent
Error: INVALID_SERVICE: 'asterisk' not among existing services

Finally check if the new firewall rules are applied successfully with:

# firewall-cmd --list-all
public (active)
  target: default
  icmp-block-inversion: no
  interfaces: eth0
  sources:
  services: asterisk cockpit dhcpv6-client ssh
  ports:
  protocols:
  masquerade: no
  forward-ports:
  source-ports:
  icmp-blocks:
  rich rules:

Delete dns service

# firewall-cmd --zone=public --remove-service=dns --permanent

How to allow/open TCP/UDP port/protocol

Open TCP port 80:

# firewall-cmd --zone=public --add-port=80/tcp --permanent

To view added ports, run:

# firewall-cmd --zone=internal --list-ports

Deny/block TCP/UDP port/protocol

# firewall-cmd --zone=public --remove-port=23/tcp --permanent

This install in on Ubuntu 18.04. There is an excellent article for CentOS at – https://www.tecmint.com/install-asterisk-on-centos-7/
Please review aslo:
– https://wiki.asterisk.org/wiki/display/AST/Installing+Asterisk+From+Source
– https://community.asterisk.org/
– https://www.sangoma.com/articles/how-to-install-asterisk-11-on-ubuntu-12-4-lts/
– http://asteriskdocs.org/en/3rd_Edition/asterisk-book-html-chunk/asterisk-Install.html

Install Requirements:

Firewalld. See the Article here to set up asterisk on firewalld – https://www.geekdecoder.com/firewalld-on-centos-8/-

The command installs a bunch of new packages including gcc, g++ and make

# apt install build-essential

Libraries:

Help Finding the Right Libraries

Asterisk comes with a shell script called install_prereq.sh in the contrib/scripts sub-directory. If you run install_prereq test, it will give you the exact commands to install the necessary system libraries on your operating system. If you run install_prereq install, it will attempt to download and install the prerequisites automatically.

cd /usr/local/src/asterisk-17.3.0/contrib/scripts/
./install_prereq test
./install_prereq install

The script calls for calling code (https://en.wikipedia.org/wiki/List_of_country_calling_codes)

Download Files:

Go to the following to see the current asterisk release:
https://downloads.asterisk.org/pub/telephony/asterisk/

Here is what I am using:

Asterisk – https://downloads.asterisk.org/pub/telephony/asterisk/asterisk-17-current.tar.gz
dahdi-complete – https://downloads.asterisk.org/pub/telephony/dahdi-linux-complete/dahdi-linux-complete-current.tar.gz
dahdi-linux – https://downloads.asterisk.org/pub/telephony/dahdi-linux/dahdi-linux-current.tar.gz
dahdi-tools – https://downloads.asterisk.org/pub/telephony/dahdi-tools/dahdi-tools-current.tar.gz
libpri – https://downloads.asterisk.org/pub/telephony/libpri/libpri-current.tar.gz

Change directory:

# cd /usr/local/src

Get the files:

wget https://downloads.asterisk.org/pub/telephony/asterisk/asterisk-17-current.tar.gz
# wget https://downloads.asterisk.org/pub/telephony/dahdi-linux-complete/dahdi-linux-complete-current.tar.gz
# wget https://downloads.asterisk.org/pub/telephony/dahdi-linux/dahdi-linux-current.tar.gz
# wget https://downloads.asterisk.org/pub/telephony/dahdi-tools/dahdi-tools-current.tar.gz
# wget https://downloads.asterisk.org/pub/telephony/libpri/libpri-current.tar.gz

Lets extract

tar -zxvf asterisk-17-current.tar.gz
# tar -zxvf dahdi-linux-complete-current.tar.gz
# tar -zxvf dahdi-linux-current.tar.gz
# tar -zxvf dahdi-tools-current.tar.gz
# tar -zxvf libpri-current.tar.gz

You should now notice that a new sub-directory was created for each of the tarballs, each containing the extracted files from the corresponding tarball. We can now compile and install each of the components.

Building and Installing DAHDI
Let’s install DAHDI!
On Linux, we will use the DAHDI-linux-complete tarball, which contains the DAHDI Linux drivers, DAHDI tools, and board firmware files.

# cd dahdi-linux-complete-3.1.0+3.1.0/
# make
# make install
# make config

Next, building and Installing LibPRI
Have you installed DAHDI? – Before you can build libpri, you’ll need to Build and Install DAHDI.

# cd libpri-1.6.0/
# make
# make install

Using Menuselect to Select Asterisk Options

The next step in the build process is to tell Asterisk which modules to compile and install, as well as set various compiler options. These settings are all controlled via a menu-driven system called Menuselect. To access the Menuselect system, type:

# make menuselect

When you’re first learning your way around Asterisk on a test system, you’ll probably want to stick with the default settings in Menuselect. If you’re building a production system, however, you may not wish to build all of the various modules, and instead only build the modules that your system is using. When you are finished selecting the modules and options you’d like in Menuselect, press F12 to save and exit, or highlight the Save and Exit button and press enter.

See More here: https://wiki.asterisk.org/wiki/display/AST/Using+Menuselect+to+Select+Asterisk+Options

Install asterisk with pre-bundled PJSIP-pjproject

# cd /usr/local/src/asterisk-17.3.0
# ./configure
# make && make install

You should see:

 +---- Asterisk Installation Complete -------+
 +                                           +
 +    YOU MUST READ THE SECURITY DOCUMENT    +
 +                                           +
 + Asterisk has successfully been installed. +
 + If you would like to install the sample   +
 + configuration files (overwriting any      +
 + existing config files), run:              +
 +                                           +
 + For generic reference documentation:      +
 +    make samples                           +
 +                                           +
 + For a sample basic PBX:                   +
 +    make basic-pbx                         +
 +                                           +
 +                                           +
 +-----------------  or ---------------------+
 +                                           +
 + You can go ahead and install the asterisk +
 + program documentation now or later run:   +
 +                                           +
 +               make progdocs               +
 +                                           +
 + **Note** This requires that you have      +
 + doxygen installed on your local system    +
 +-------------------------------------------+

Installing Sample Files

Asterisk Sample Configs: not a sample PBX configuration

For many of the sample configuration files that make samples installs, the configuration contains more than just an example configuration. The sample configuration files historically were used predominately for documentation of available options. As such, they contain many examples of configuring Asterisk that may not be ideal for standard deployments.

While installing the sample configuration files may be a good starting point for some people, they should not be viewed as recommended configuration for an Asterisk system.

To install a set of sample configuration files for Asterisk, type:

# make samples

Any existing sample files which have been modified will be given a .old file extension. For example, if you had an existing file named extensions.conf, it would be renamed to extensions.conf.old and the sample dialplan would be installed as extensions.conf.

Installing Initialization Scripts

Now that you have Asterisk compiled and installed, the last step is to install the initialization script, or initscript. This script starts Asterisk when your server starts, will monitor the Asterisk process in case anything bad happens to it, and can be used to stop or restart Asterisk as well. To install the initscript, use the make config command.

# make config

As your Asterisk system runs, it will generate logfiles. It is recommended to install the logrotation script in order to compress and rotate those files, to save disk space and to make searching them or cataloguing them easier. To do this, use the make install-logrotate command.

# make install-logrotate

Validating Your Installation

Before continuing on, let’s check a few things to make sure your system is in good working order. First, let’s make sure the DAHDI drivers are loaded. You can use the lsmod under Linux to list all of the loaded kernel modules, and the grep command to filter the input and only show the modules that have dahdi in their name.

# lsmod | grep dahdi

If the command returns nothing, then DAHDI has not been started. Start DAHDI by running:

# /etc/init.d/dadhi start

Asterisk can now be started as a service:

# service asterisk start
 * Starting Asterisk PBX: asterisk                                                                               [ OK ] 

And stopped:

# service asterisk stop
 * Stopping Asterisk PBX: asterisk                                                                               [ OK ] 

And restarted:

# service asterisk restart
 * Stopping Asterisk PBX: asterisk                                                                               [ OK ] 
 * Starting Asterisk PBX: asterisk                                                                               [ OK ]

Asterisk Console

# asterisk -rvvvvv

Let set up a SIP client and Make a test call. Configure extensions.conf. Backup the sample extensions.conf and create a new one

# mv extensions.conf extensions.sample
# vim extensions.conf

We are going to use a very simple dialplan. A dialplan is simply instructions telling Asterisk what to do with a call. Edit your blank extensions.conf to reflect the following:

[from-internal]
exten = 100,1,Answer()
same = n,Wait(1)
same = n,Playback(hello-world)
same = n,Hangup()
[/bash]
When a phone dials extension 100, we are telling Asterisk to Answer the call, Wait one second, then Play (Playback) a sound file (hello-world) to the channel and Hangup.

Configure a SIP channel driver. Depending on the version of Asterisk in use, you may have the option of more than one SIP channel driver. You'll have to pick one to use for the example.
Asterisk 11 and previous: chan_sip is the primary option. Asterisk 12 and beyond: You'll probably want to use chan_pjsip (the newest driver), but you still have the option of using chan_sip as well
Follow the instructions below for the channel driver you chose. Configure chan_sip Backup and edit a new blank sip.conf. Then add the following to your sip.conf file:
[general]
context=default

[6001]
type=friend
context=from-internal
host=dynamic
secret=unsecurepassword
disallow=all
allow=ulaw

Configure chan_pjsip

Backup and edit a new blank pjsip.conf. Then add the following to your pjsip.conf file:

[transport-udp]
type=transport
protocol=udp
bind=0.0.0.0

[6001]
type=endpoint
context=from-internal
disallow=all
allow=ulaw
auth=6001
aors=6001

[6001]
type=auth
auth_type=userpass
password=unsecurepassword
username=6001

[6001]
type=aor
max_contacts=1

Configure your SIP phone

Use Jitsi.

Once Jitsi is opened, click Tools > Options > Add.
Select the "SIP" Network".
For "SIP id", Enter 6001.
Enter your SIP peer's password(see above - unsecurepassword) in the Password field.
Click Advanced. Add your Display Name. Click the Connection Tab.
Put in the IP for the asterisk server in the "Registrar" Field.
Review and Click Sign in.
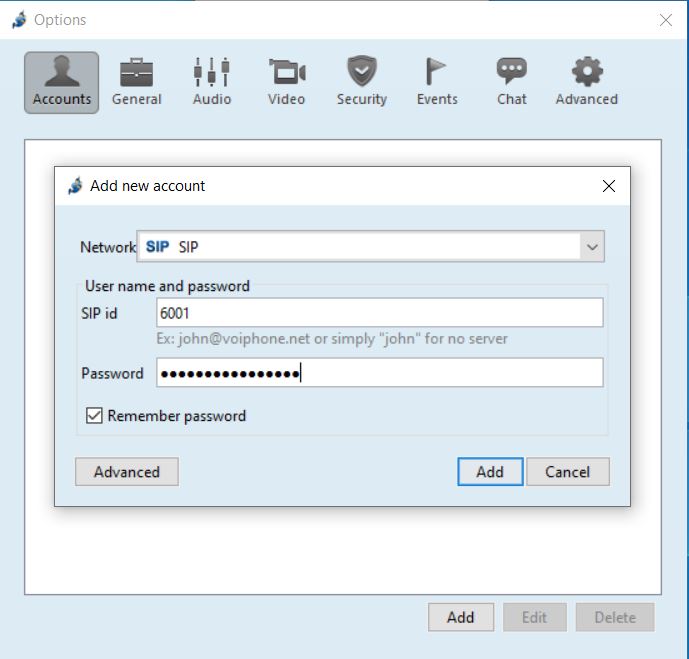


You should see the registration in asterisk:

Start Asterisk. Back at the Linux shell go ahead and start Asterisk. We'll start Asterisk with a control console (-c) and level 5 verbosity (vvvvv).

# asterisk -cvvvvv

Or if Asterisk is already running, restart Asterisk from the shell and connect to it.

# asterisk -rx "core restart now"
# asterisk -rvvvvv

Make the call. Once registered, enter extension 100 and click the Dial button. The call should be made and you should hear the sound file hello-world!

On the Asterisk CLI, you should see something like:

This article guides you how to assign Home Folder to Active Directory users.

Install the File Server Resource Manager

  1. Open Server Manager
  2. Go to “Add roles and features”
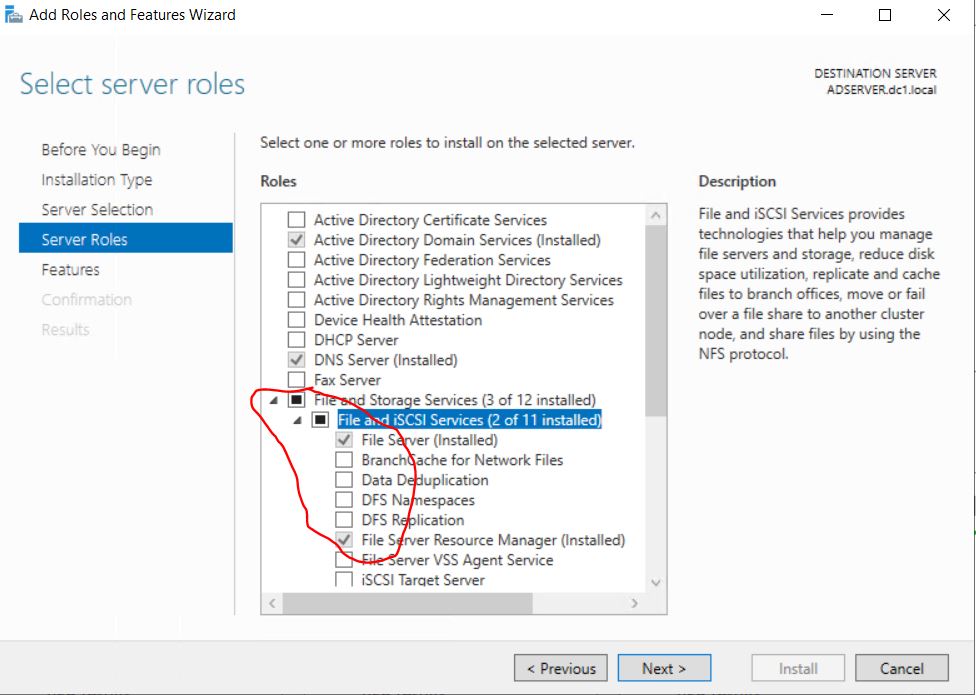
  3. In “Server Roles” expand “File and Storage Services“, again expand “File and iSCI Services“, then tick “File Server Resource Manager” and click “next” to install.

Configure a Shared Folder

  1. Create a shared folder ex:- D:\HOME
  2. Open “HOME” folder properties by right clicking on it and go to properties > sharing.
  3. Click on “Share” button and activate folder sharing. Add users.  Find shared folder path ex:- “\\YOUR-SERVER\home\”
  4. select “security” tab and then open “Advance Security”. Please make sure inheritance is disabled like below.

Configure Disk Quota

  1. Open “File Server Resource Manager”
  2. Expand “Quota Management” , you can configure “Quota Templates” if you wish or you can use existing template like here I did.
  3. Click on “Quotas” –> “Create Quotas” from right hand side.
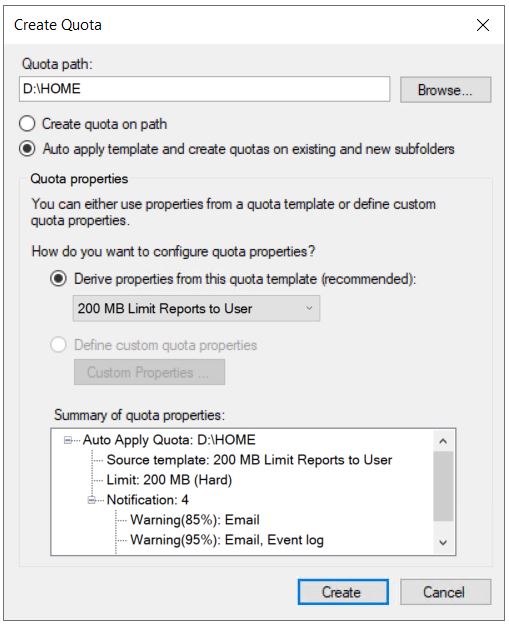
  4. On then “Create Quota” window, browse and set Quota Path, select “Auto apply template and create quotas on existing and new sub folders” radio button, and make sure to select previously configured template from the drop down menu (200 MB Limit Reports to User – existing template).

Attach Network folder to Active directory user

Open “Active Directory Users and Computers”
Right click on user and open “properties” , then browse “profile” and set following Network path there.

“\\YOUR-SERVER\home\%username%”

In order to view .ODT files, you will need to install the ONLYOFFICE App. ONLYOFFICE integration in Nextcloud empowers users to collaborate on office documents with their team members in real-time. Compatibility with Microsoft Office formats means perfect documents, every time.

ONLYOFFICE comes with a Powerful spreadsheet editor – Organize and manage your data online in XLSX, ODS and CSV files with over 400 formulas and create colorful visualizations.
Beautiful presentation builder – Express ideas in beautiful presentations stored in PPTX and ODP or exported to PDF full of charts, shapes, and images.
Complete document writer – Open, edit and collaborate on Word, ODT, PDF or HTML documents in real-time with powerful formatting and layout capabilities.

Here is how to do it.

Read More

This article describes how to add an MX record to Godaddy if the DNS is hosted at Godaddy.

Create an A record for “mail”. Point the record to the primary IP where the mail will be hosted. This can be the same IP as the website or a different IP if mail in on a different server.

Now create the MX record. Replace “domain” with your actual domain name.

Allow for DNS propigation. Check the DNS at:

https://www.whatsmydns.net

After updating/restarting the manager to v14.2.5 we are no longer able to send data to our zabbix servers. Ceph reports a non-zero exit status from zabbix_sender.

Check to install zabbix-server.

apt install zabbix-sender

Info:

# ceph mon versions

Output:

{
    "ceph version 16.2.7 (f9aa029788115b5df5eeee328f584156565ee5b7) pacific (stable)": 4
}

Check Debian version

# cat /etc/debian_version
11.2
# lsb_release -a
No LSB modules are available.
Distributor ID: Debian
Description:    Debian GNU/Linux 11 (bullseye)
Release:        11
Codename:       bullseye
ceph -s
  cluster:
    id:     20a806df-b3f4-4032-ab8e-ae15aef1e836
    health: HEALTH_WARN
            Failed to send data to Zabbix
            mon px1 is low on available space

  services:
    mon: 3 daemons, quorum px1,px2,px3 (age 8d)
    mgr: px1(active, since 8d), standbys: px2, px3
    osd: 32 osds: 32 up (since 8d), 32 in (since 11d)

  data:
    pools:   7 pools, 640 pgs
    objects: 3.52M objects, 13 TiB
    usage:   53 TiB used, 124 TiB / 176 TiB avail
    pgs:     639 active+clean
             1   active+clean+scrubbing+deep

  io:
    client:   0 B/s rd, 23 MiB/s wr, 0 op/s rd, 34 op/s wr

ceph health detail
HEALTH_WARN Failed to send data to Zabbix; mon px1 is low on available space
MGR_ZABBIX_SEND_FAILED Failed to send data to Zabbix
    /usr/bin/zabbix_sender exited non-zero: zabbix_sender [4088351]: DEBUG: answer []
zabbix_sender [4088351]: Warning: incorrect answer from server []

Setting “debug mgr = 20” yields no additional information. Zabbix configuration in ceph has not changed since the v14.2.5 update, and was working under v14.2.4:

# ceph zabbix config-show
{"zabbix_port": 10050, "zabbix_host": "stats.myzabbix.host", "identifier": "px1.cephserver.host", "zabbix_sender": "/usr/bin/zabbix_sender", "interval": 60}

So, how to reconfigure it.
SOME DETAILS:

Zabbix plugin
The Zabbix plugin actively sends information to a Zabbix server like:
Ceph status
I/O operations
I/O bandwidth
OSD status
Storage utilization
Requirements

The plugin requires that the zabbix_sender executable is present on all machines running ceph-mgr. It can be installed on most distributions using the package manager.
Dependencies.

Installing zabbix_sender can be done under Ubuntu or CentOS using either apt or dnf.

On Ubuntu Xenial:

# apt install zabbix-agent

On Fedora:

# dnf install zabbix-sender

Enabling

You can enable the zabbix module with:

# ceph mgr module enable zabbix

Configuration

Two configuration keys are vital for the module to work:

zabbix_host
identifier (optional)

The parameter zabbix_host controls the hostname of the Zabbix server to which zabbix_sender will send the items. This can be a IP-Address if required by your installation. The identifier parameter controls the identifier/hostname to use as source when sending items to Zabbix. This should match the name of the Host in your Zabbix server. When the identifier parameter is not configured the ceph- of the cluster will be used when sending data to Zabbix.

This would for example be ceph-c4d32a99-9e80-490f-bd3a-1d22d8a7d354

Additional configuration keys which can be configured and their default values:

zabbix_port: 10051
zabbix_sender: /usr/bin/zabbix_sender
interval: 60
Configuration keys
Configuration keys can be set on any machine with the proper cephx credentials, these are usually Monitors where the client.admin key is present.
ceph zabbix config-set
For example:

# ceph zabbix config-set zabbix_host zabbix.localdomain
# ceph zabbix config-set identifier ceph.eu-ams02.local

The current configuration of the module can also be shown:

# ceph zabbix config-show

Manually sending data

If needed the module can be asked to send data immediately instead of waiting for the interval.

This can be done with this command:

# ceph zabbix send

The module will now send its latest data to the Zabbix server.
Debugging

Should you want to debug the Zabbix module increase the logging level for ceph-mgr and check the logs.

[mgr]
    debug mgr = 20

With logging set to debug for the manager the plugin will print various logging lines prefixed with mgr[zabbix] for easy filtering.

When trying to Enabling Physical GPUs in Hyper-V, the option is not there in the GUI. In Windows 2016 there is an option as in the below screenshot:

In Windows Server 2019, here is the screenshot and there is no option to enable it:

So, Here is how to enable it in Windows server 2019. You can also use RemoteFX vGPU feature on Windows Server 2019. Although the config UI of RemoteFX vGPU has been removed from Hyper-V Manager of Windows Server 2019, you can configure RemoteFX vGPU by using Powershell on Windows Server 2019.

Check your Host GPU – You need RemoteFX Compatible GPU Card and you need to install the Remote Desktop Virtualization Host role in Windows Server Manager.

To install the Remote Desktop Virtualization Host role, open Server Manager, and select the Add Roles and Features option from the Manage menu. This will cause Windows to launch the Add Roles and Features Wizard. Click Next to skip the wizard’s Before You Begin screen. You will now be taken to the Installation Type screen. Select the Role-Based or Feature-Based Installation option and click Next. You will now be prompted to choose the server on which you wish to install the role. Choose the Select a Server from the Server Pool option. Make sure that the correct server is selected, and click Next. You should now see the Select Server Roles screen. Select the Remote Desktop Services role, and click Next. Click Next again to bypass the Features screen, and once again to bypass the Remote Desktop Services introduction.

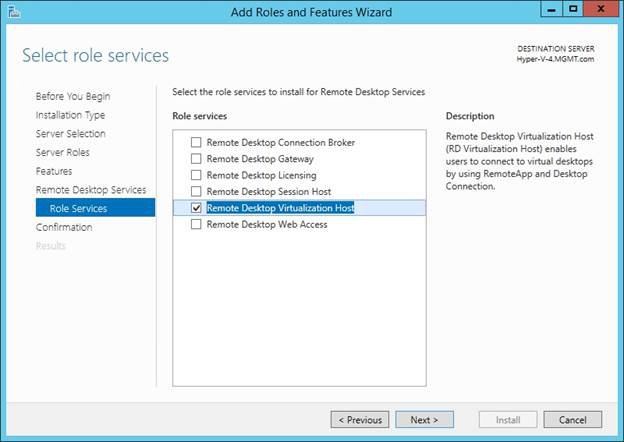
The next screen that you will see asks you to select the role services that you wish to install. Select the Remote Desktop Virtualization Host checkbox, as shown below. If prompted to install the Media Foundation and the Remote Server Administration Tools, be sure to click the Add Features button.

Click Next, followed by Install, and the required role services will be installed onto the server. When the process completes, click Close. You will need to reboot the server in order to finish the installation.

Now open powershell as Administrator.

Run the following commands:

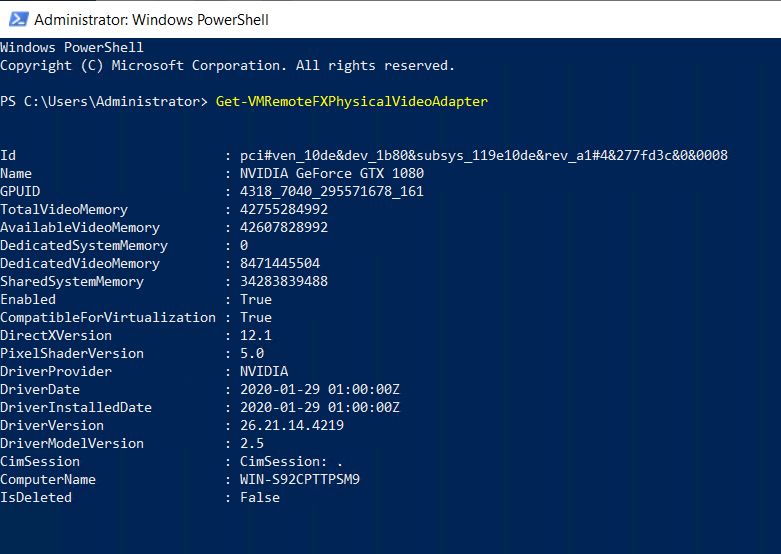
Get-VMRemoteFXPhysicalVideoAdapter
CompatibleForVirtualization: True
Enabled: True

Here is the screenshot for the Nvidia card I have. Make a note of the name of the card as well.


You can also use the name of the card directly or with a wildcard as below:

Next, Enable/Disable Host GPU for RemoteFX vGPU. To Enable, run this:

Get-VMRemoteFXPhysicalVideoAdapter -Name *Nvidia* | Enable-VMRemoteFXPhysicalVideoAdapter

Next, stop the VM on hyper V. Then, Add RemoteFX vGPU to your VM:

Example: Add-VMRemoteFx3dVideoAdapter -VMName [vm_name]

Add-VMRemoteFx3dVideoAdapter -VMName Windows1

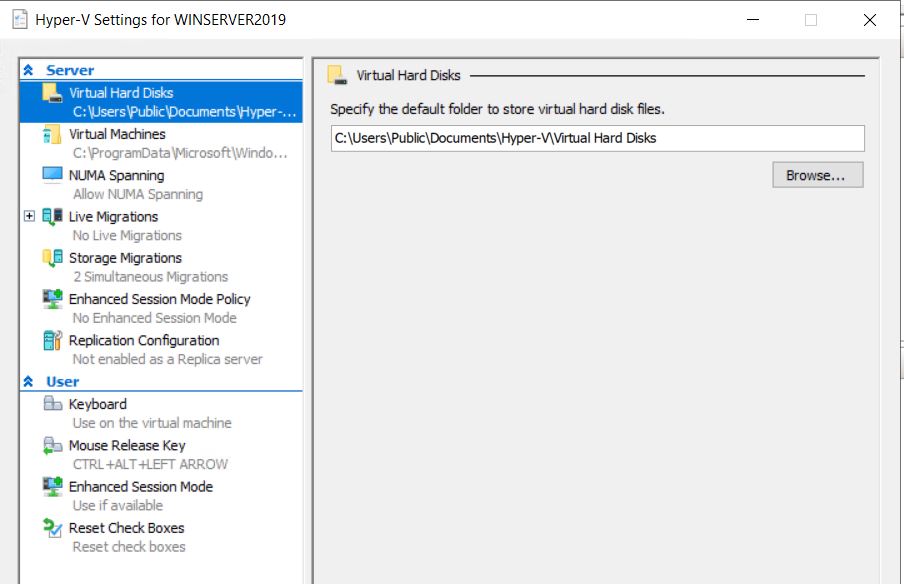
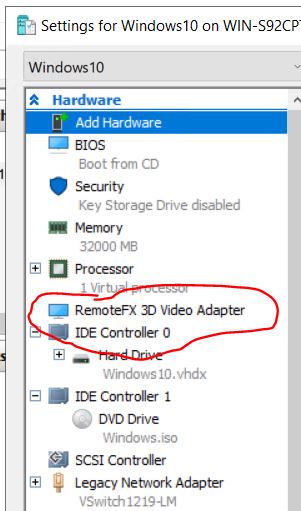
Now, open the VM Settings in Hyper V so you can configure RemoteFX vGPU. You should see this:

Now Start VM.

Other Resources:

1. https://techcommunity.microsoft.com/t5/windows-server-for-it-pro/server-2019-hyper-v-vm-using-gpu/m-p/303761
2. https://social.technet.microsoft.com/Forums/forefront/en-US/738f05a3-a8d2-49ca-a82a-d356b83e1cd4/hyperv-quotremotefx-3d-video-adapterquot-gone-in-windows-10-1809
3. http://techgenix.com/enabling-physical-gpus-hyper/
4. https://docs.microsoft.com/en-us/powershell/module/hyper-v/enable-vmremotefxphysicalvideoadapter?view=win10-ps
5. https://social.technet.microsoft.com/wiki/contents/articles/16652.remotefx-vgpu-setup-and-configuration-guide-for-windows-server-2012.aspx?wa=wsignin1.0&CommentPosted=true

CentOS

For CentOS, the DIG tool is a part of the BIND Utilities so you need to install them.

# yum whatprovides '*bin/dig'

To install the BIND Utilities, type the following:

# yum install bind-utils

Debian

Update Debian

 $ sudo apt update

Install dnsutils package with the following command:

$ sudo apt install dnsutils -y

Check dig

dig -v
DiG 9.11.5-P4-5.1+deb10u5-Debian

If you get the following error message the first time that you access Windows after installation,

then your client has been negotiating with the server for network level authentication.

However, network level authentication is executed before a remote desktop session has even been created.

That means that you cannot perform the forced password change during the first login.
Temporarily disabling network level authentication

To make the password change take place despite this, you must first temporarily disable network level authentication.

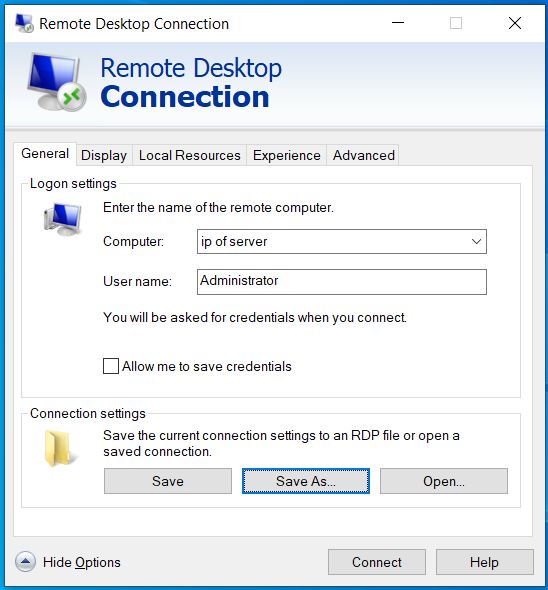
To do this, first, create a RDP file:

The save the file as Newconnection.rdp

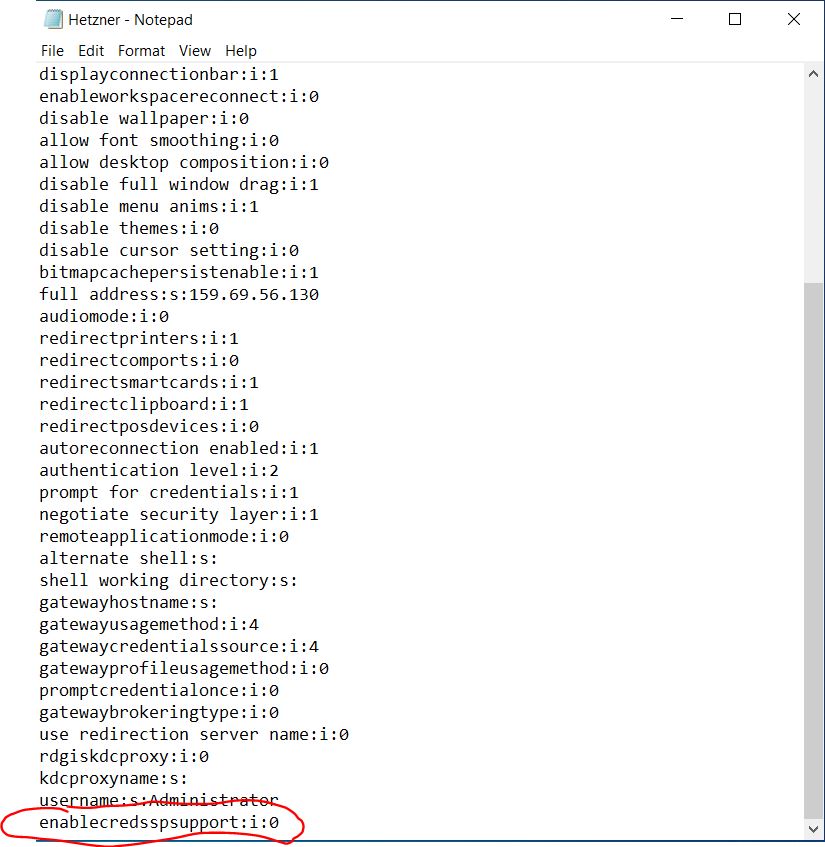
Now, open the file with notepad and add the following line at the bottom:

Save it. Now click on it to open and login.