The following dd command example creates a swap file with the name “swapfile” under /root directory with a size of 8192MB (8GB).

To create the swap space (non-persistent):


# dd if=/dev/zero of=/root/myswapfile bs=1m count=8192;
8192+0 records in
8192+0 records out

Change the permission of the swap file so that only root can access it.


# chmod 0600 /root/myswapfile;

Make this file as a swap file using mkswap command.

# mkswap /root/myswapfile

Enable the newly created swapfile.

# swapon /root/myswapfile

To make this swap file available as a swap area even after the reboot, add the following line to the /etc/fstab file.

# cat /etc/fstab
/root/myswapfile               swap                    swap    defaults        0 0

Verify whether the newly created swap area is available for your use.

# swapon -s
Filename                        Type            Size    Used    Priority
/dev/sda2                       partition       4192956 0       -1
/root/myswapfile                file            1048568 0       -2

# free -k
             total       used       free     shared    buffers     cached
Mem:       3082356    3022364      59992          0      52056    2646472
-/+ buffers/cache:     323836    2758520
Swap:      5241524          0    5241524

Note: In the output of swapon -s command, the Type column will say “file” if the swap space is created from a swap file.

If you don’t want to reboot to verify whether the system takes all the swap space mentioned in the /etc/fstab, you can do the following, which will disable and enable all the swap partition mentioned in the /etc/fstab

# swapoff -a

# swapon -a
For Ubuntu 16.04 LTS:


$ wget http://repo.zabbix.com/zabbix/3.0/ubuntu/pool/main/z/zabbix-release/zabbix-release_3.0-1+xenial_all.deb
$ sudo dpkg -i zabbix-release_3.0-1+xenial_all.deb
$ sudo apt update

For Ubuntu 14.04 LTS:


$ wget http://repo.zabbix.com/zabbix/3.0/ubuntu/pool/main/z/zabbix-release/zabbix-release_3.0-1+trusty_all.deb
$ sudo dpkg -i zabbix-release_3.0-1+trusty_all.deb
$ sudo apt-get update

Install Zabbix Agent


$ sudo apt-get install zabbix-agent

Edit Zabbix Agent Configuration

 $ sudo nano /etc/zabbix/zabbix_agentd.conf

After adding zabbix server ip in configuration file, now restart agent service using below command.


# /etc/init.d/zabbix-agent restart

To start and stop zabbix-agent service anytime use following commands.

# /etc/init.d/zabbix-agent start
# /etc/init.d/zabbix-agent stop

Here is how to keep your ssh session from freezing and how to keep ssh alive.

Edit your ssh config file. Change to the following variables

# nano /etc/ssh/sshd_config
TCPKeepAlive yes
ClientAliveInterval 60
ClientAliveCountMax 10000

Then, restart ssh

On CentOS:

# service sshd restart
Stopping sshd:                                             [  OK  ]
Starting sshd:                                             [  OK  ]
  • TCPKeepAlive – is there to ensure that certain firewalls don’t drop idle connections.
  • ClientAliveInterval – the server will wait 60 seconds before sending a null packet to the client to keep the connection alive.
  • ClientAliveCountMax – server will send alive messages to the client even though it has not received any message back from the client.

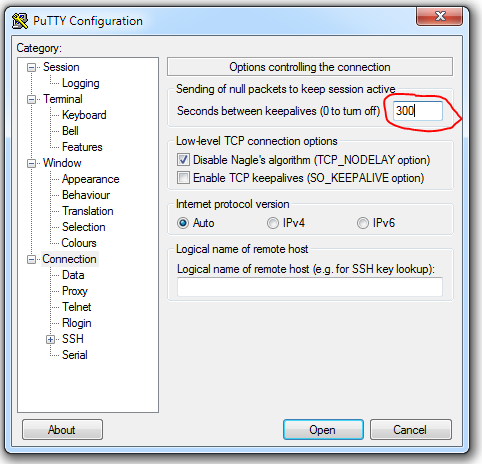
Using Putty Settings

  1. Start PuTTY.
  2. Load pone of your saved sessions.
  3. In the Category pane, click Connection.
  4. Look for ” Sending of null packets to keep session active”.
  5. In the Seconds between keepalives (0 to turn off), type 300. (With this configuration, PuTTY sends a packet to the server every 300 seconds -5 minutes – to keep the connection alive.
  6. In the Category pane, click Session.
  7. Click Save.
  8. Connect to your account and monitor the connection. If it still drops, gradually decrease the keepalive interval until the connection is stable.

Sysstat

For disk I/O trending there are a few options. the sar command from sysstat. By default, it gives output like this:

# sar
Linux 2.6.32-642.11.1.el6.x86_64 (test.geekdecoder.com)    01/26/2017      _x86_64_        (2 CPU)

12:00:01 AM     CPU     %user     %nice   %system   %iowait    %steal     %idle
12:10:01 AM     all      0.03      0.00      0.03      0.09      0.00     99.85
12:20:01 AM     all      0.27      0.00      0.04      0.00      0.00     99.69
12:30:01 AM     all      0.33      0.00      0.05      0.00      0.00     99.62
12:40:01 AM     all      1.01      0.00      0.18      1.18      0.00     97.63
12:50:01 AM     all      0.15      0.00      0.04      0.00      0.00     99.80
01:00:01 AM     all      0.16      0.00      0.03      0.00      0.00     99.80
01:10:01 AM     all      0.22      0.00      0.04      0.00      0.00     99.74
01:20:01 AM     all      0.36      0.00      0.05      0.00      0.00     99.59
01:30:01 AM     all      0.23      0.00      0.04      0.00      0.00     99.74
01:40:01 AM     all      0.70      0.00      0.25      6.23      0.00     92.82
01:50:01 AM     all      0.13      0.00      0.03      0.00      0.00     99.83
02:00:01 AM     all      0.16      0.00      0.04      0.00      0.00     99.80
02:10:01 AM     all      0.21      0.00      0.04      0.00      0.00     99.75
02:20:01 AM     all      0.30      0.00      0.04      0.00      0.00     99.66
02:30:01 AM     all      0.14      0.00      0.03      0.00      0.00     99.83
02:40:01 AM     all      0.20      0.00      0.03      0.00      0.00     99.76
02:50:01 AM     all      0.32      0.00      0.05      0.00      0.00     99.63
03:00:01 AM     all      0.21      0.00      0.03      0.00      0.00     99.76
03:10:01 AM     all      0.19      0.00      0.04      0.00      0.00     99.77
03:20:01 AM     all      0.12      8.44      2.69     10.79      0.00     77.96
03:30:01 AM     all      0.13      4.52      8.36      0.30      0.00     86.69
03:40:01 AM     all      0.48      0.00      0.05      0.02      0.00     99.45
03:50:01 AM     all      0.15      0.00      0.04      0.01      0.00     99.80
04:00:01 AM     all      0.13      0.00      0.03      0.00      0.00     99.84
04:10:01 AM     all      0.48      0.00      0.06      0.04      0.00     99.43
04:20:01 AM     all      0.17      0.00      0.05      0.11      0.00     99.67
04:30:01 AM     all      0.22      0.00      0.04      0.00      0.00     99.74
04:40:01 AM     all      0.89      0.00      0.08      0.16      0.00     98.87
04:50:01 AM     all      0.55      0.00      0.07      0.05      0.00     99.34
05:00:01 AM     all      0.11      0.00      0.04      0.01      0.00     99.85
05:10:01 AM     all      0.09      0.00      0.03      0.00      0.00     99.87
05:20:01 AM     all      0.17      0.00      0.04      0.00      0.00     99.80
05:30:01 AM     all      0.27      0.00      0.05      0.08      0.00     99.60

Read More

Some Links to setting up an Email Server on Ubuntu 14:

http://wiki.vpsget.com/index.php/Dovecot_/postfix_with_Roundcube_WebUI
http://www.krizna.com/ubuntu/setup-mail-server-ubuntu-14-04
http://www.tecmint.com/setup-postfix-mail-server-in-ubuntu-debian/
https://www.digitalocean.com/community/tutorials/how-to-install-and-configure-postfix-on-ubuntu-16-04
https://www.linode.com/docs/email/clients/install-roundcube-on-ubuntu-14-04
Unixmen – https://www.unixmen.com/install-configure-roundcube-webmail-ubuntu/

Useful command:


sudo dpkg-reconfigure postfix

Set up roundcube conf file:


sudo wget https://linode.com/docs/assets/apache2-roundcube.sample.conf

On systems that run EasyApache 3, the /usr/local/lib/ directory contains your server’s php.ini file.
On systems that run EasyApache 4, multiple php.ini and local.ini files manage your system’s PHP. Each version of PHP on your systems uses its own php.ini and local.ini file. You must make changes to each file separately.

On systems that run EasyApache 3, we strongly recommend that you only edit this file with WHM’s PHP Configuration Editor interface (Home >> Service Configuration >> PHP Configuration Editor).

On systems that run EasyApache 4, we strongly recommend that you only edit these files with WHM’s MultiPHP INI Editor interface (Home >> Software >> MultiPHP INI Editor). This ensures that an operable version of PHP exists on the system.

Resource: https://documentation.cpanel.net/display/CKB/How+to+Edit+Your+php.ini+File

Please follow the under mentioned instructions to turn off the MySQL strict mode. Make the following changes in the “my.ini/my.cnf”:

Look for the following line:

sql-mode = "STRICT_TRANS_TABLES,NO_AUTO_CREATE_USER,NO_ENGINE_SUBSTITUTION"

Change it to:


sql_mode=""


Restart the MySQL service.

or

Look for the following line , this line will set MySQL strict mode


sql-mode = "STRICT_TRANS_TABLES,NO_AUTO_CREATE_USER,NO_ENGINE_SUBSTITUTION"

To disable MySQL strict mode, you can change the above line as follow:


sql_mode="TRADITIONAL,NO_AUTO_CREATE_USER,,NO_ENGINE_SUBSTITUTION"

Restart the MySQL service.

You may be able to run an SQL query within your database management tool such as phpMyAdmin which can normally be found from your web hosting control panel:


SET @@global.sql_mode= '';

Test

Run the following:

#mysql -uroot -p -e 'select @@GLOBAL.sql_mode;'
+------------------------+
| @@GLOBAL.sql_mode      |
+------------------------+
| TRADITIONAL,NO_AUTO_CREATE_USER,NO_ENGINE_SUBSTITUTION |
+------------------------+

It could be that a session was left connected. If thats the case I’ll try using the admin console command and see if I can get connected with it.

On you local computer, go to Start -> Run then paste this and hit enter

mstsc.exe /admin

It’ll prompt for IP and then user/pass. It looks like it opens Remote Desktop Connection, but really its the “admin console”